How to Add Yarn Hair to a Crochet Doll: Step-by-Step
Yarn hair becomes easier to control when you plan the hairline, fringe and longer strands separately. Attach a small amount first, check the silhouette, then add coverage where it is needed. More yarn is not automatically a better hairstyle.
This guide adapts the supplied illustrated doll-hair tutorial into a sequence you can scale to your own doll. Its strand counts and positions belong to the pictured doll, so use the actual head and desired hairstyle to set yours.
In this guide
Prepare two lengths of yarn / Mark the hairline / Attach one folded strand / Build coverage in staggered rows / Finish the crown / Trim last, in small stages
Prepare two lengths of yarn
Cut a small batch of longer strands for the sides and back, and shorter strands for the fringe. For a folded attachment, each cut strand needs roughly twice the desired hanging length, plus a little trimming allowance. Test one before cutting the whole batch.
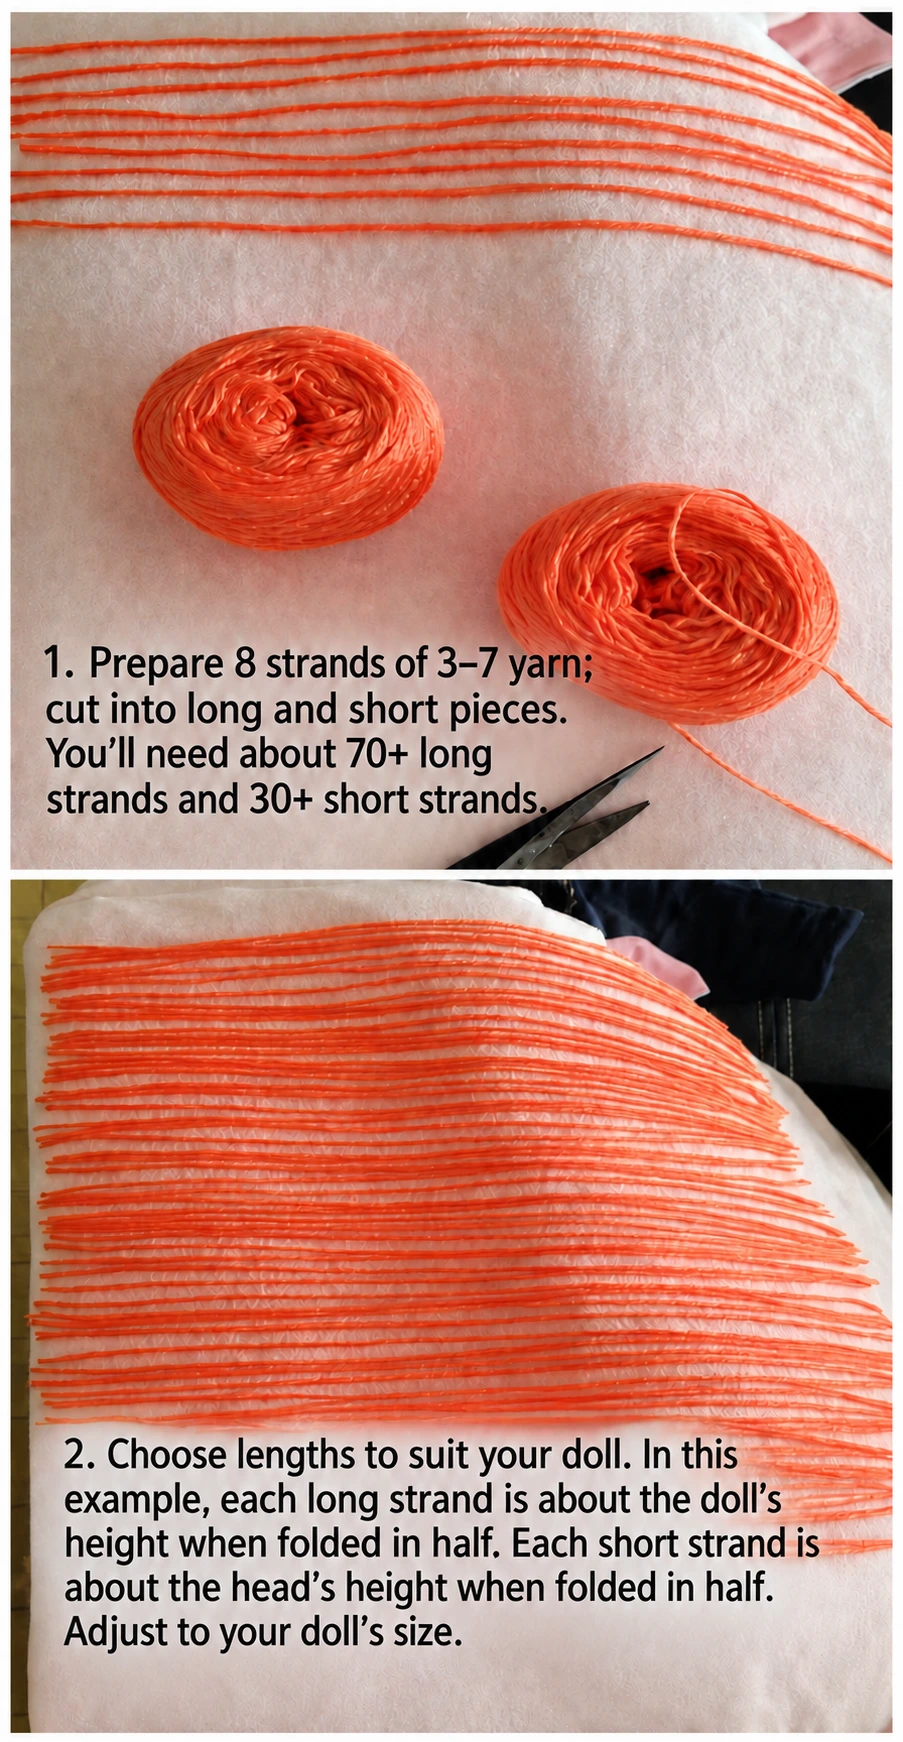
Use a hook fine enough to pass beneath the chosen stitch without stretching it, while still catching the hair yarn. Gather removable markers and sharp scissors. Keep the doll’s original finishing instructions nearby, particularly if the crown has been left open for an attachment.
Mark the hairline
Identify the front of the face and mark both sides symmetrically. The supplied tutorial uses the ear positions to guide the boundary. Look from the front and side before attaching yarn so the hairline frames the face rather than covering it unintentionally.
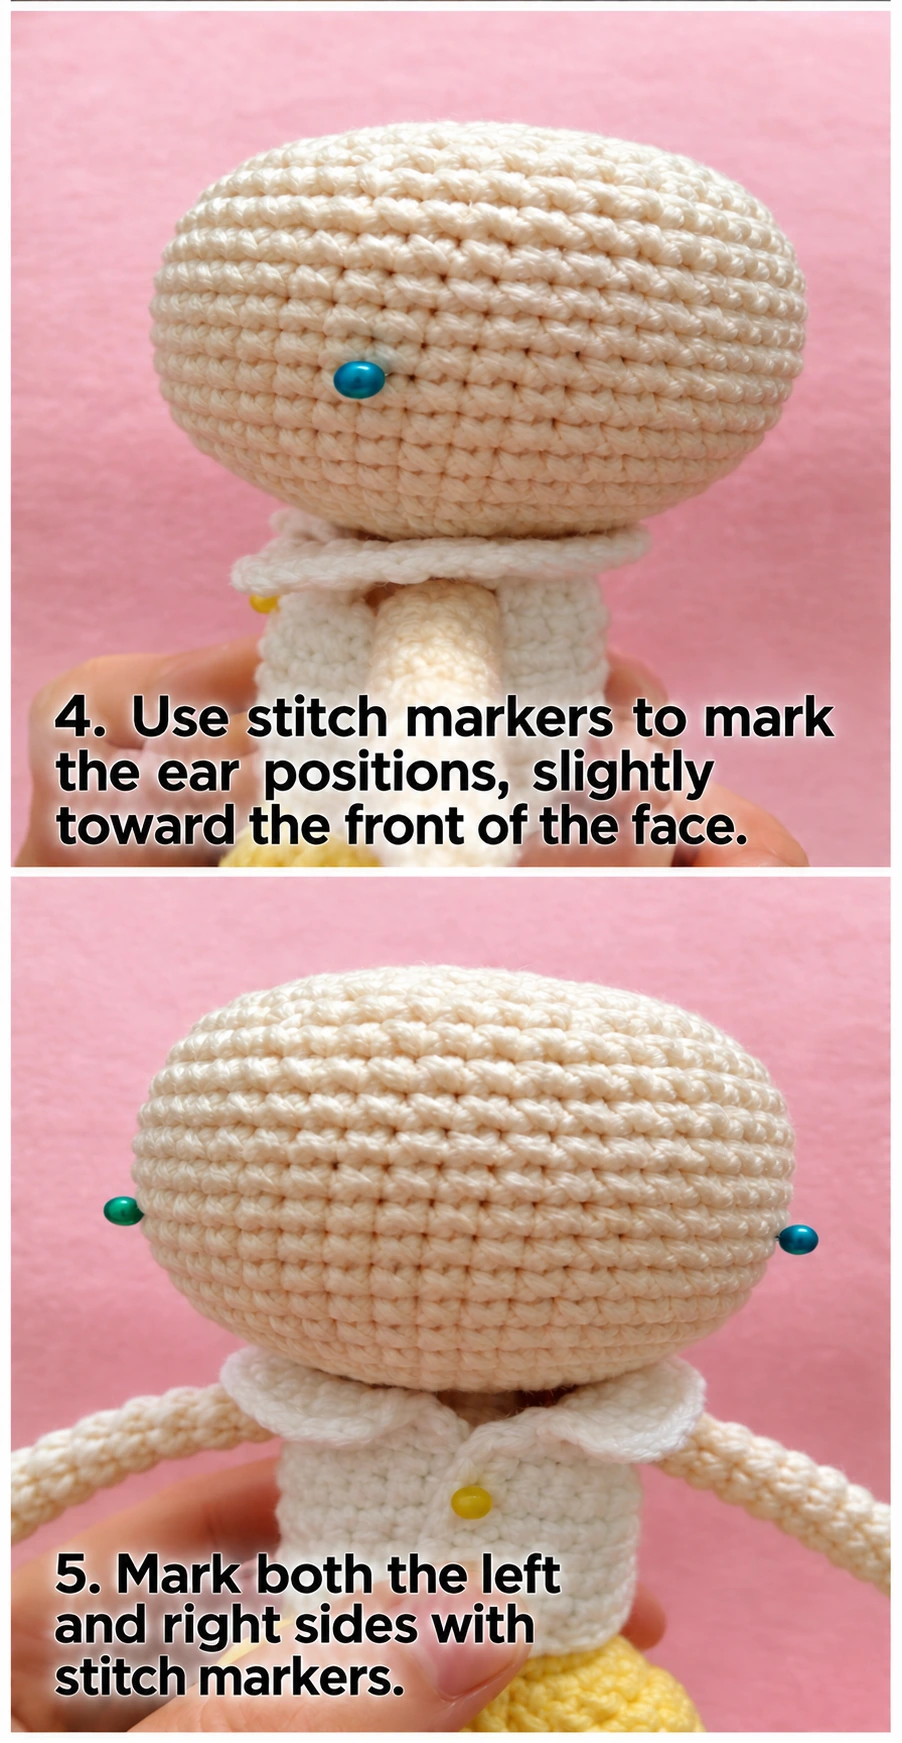
Decide where the fringe ends and the longer hair begins. A parting, ponytail or plait needs the yarn to fall in a planned direction, so place a few test strands and arrange them before filling an entire row.
Attach one folded strand
- Fold a strand at its centre.
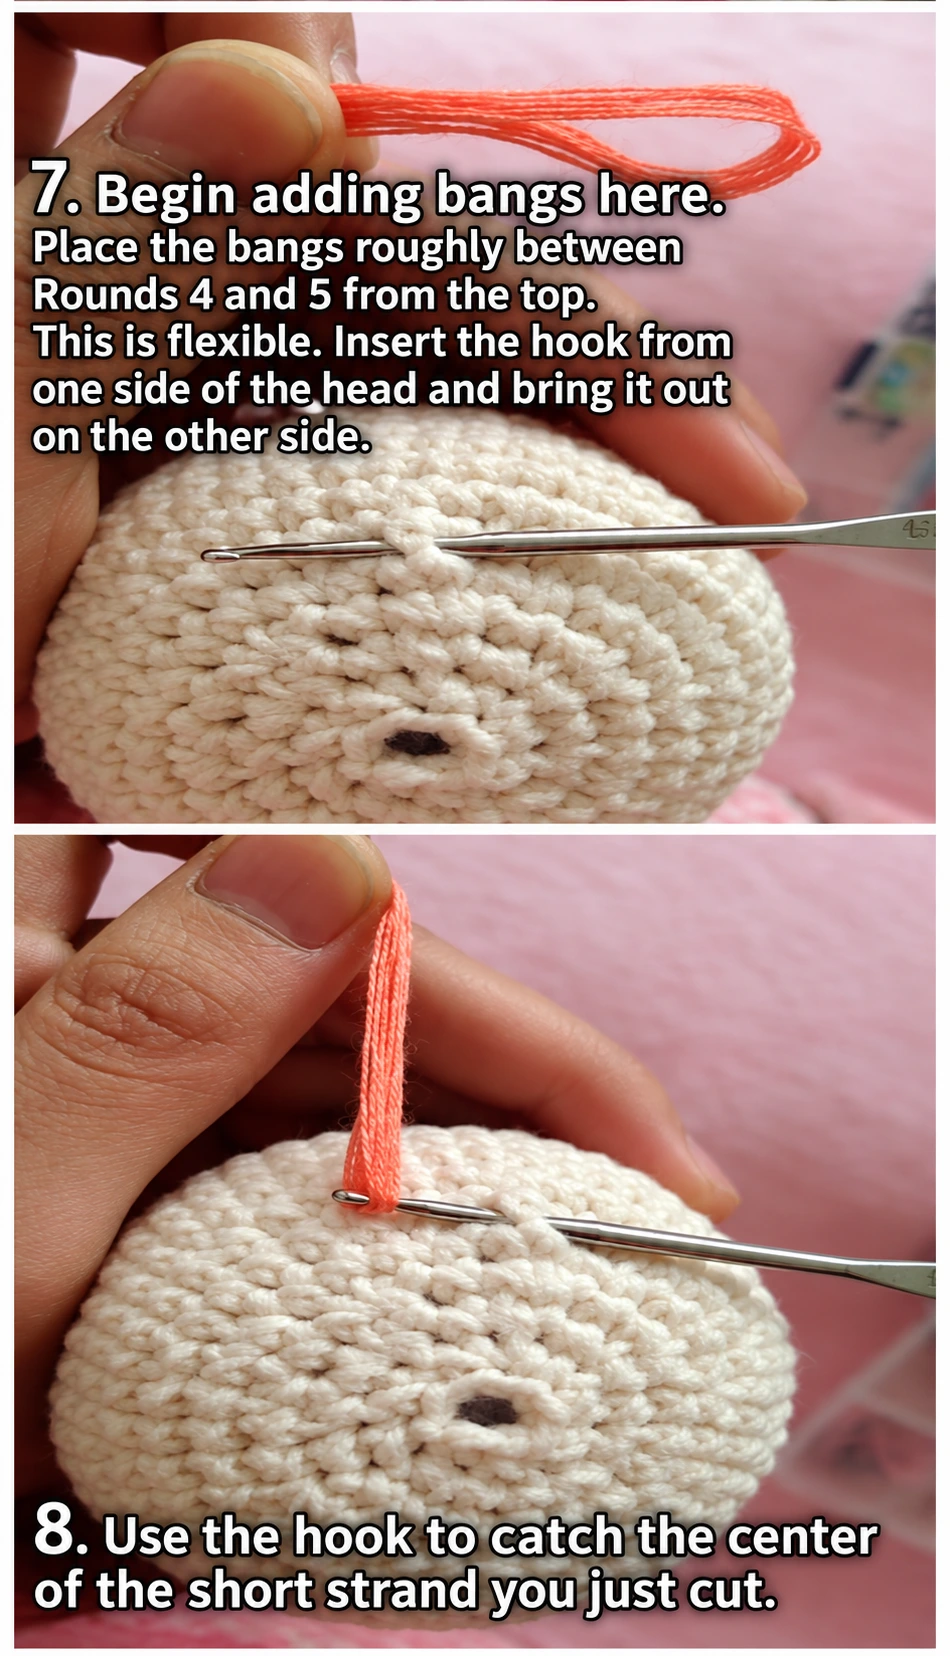
- Pass the hook beneath a secure surface stitch at the chosen hairline.
- Catch the folded midpoint and pull a small loop through.
- Pass both loose ends through that loop.
- Tighten gently against the surface without distorting the head.
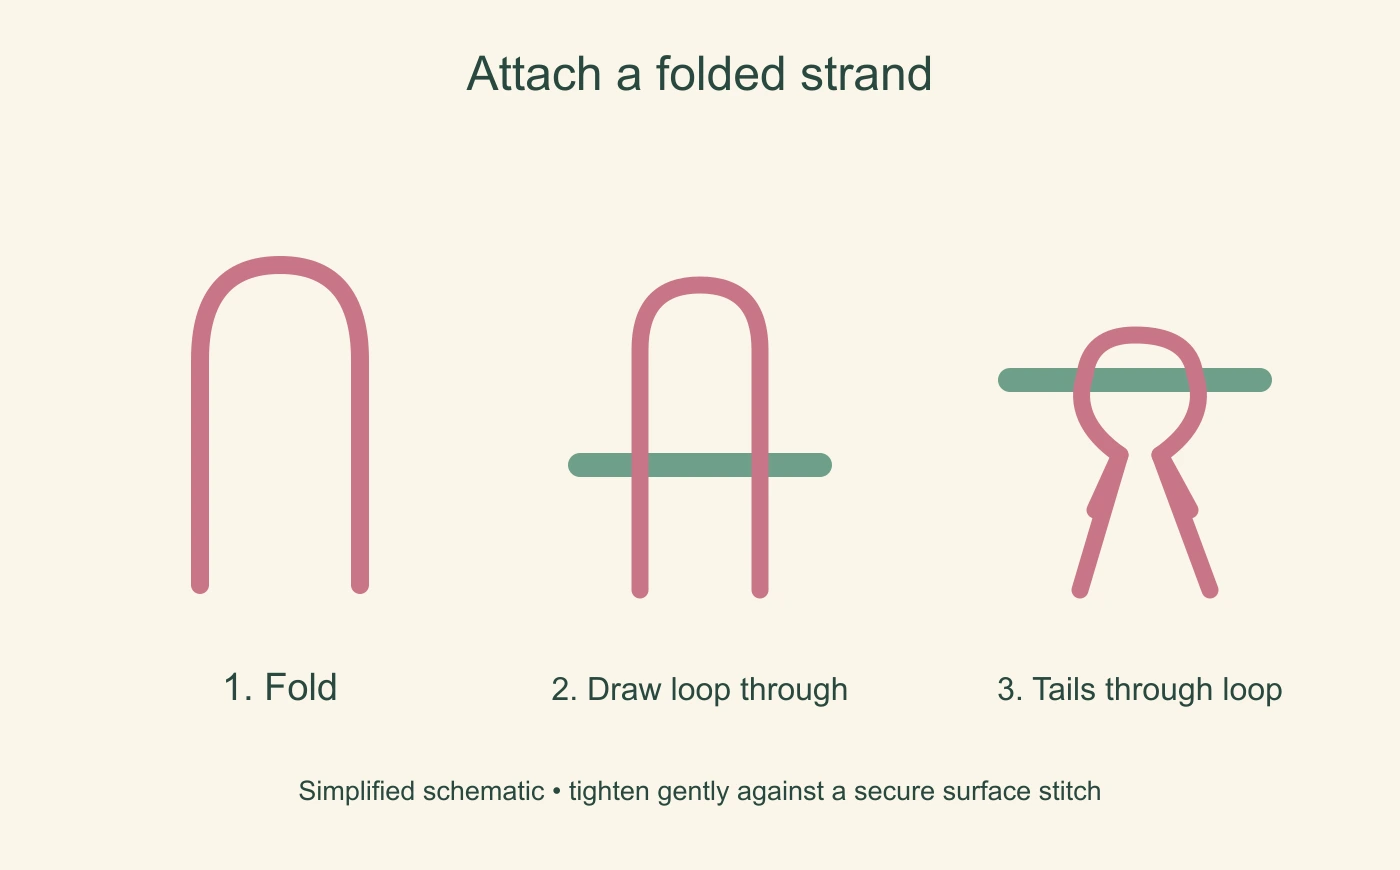
This attachment is often called a lark’s-head knot. Keep the knots consistent in direction and tension so the hair falls evenly. Avoid splitting the head yarn or dragging filling through the surface.
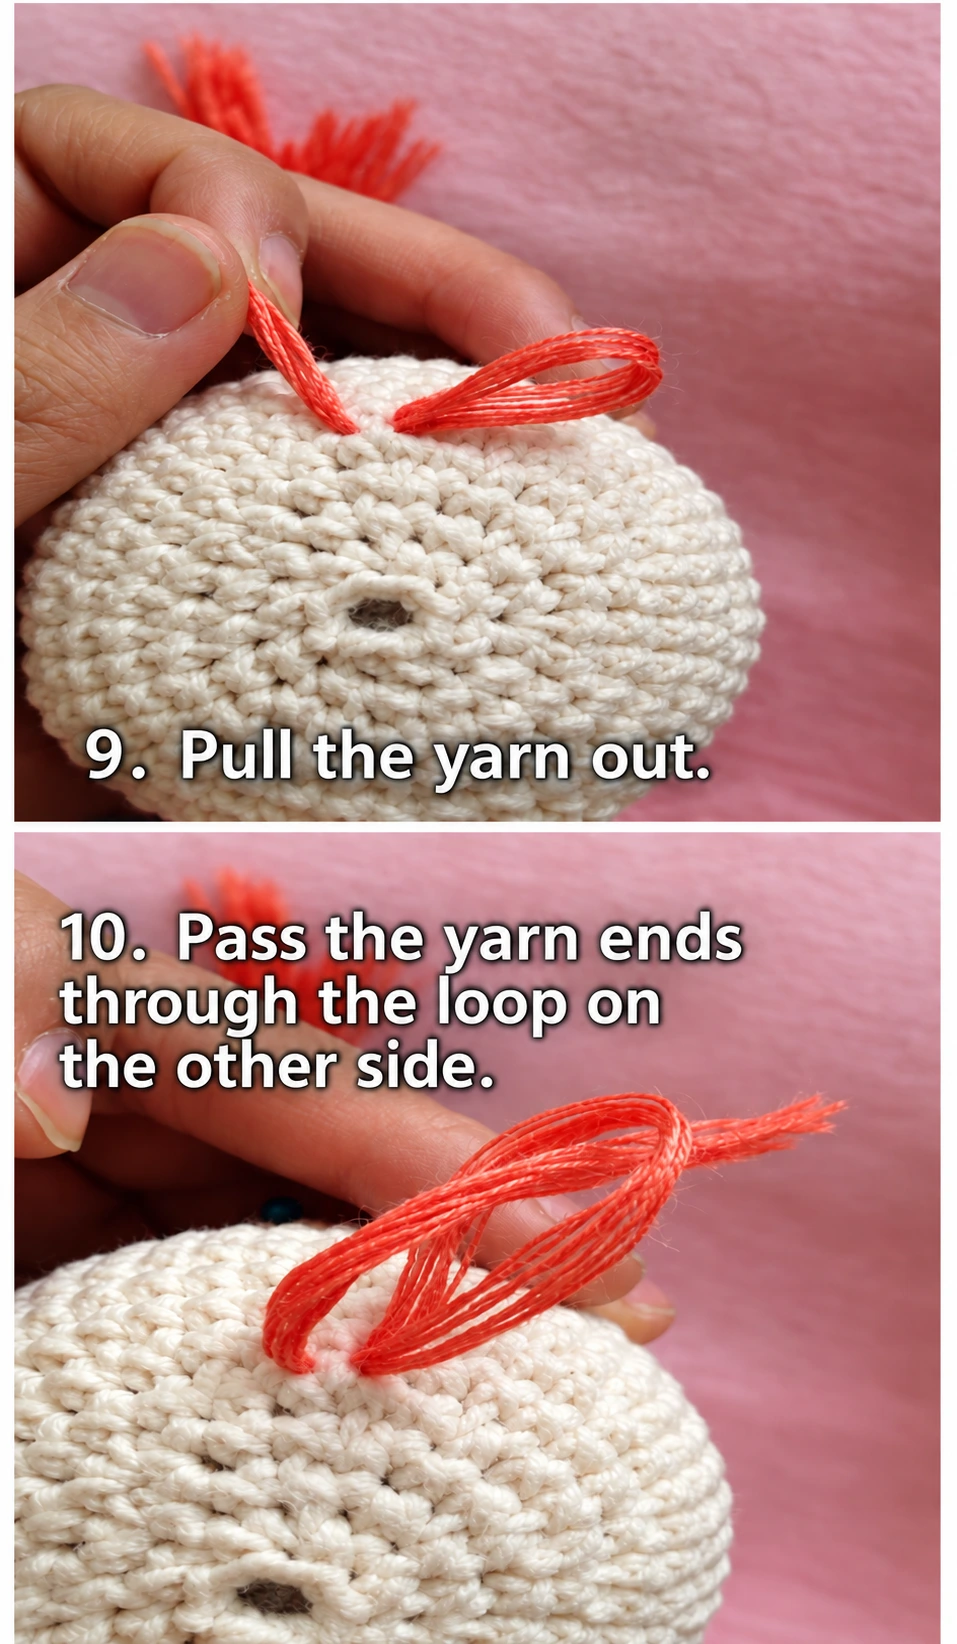
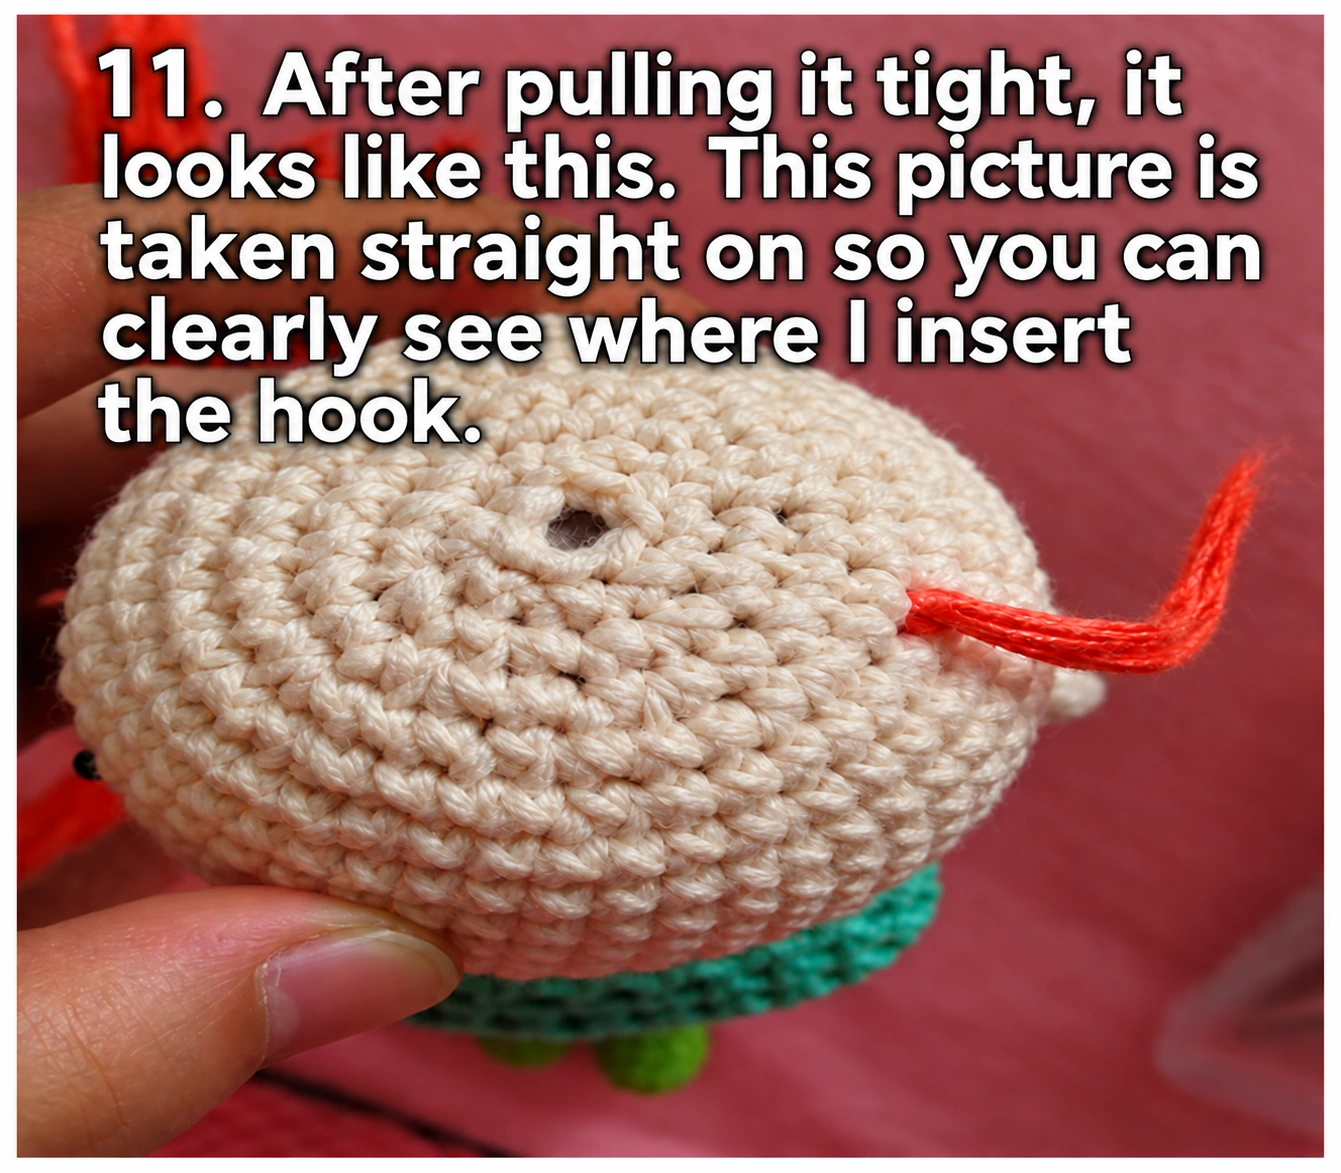
Build coverage in staggered rows
Start with the outline, then add rows toward the crown. The reference alternates the later attachments between earlier ones to cover gaps. Use the same principle rather than packing every available stitch with a thick bundle.
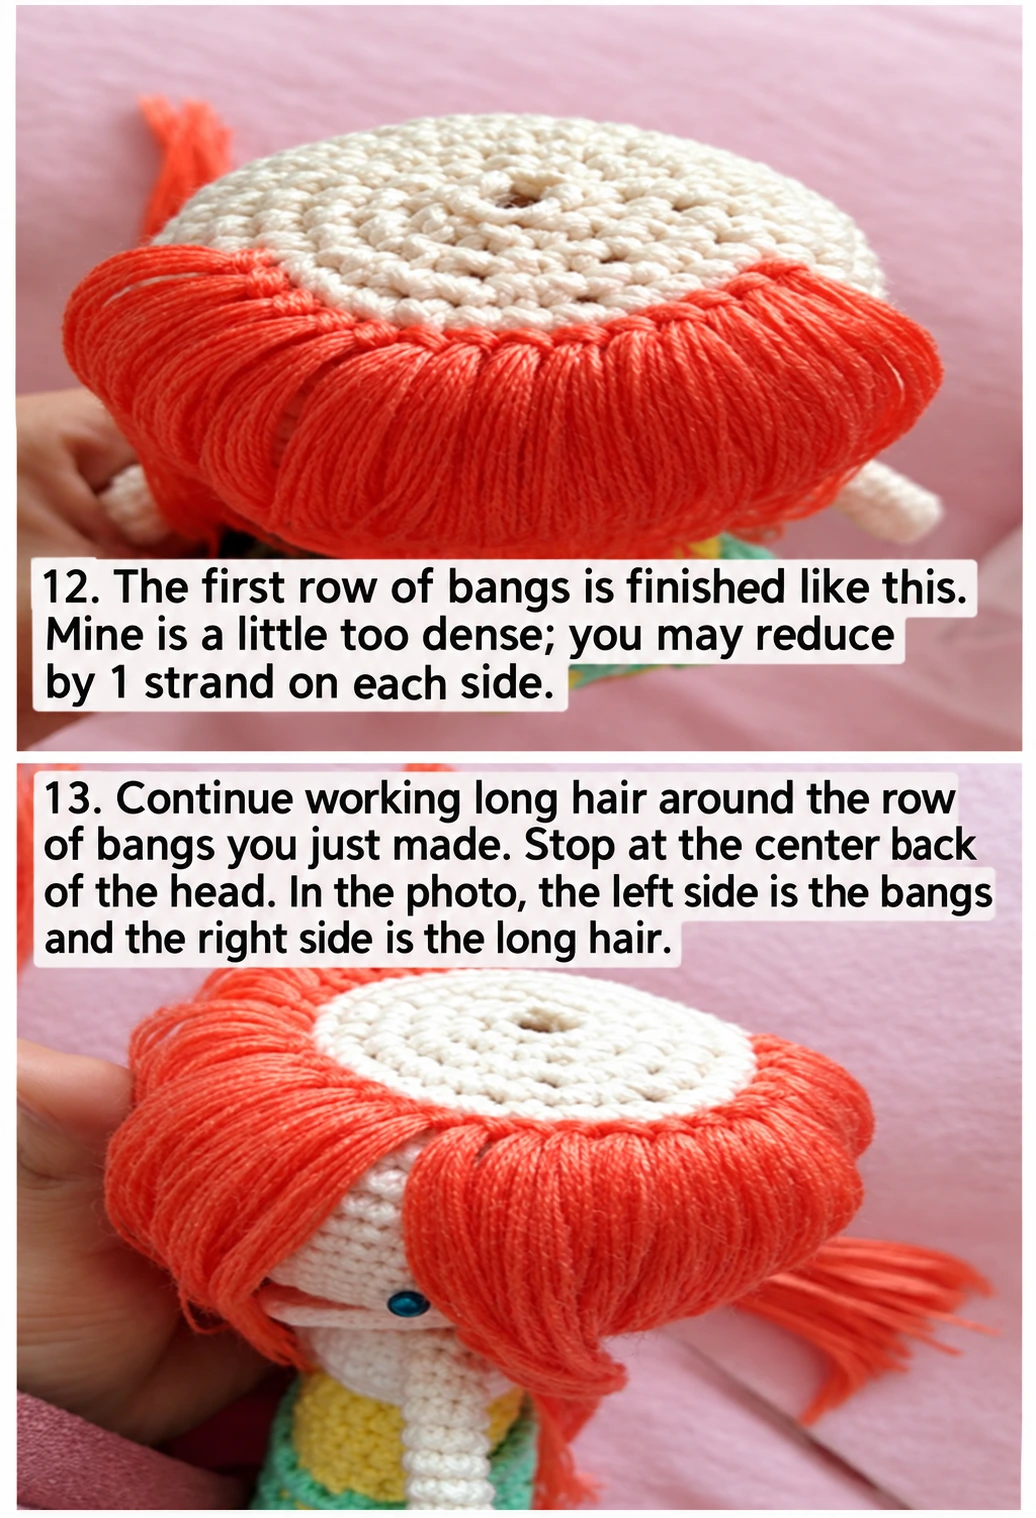
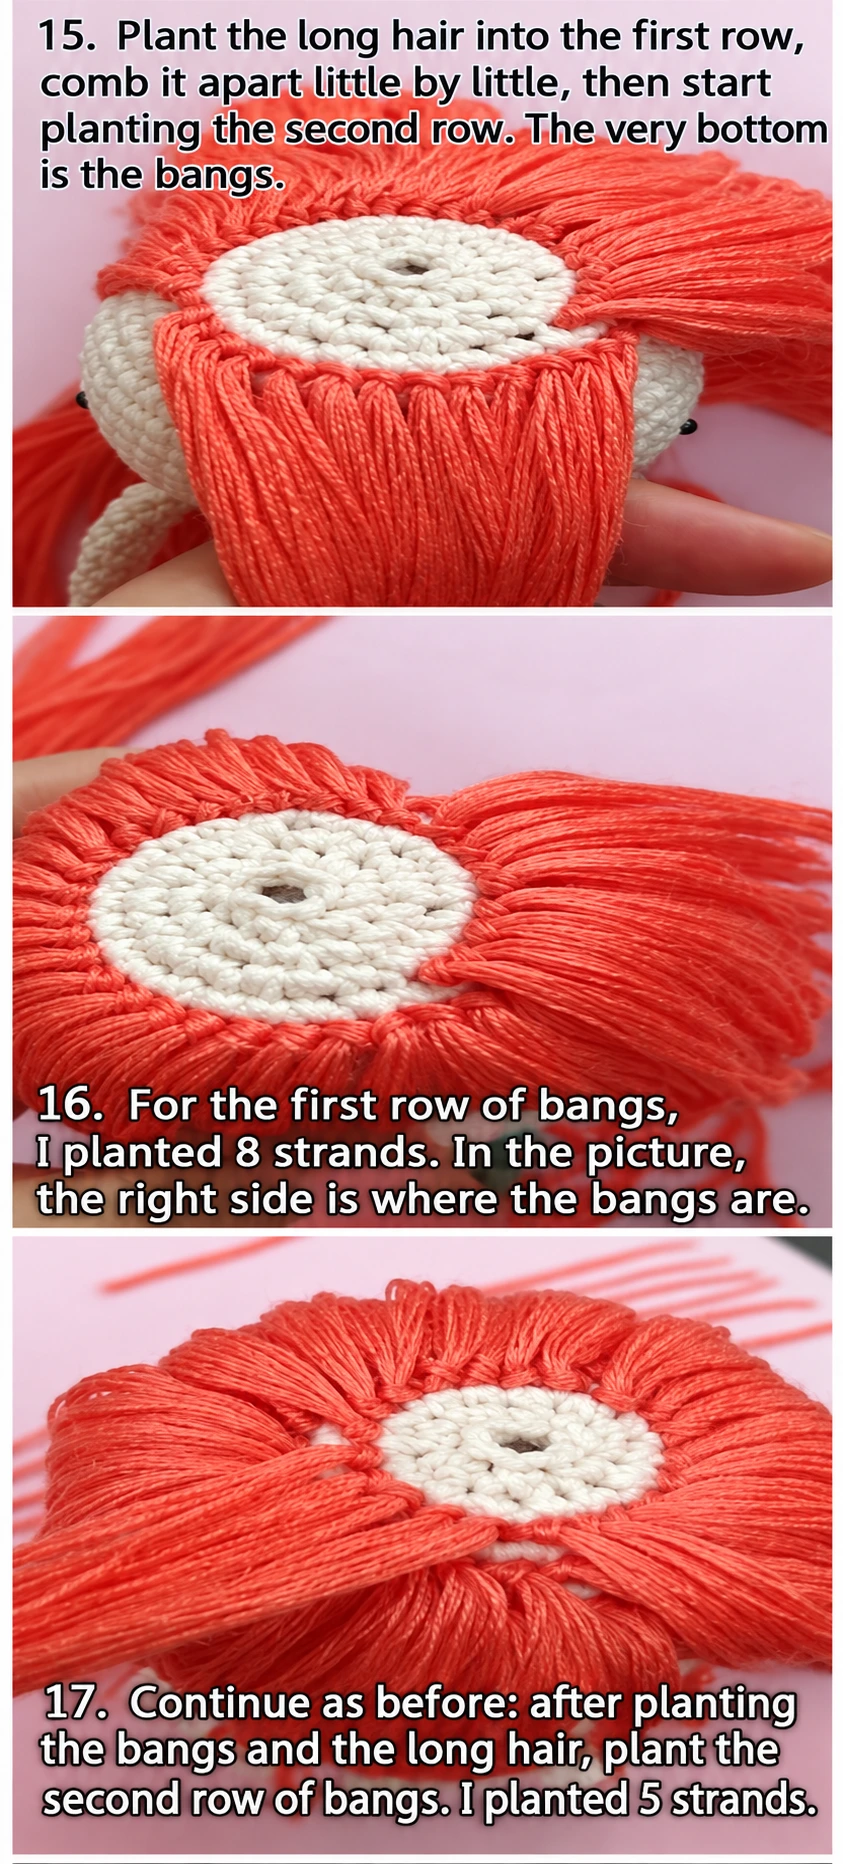
Pause after each row and let the strands fall naturally. Check the sides and back as well as the front. If the scalp shows only because the hair has been pulled aside, arrange it before adding more weight.
Finish the crown
The supplied example leaves an opening at the crown and finishes it with a separate tied bundle secured with glue. That is a method specific to that construction, not a reason to open an already finished doll head.
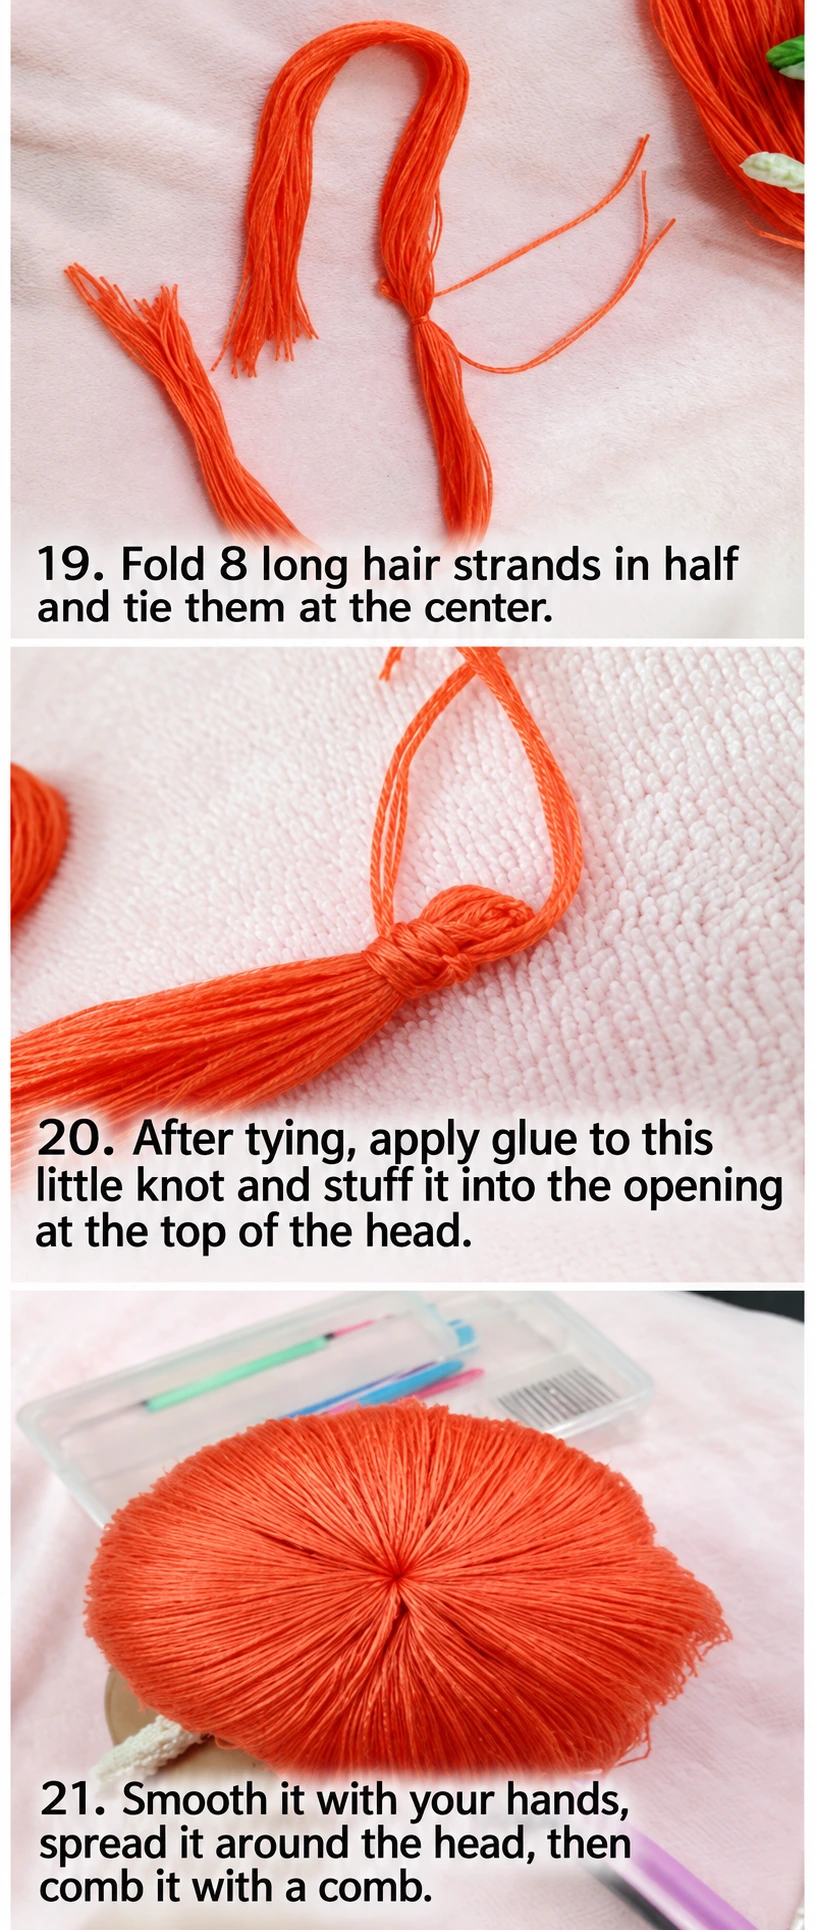
For a sewn construction, use a hair cap or bundle designed to be stitched securely to the crown, following that design’s instructions. Choose the attachment method before closing the head. If glue is used in a decorative project, check compatibility with the yarn and allow the product’s full curing time.
Trim last, in small stages
Arrange the strands and protect the body from loose cut fibres. Trim a small amount, let the hair fall again and compare the sides. Keep the first cut longer than the final target; once shortened, a strand cannot be restored without replacement.
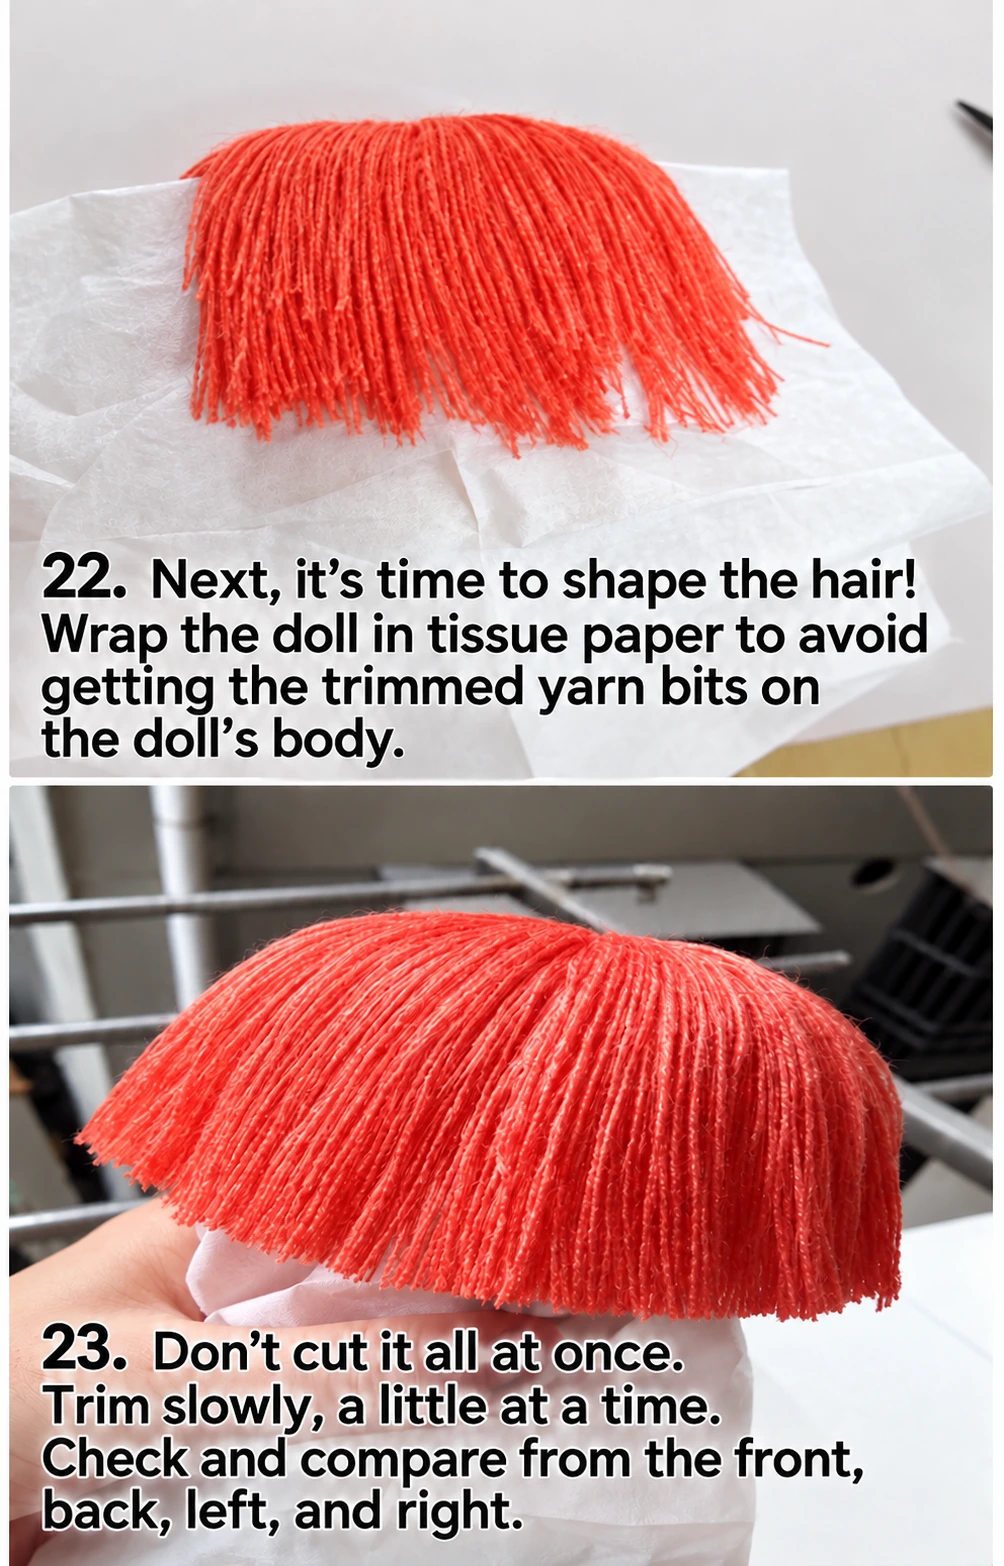
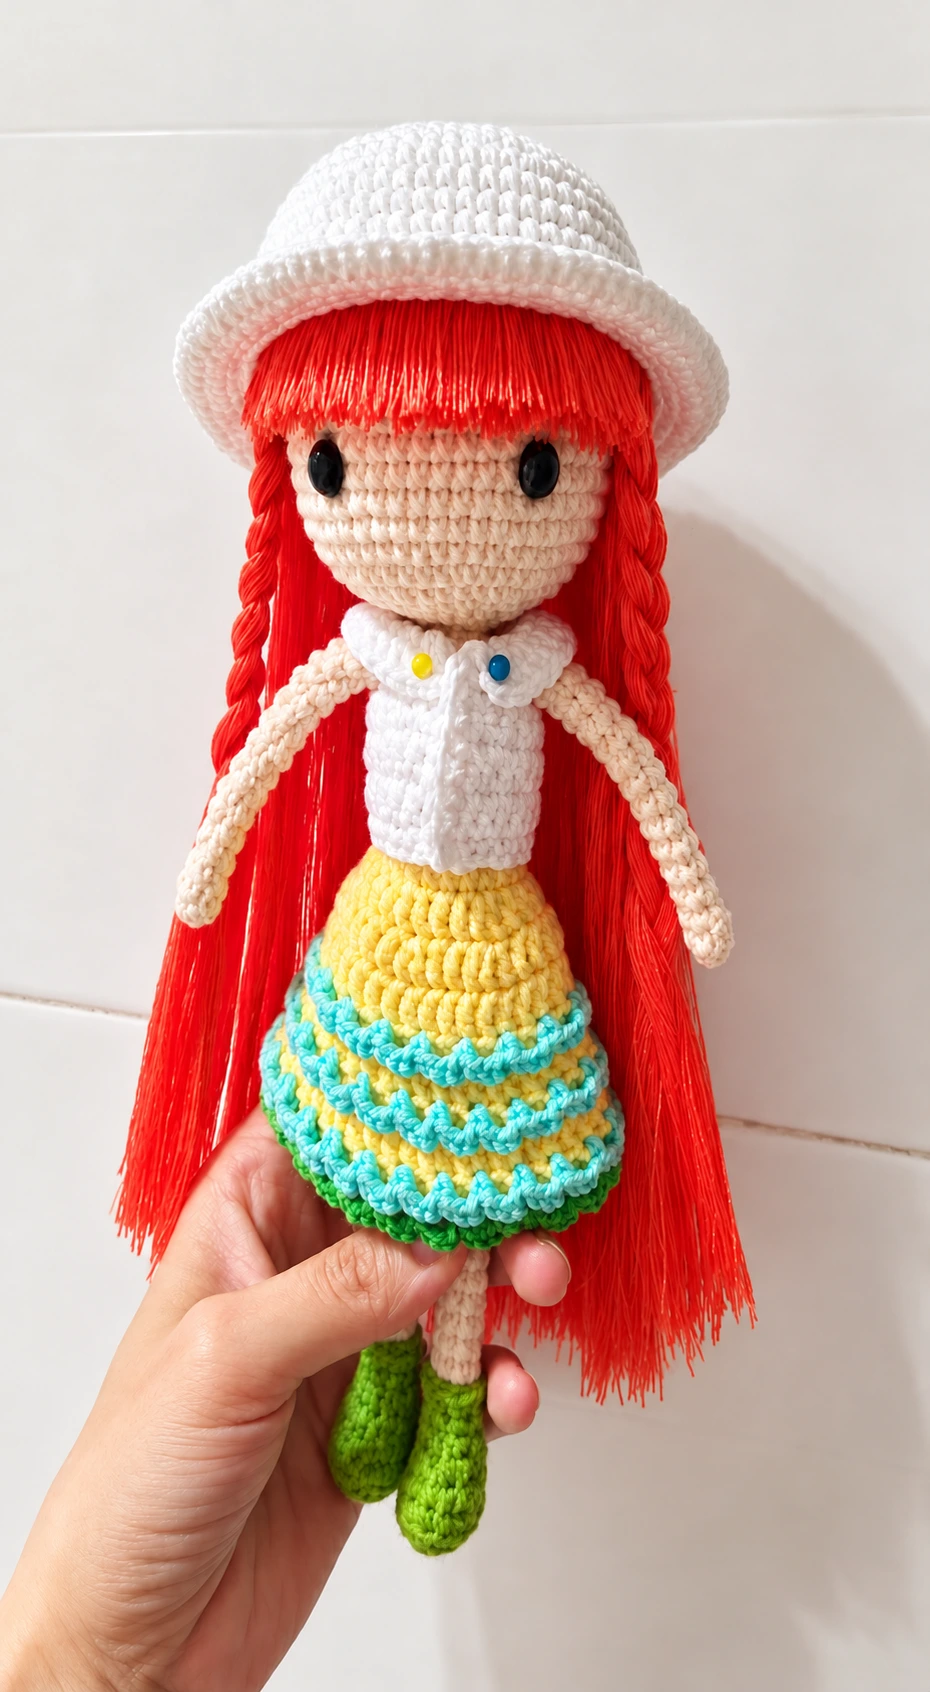
The reference forms a fringe and long plaits. You can use the same planning sequence for a different hairstyle, but assess the weight and hold before adding accessories. Remove all temporary pins and markers when finished.
Reference notes
Adapted from the supplied Doll Hair Rooting Tutorial, whose images carry the name Yin Yu Piao Ling. The English guide preserves the placement and folded-strand method while leaving doll-specific counts and measurements to the actual project.
Step illustrations and photographs are excerpts from the supplied reference materials credited below. In-image instructional text has been translated into English and the supplied images enhanced with AI assistance. The English captions explain the pictured actions. Select a step image to view it at full size.
How to Add a Wire Armature to a Crochet Doll
An internal armature can help a decorative doll hold a pose. It must fit the crocheted body rather than stretching the body around it. Plan the support while the limbs and body openings are still accessible.
This guide adapts the supplied three-page doll-shaping reference. It describes the construction sequence, not a complete doll pattern or a tested toy design. A wire-supported display figure should not be treated as a soft toy for a baby or young child.
In this guide
Gather the parts before closing the body / 01. Fit the leg support while the waist is open / 02. Continue the body and add filling gradually / 03. Fit the arm support before the head is closed / 04. Check before closing / When to choose a different construction
Gather the parts before closing the body
- The partly completed doll and its original crochet pattern.
- Suitable craft armature wire for the planned display piece.
- Tools rated for cutting and bending that wire.
- Appropriate covering for the wire ends and the chosen filling.
- Markers, a ruler and a blunt tool for positioning stuffing.
The reference does not specify a wire gauge that can be transferred to every doll. Wire stiffness, limb thickness and the intended pose all affect the choice. Test the support inside a sample section if those details are new to you.
01. Fit the leg support while the waist is open
The reference introduces the leg support partway through crocheting the waist. Compare the wire with the actual leg length and allow for how its ends will be finished. It should sit inside the limb without pressing against the foot or forcing the stitches apart.
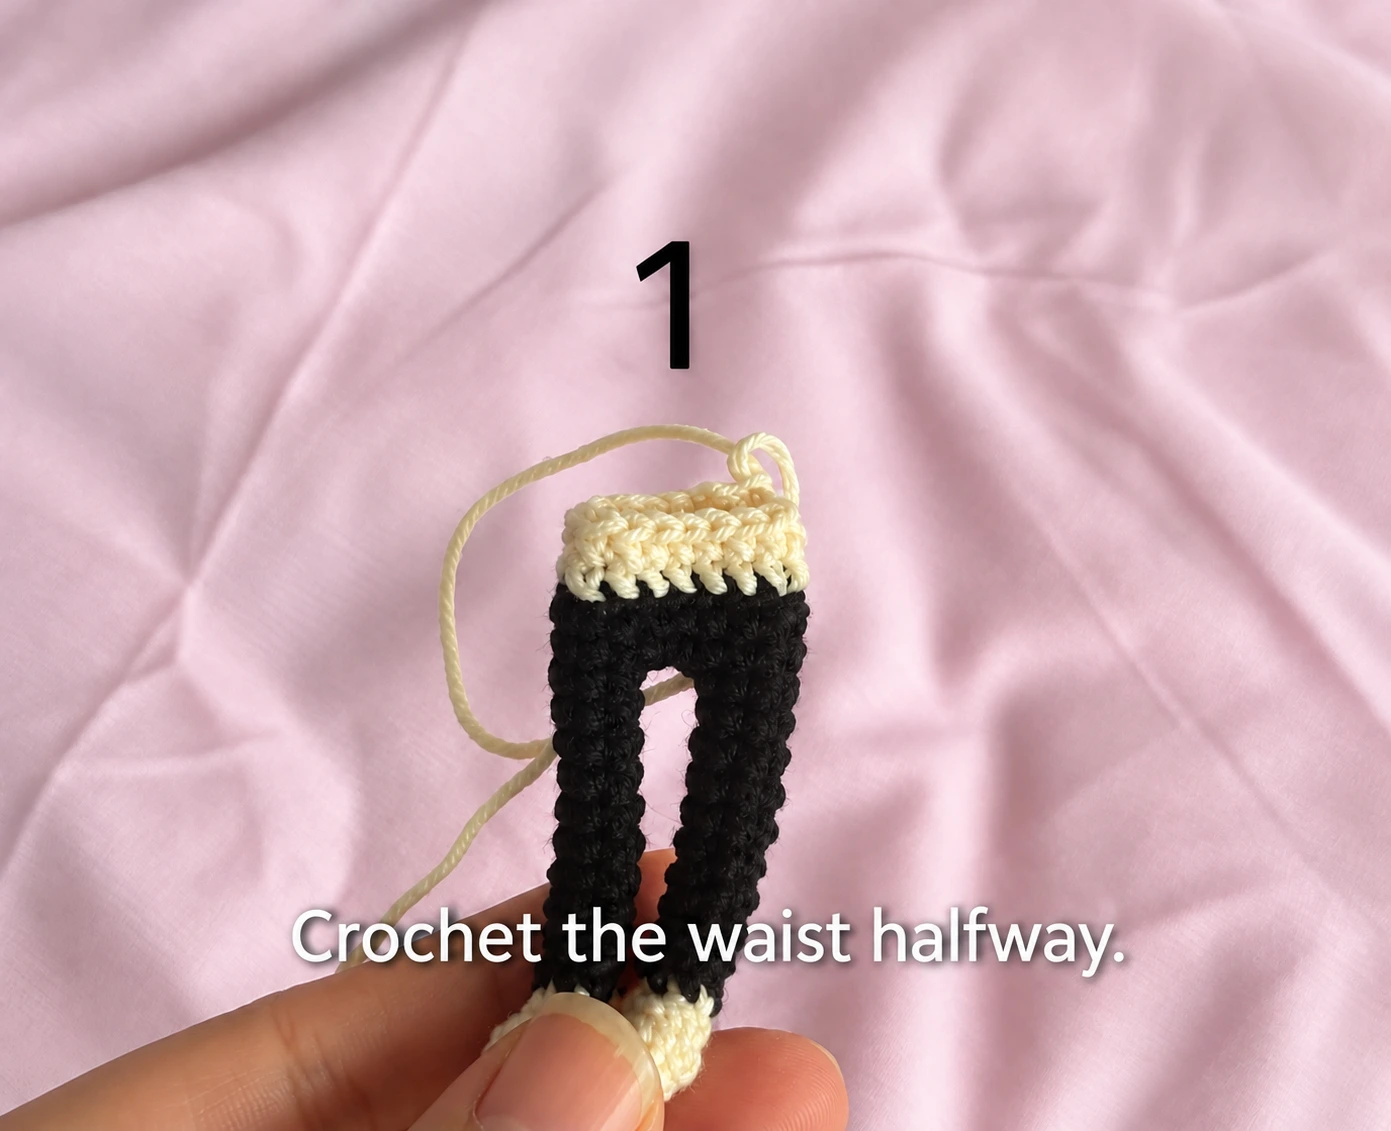
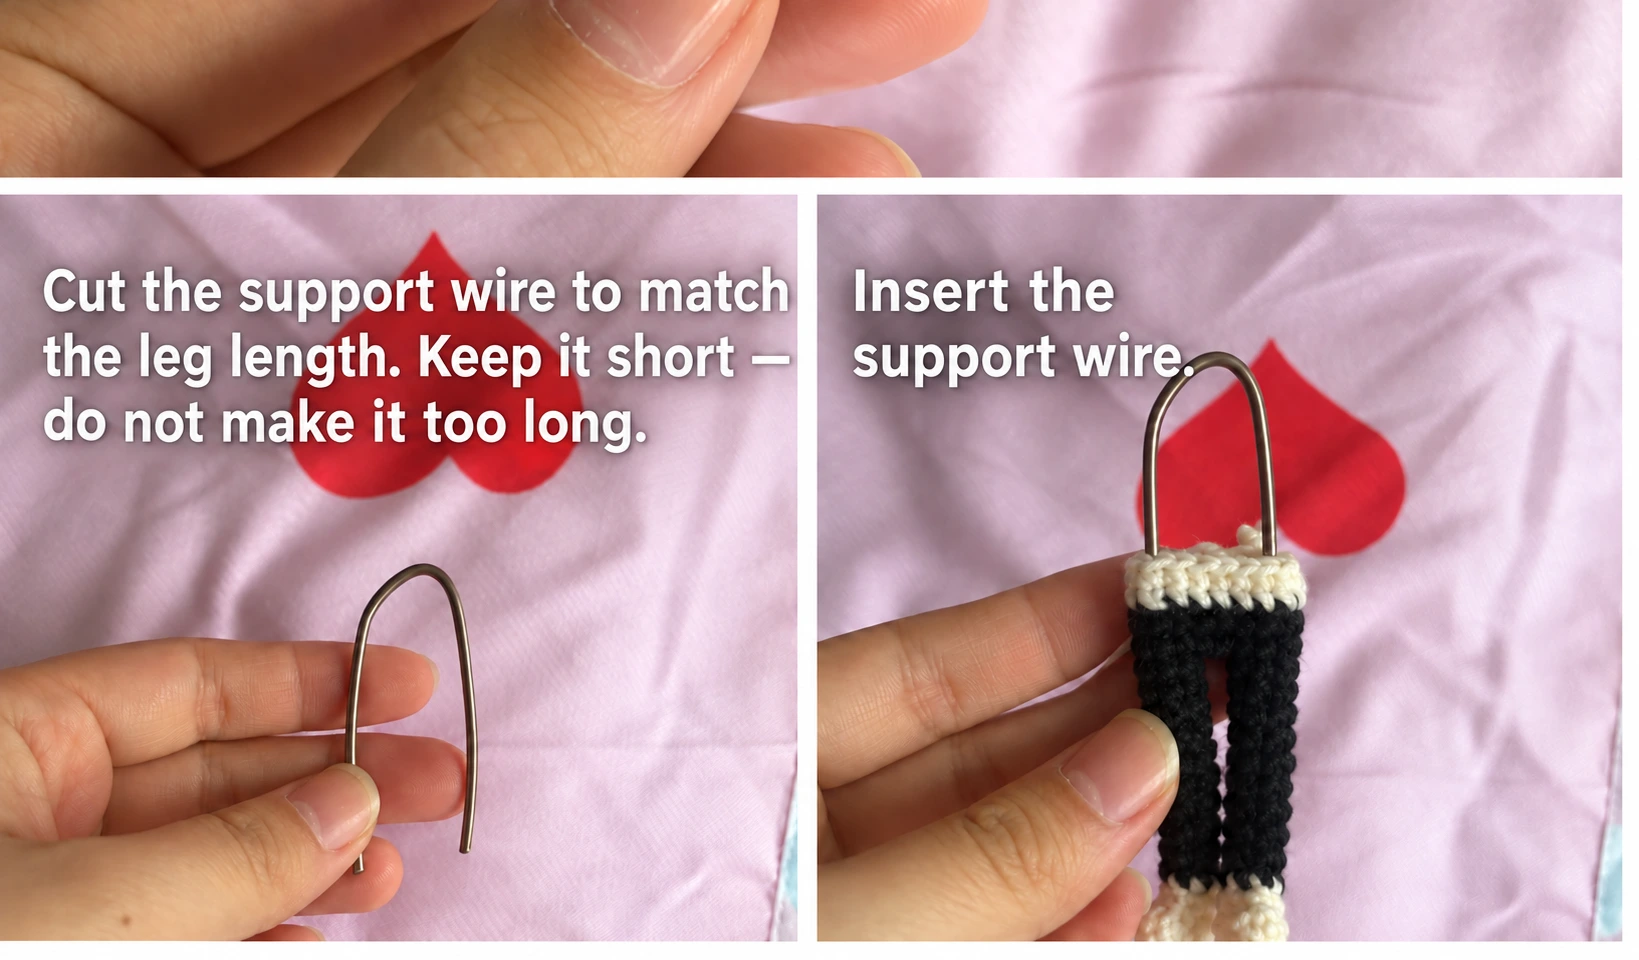
Fold or curve cut ends away from the fabric and cover them appropriately for your construction. Check by touch that no sharp point bears directly on the crocheted surface. Do not assume that covering a sharp point alone solves a poor fit.
02. Continue the body and add filling gradually
Crochet onward following the doll pattern. Add small amounts of filling around the support while you can still reach the space. Keep the support positioned centrally rather than pushed against one side.
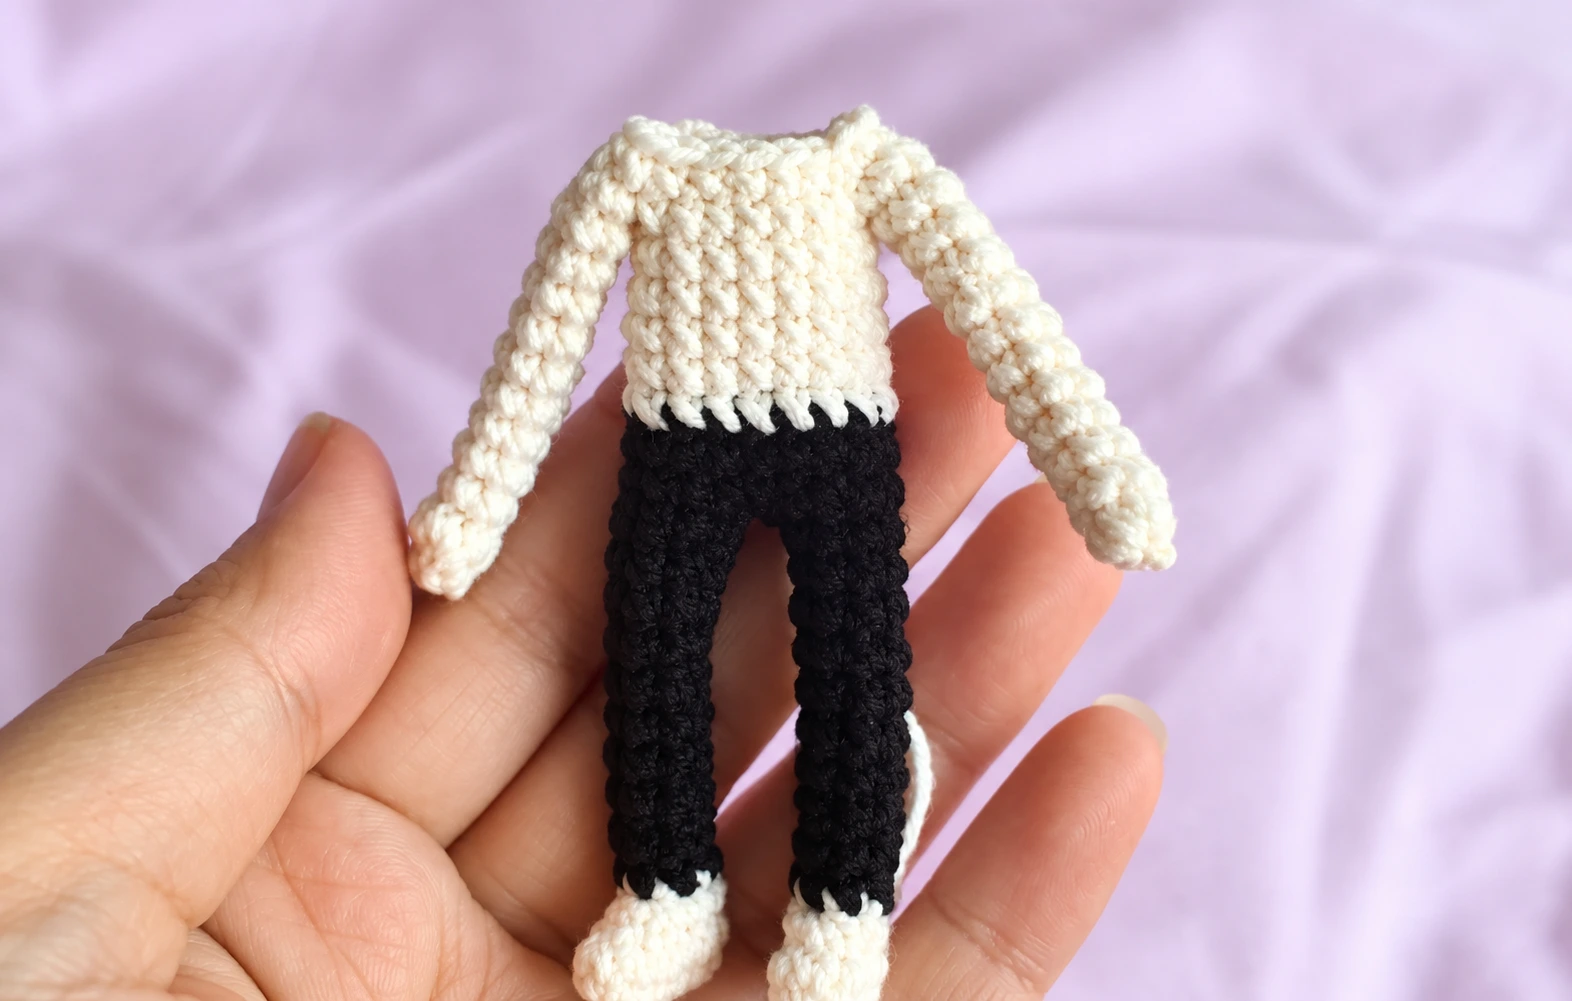
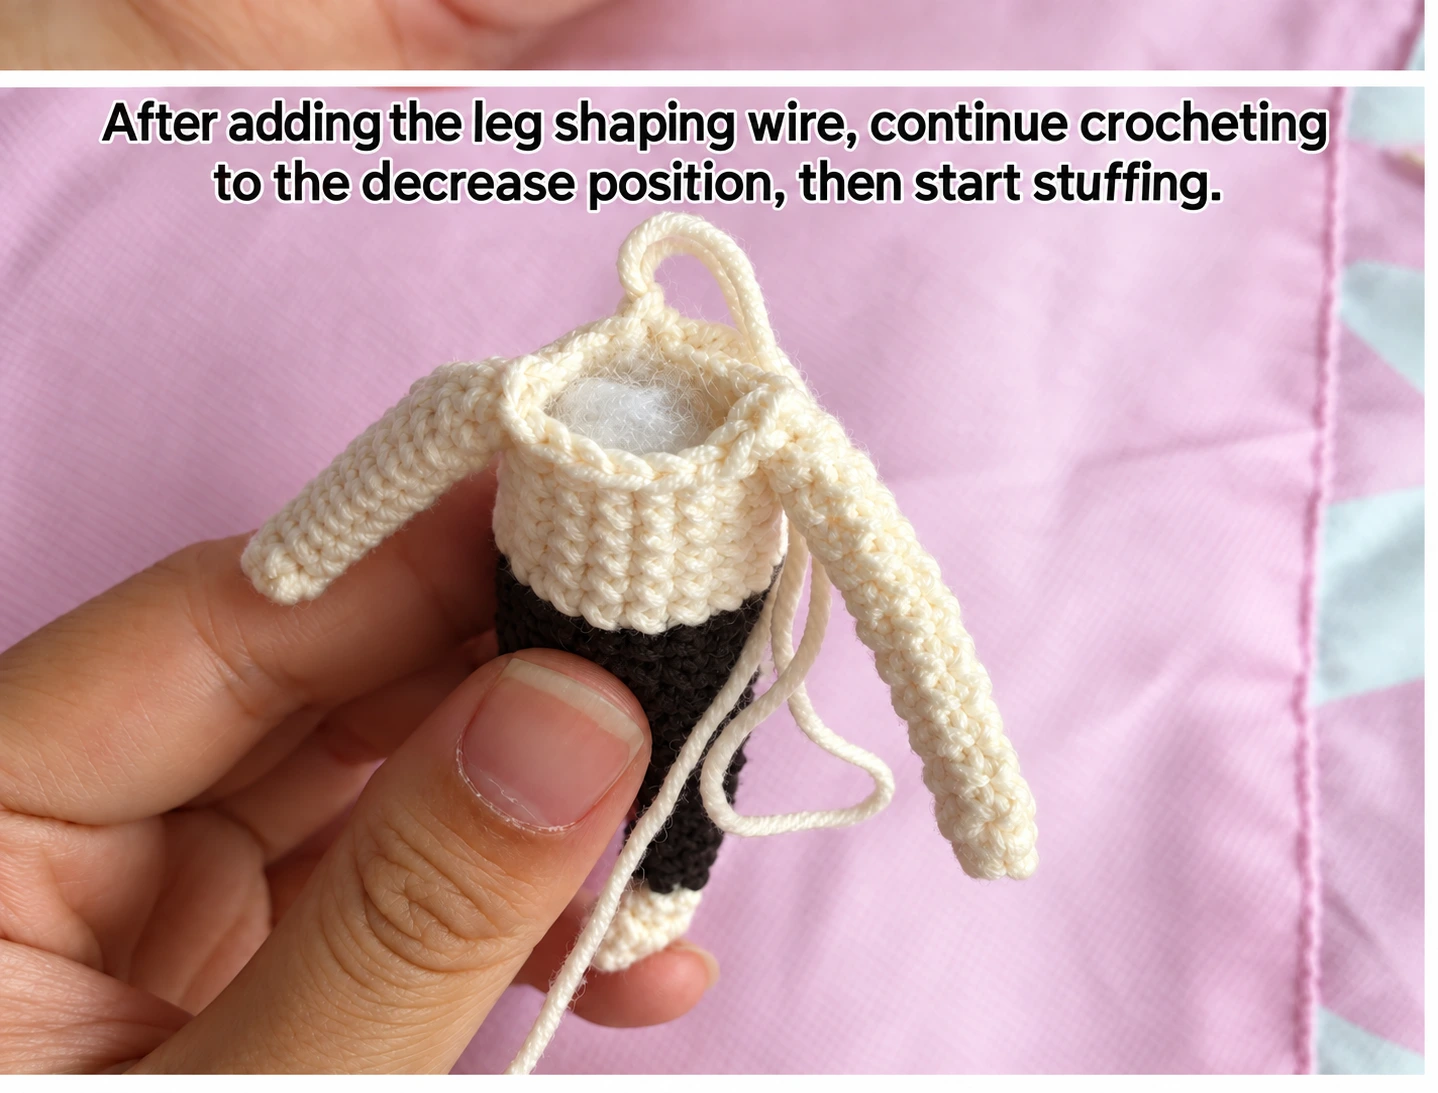
Look at the front and side profiles as you fill. A lump of tightly packed filling can push a wire out of place; an empty pocket can let it move around. Stop and reposition the support instead of hiding the problem beneath more filling.
03. Fit the arm support before the head is closed
The reference fits the arm support while the head is still partly open, using that access to position it through the shoulder region. Measure against the actual arms, finish the ends and check the available space at the shoulder and neck.
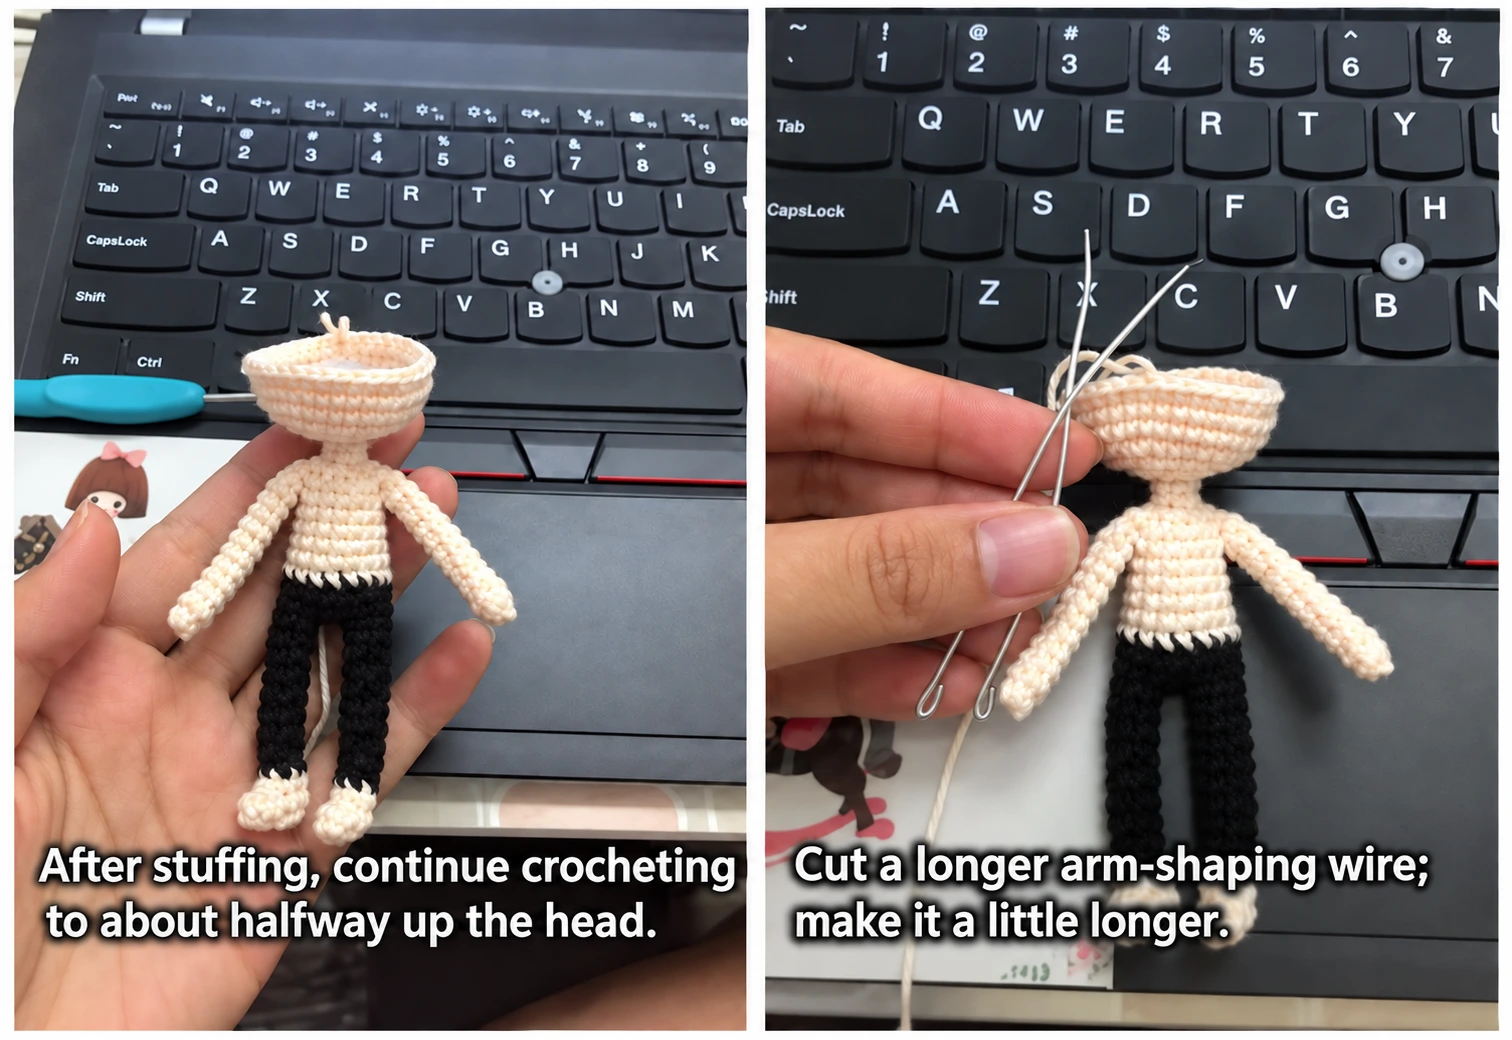
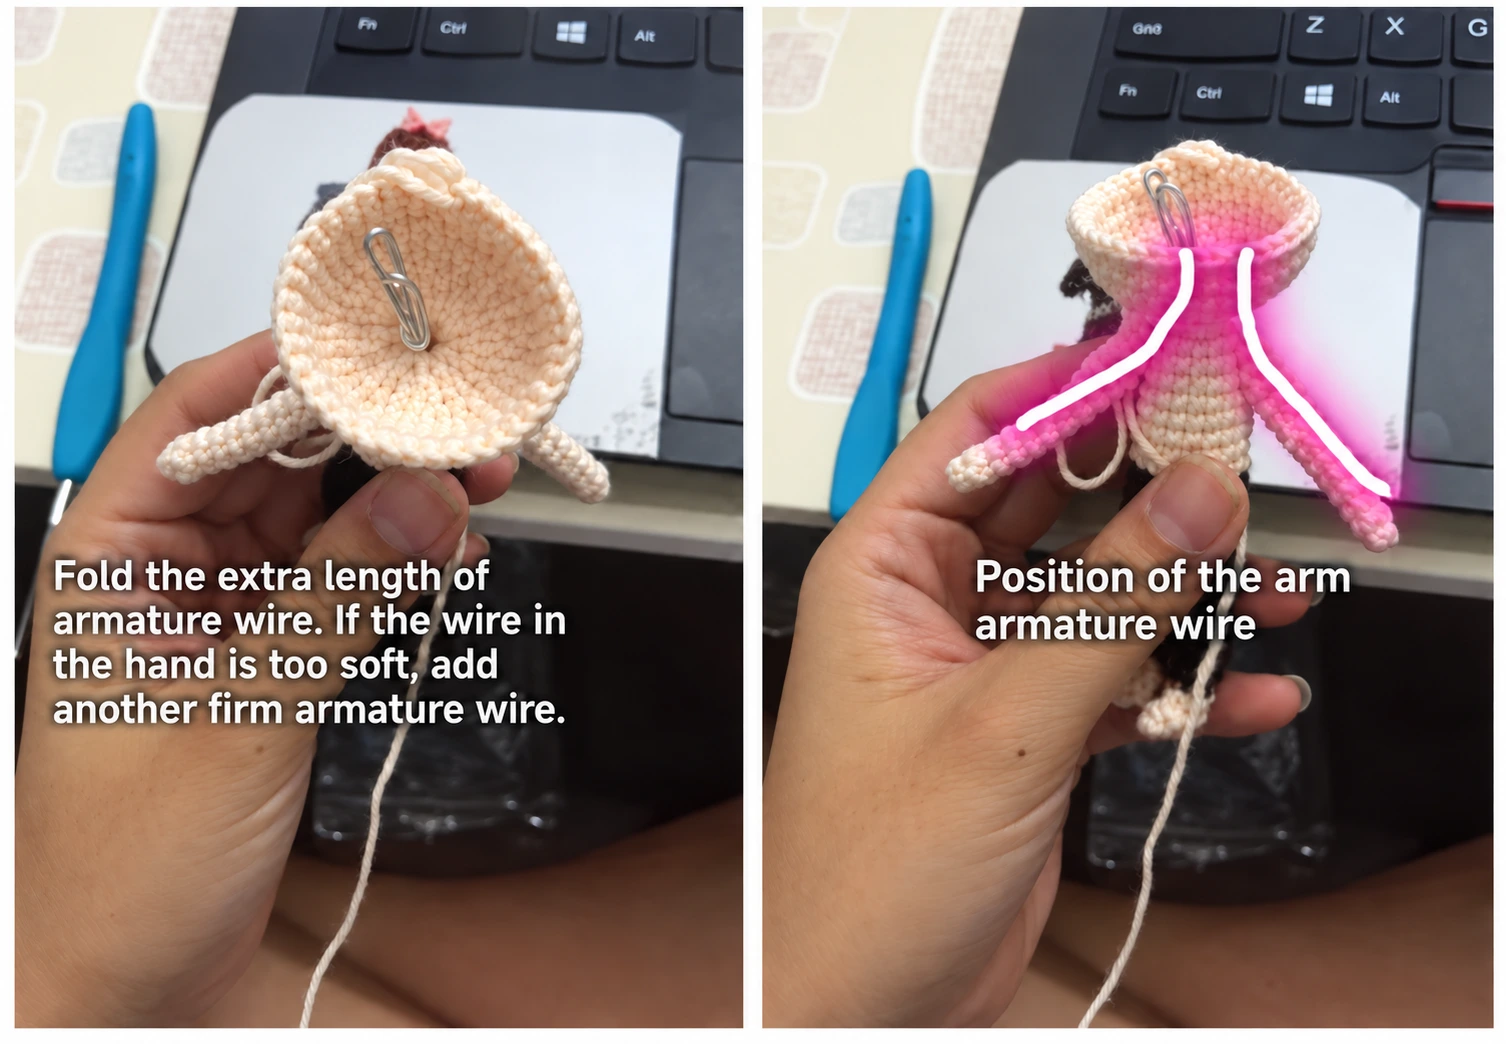
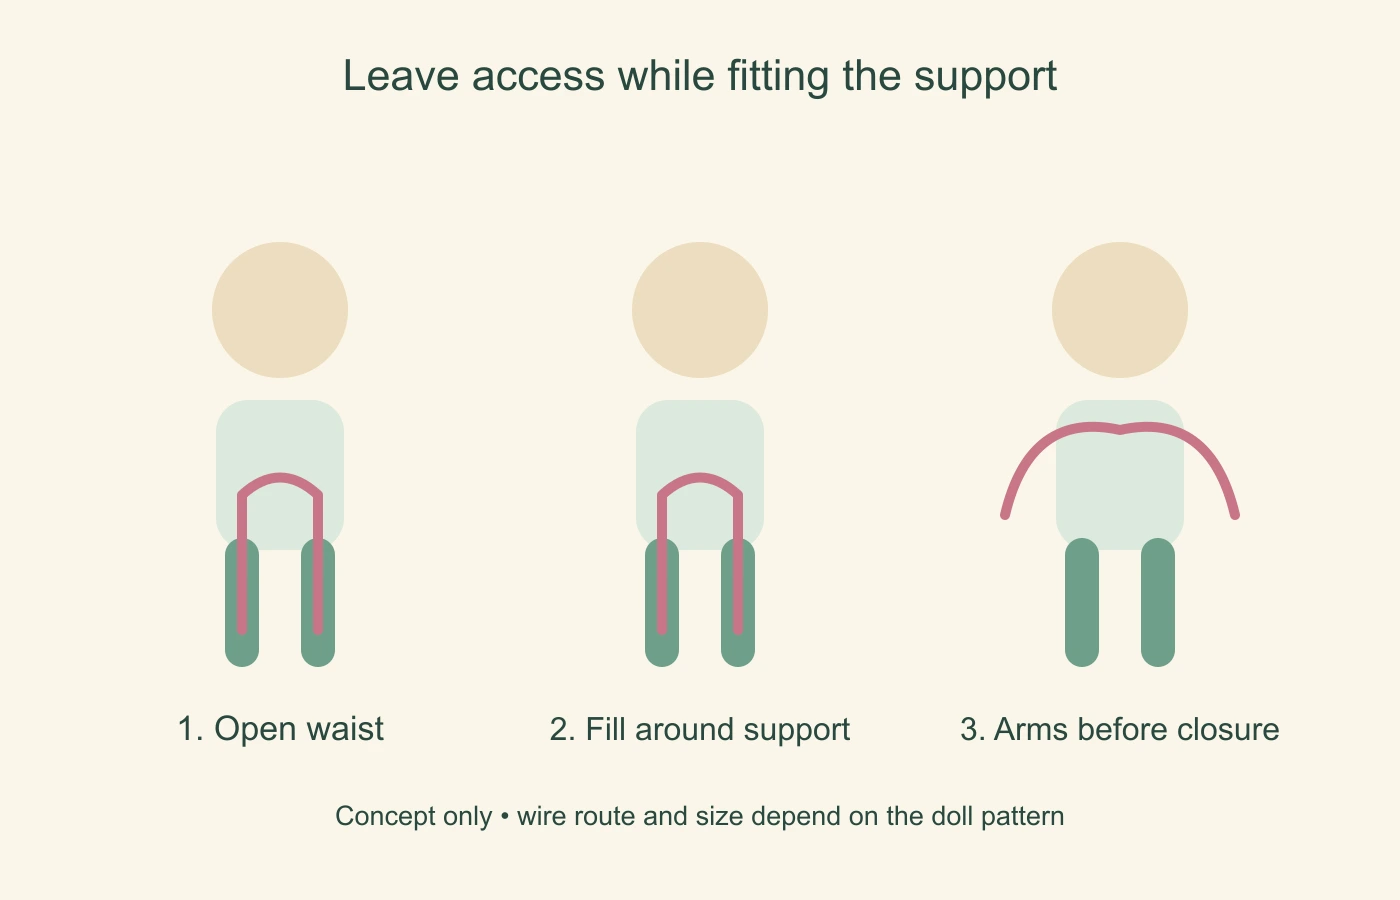
The exact route depends on the doll pattern. Do not push a wire through a closed, stuffed limb blindly. If an arm has no accessible route, use a construction designed for it rather than forcing the wire through the fabric.
04. Check before closing
Gently place the doll in its intended display pose. Feel each limb and inspect the stitches for a hard point, stretched opening or visible wire. Confirm that the filling stays distributed and the neck is not forced out of shape.
Only then finish closing the opening and secure the yarn tails. Avoid repeatedly bending the support sharply at the same place; wire can fatigue. If a hard end becomes detectable later, stop handling or displaying it until it has been repaired.
When to choose a different construction
If the object is intended for play, washing or repeated handling, a wire-supported display design may not suit that purpose. Choose a soft construction or a separately evaluated joint system appropriate to that use. This tutorial does not establish product-safety compliance.
Reference notes
Adapted from the supplied Doll Shaping Tutorial, whose screenshots carry the name Hua Kai Yi Duo Xiao Mao Qiu. The original shows the order of insertion but does not provide complete wire specifications; this guide therefore avoids inventing a universal gauge or length.
Step illustrations and photographs are excerpts from the supplied reference materials credited below. In-image instructional text has been translated into English and the supplied images enhanced with AI assistance. The English captions explain the pictured actions. Select a step image to view it at full size.
How to Join Crochet Pieces: Whipstitch, Slip Stitch and Motifs
A good join keeps the intended shape without pulling the pieces out of line. Before choosing a seam, decide whether you are connecting stitch tops, row ends or shaped edges. They are different structures and may need different spacing.
The supplied reference covers flat pieces, motifs, buttonholes and cords. This guide brings those finishing choices together so you can plan a small project before sewing it up.
In this guide
Prepare the pieces first / Choose the seam for its job / A straightforward whipstitch join / Plan motif layouts on a flat surface / Make a simple buttonhole sample / A simple slip-stitch cord
Prepare the pieces first
Lay the pieces in their finished arrangement. Check their sizes, stitch counts, right sides and attachment points. Mark corners and matching landmarks with removable markers.
If blocking is appropriate for the yarn and project, follow the yarn’s care guidance and let the pieces dry before joining. Do not stretch one part aggressively to make it match another that was crocheted to a different size.
Choose the seam for its job
| Join | What it does |
|---|---|
| Whipstitch with a tapestry needle | Wraps the joining yarn around matched edge loops |
| Mattress-style seam | Alternates between corresponding edge bars for a more concealed join |
| Slip-stitch join | Uses a hook to join the selected loops with a low ridge |
| Single-crochet join | Creates a more pronounced crocheted seam |
| Chain-spaced join | Leaves planned openings between attachment points |
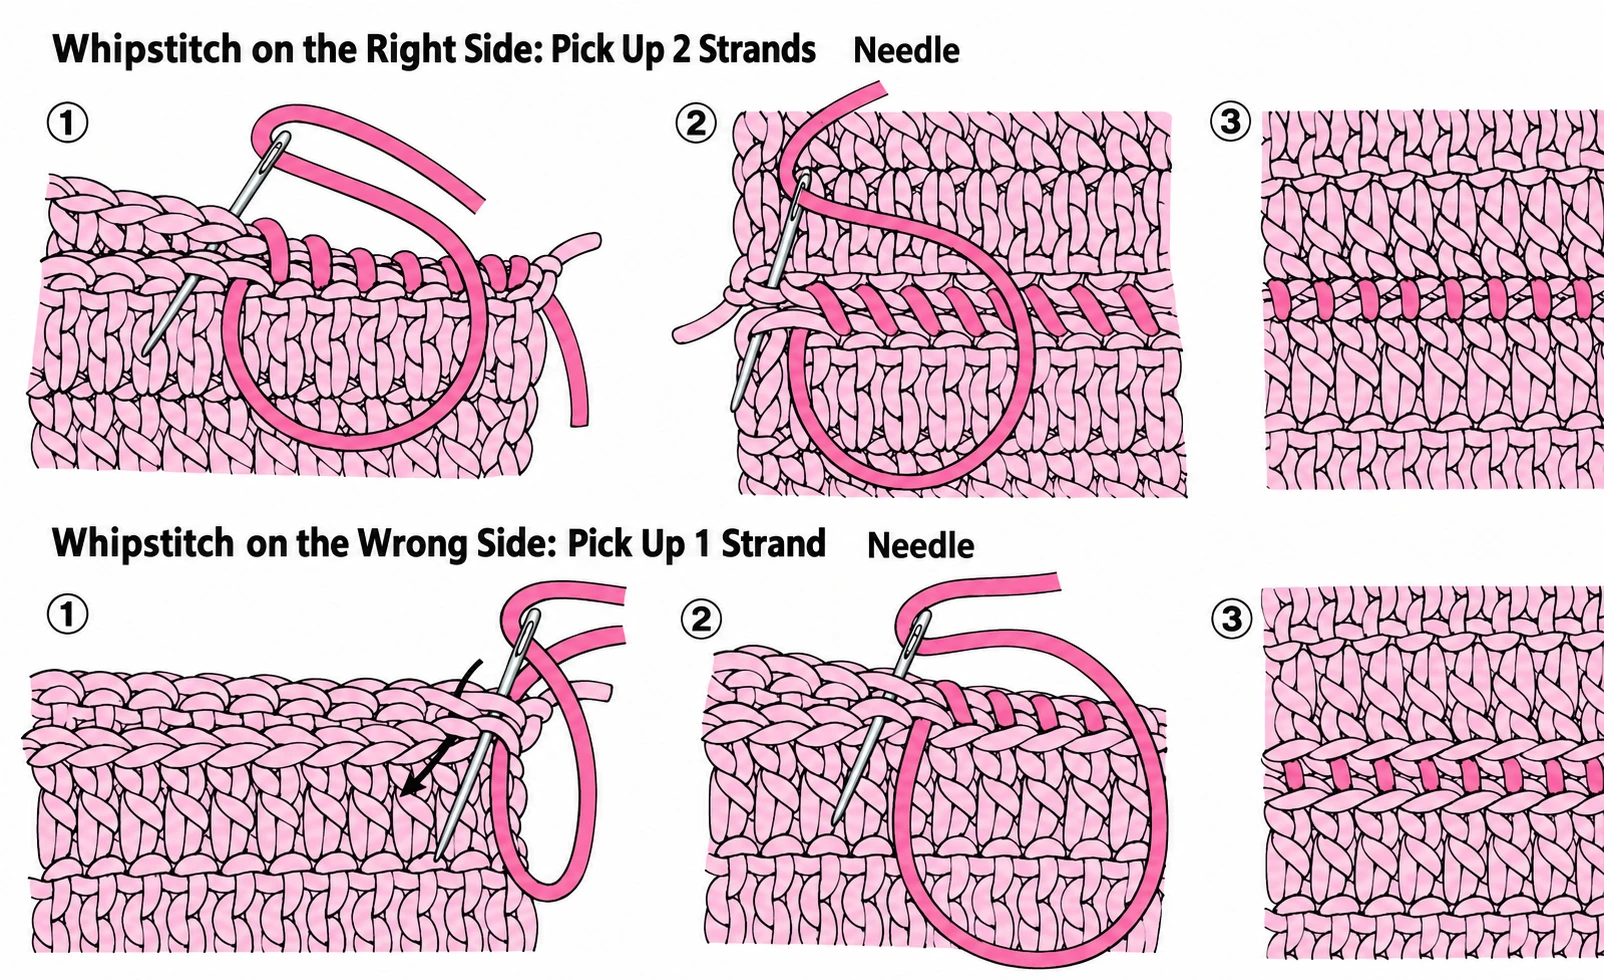
Which face is toward you and which loops you pick up affect the result. Test a few centimetres of seam before committing to a long edge.
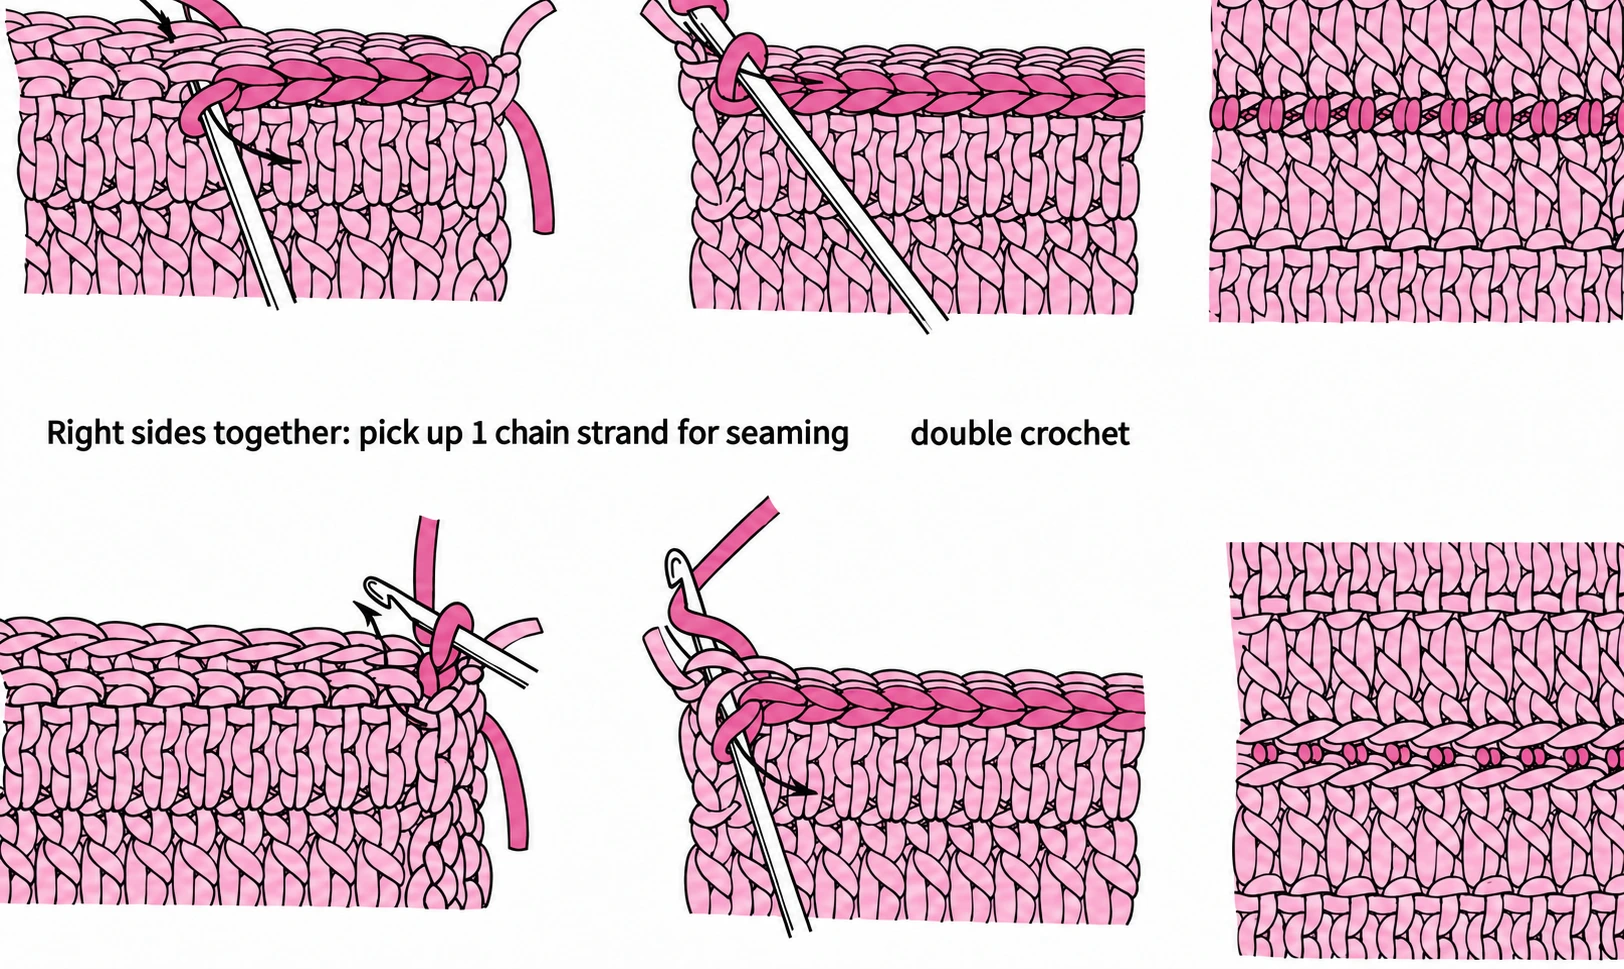
A straightforward whipstitch join
- Align the two edges in the orientation required by your project.
- Thread a tapestry needle with a workable length of matching yarn.
- Pass through the selected edge loops of both pieces, then repeat in the next matching position.
- Ease the joining yarn as you go so the seam holds without puckering.
- Check the visible face before securing the tail.
For row-end seams, match the total lengths and markers rather than forcing one stitch into every visible gap. Taller stitches create a different edge from rows of single crochet. On sloping edges, distribute the join evenly between landmarks.
Plan motif layouts on a flat surface
Squares placed edge to edge form a different outline from squares rotated onto their corners. Hexagons, circles and triangles also leave different gaps. Arrange several motifs before making a whole batch, especially if the finished boundary must be rectangular.
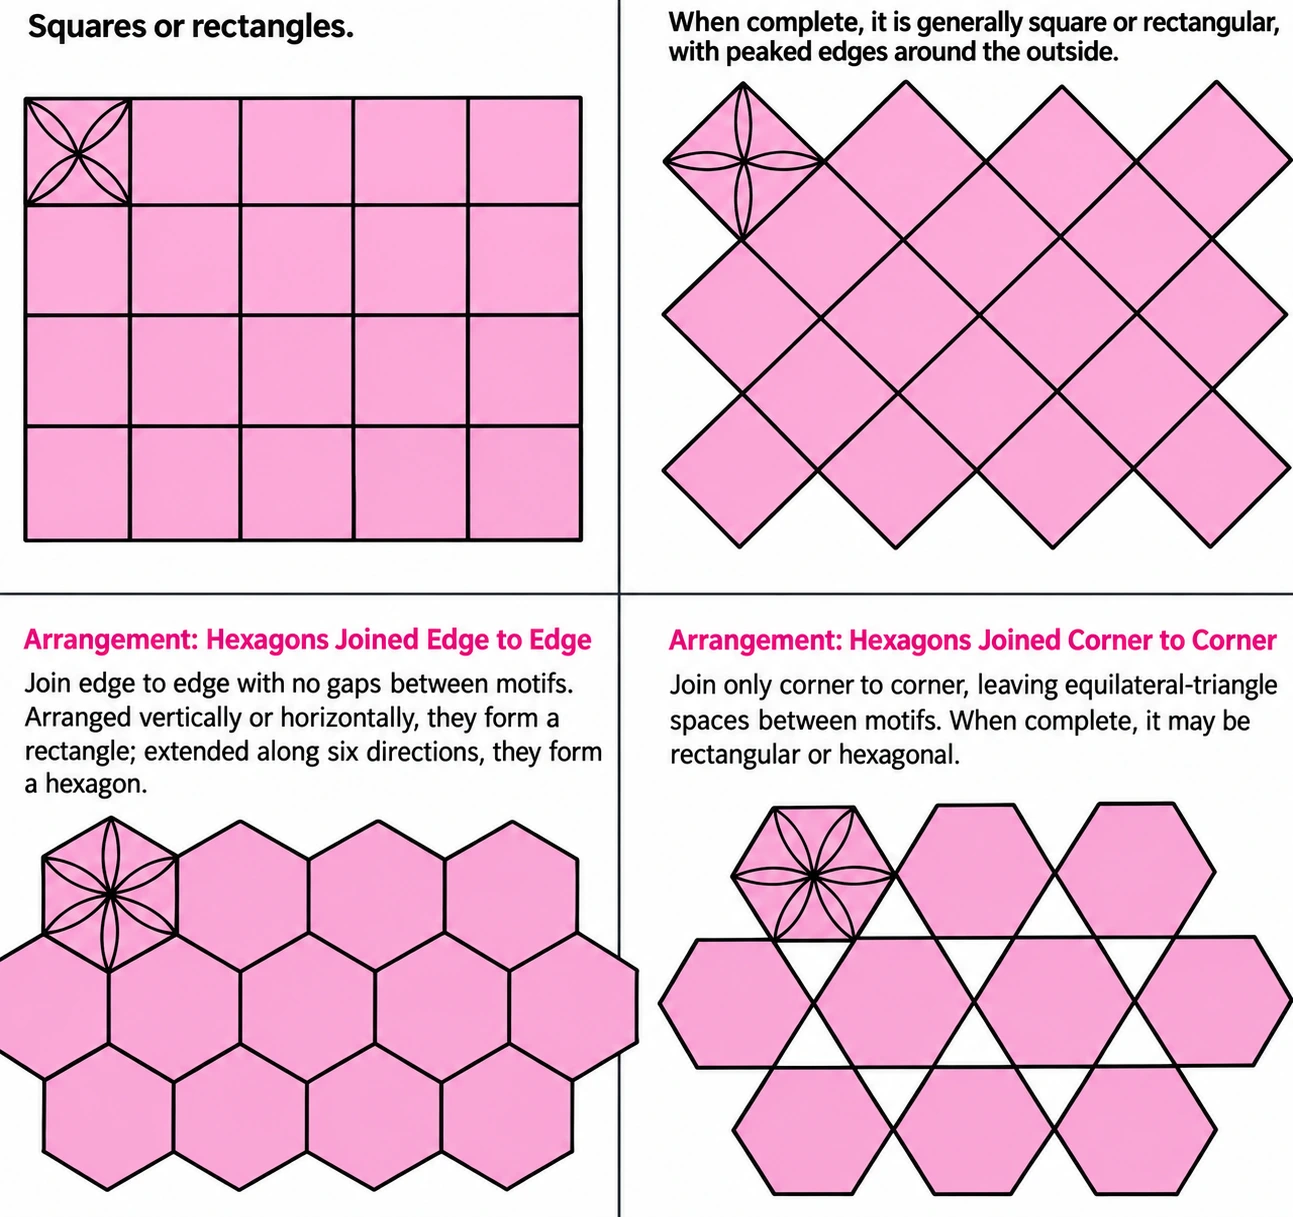
Some projects join motifs during their final round; others join completed pieces afterward. Keep those approaches separate. A gap intended by the design is not necessarily an error, and a gap-filling motif needs its own instructions.
Make a simple buttonhole sample
In a single-crochet practice row, chain two and skip two stitches at the intended opening, then continue across. On the next row, work two single crochets into the chain space. Test the opening with the actual button and adjust the sample before putting it into the finished item.
An edge button loop is different: chain a loop at the edge and anchor it at the chosen next point. Its length depends on the button, yarn and tension. Reinforce it only as the design requires, and test that the button stays closed without straining the fabric.
A simple slip-stitch cord
Make a chain slightly longer than the intended finished cord. Work slip stitches back along it using a consistent insertion point, then measure again: working into the chain can shorten it. Keep the tension relaxed so the cord remains flexible.
Reference notes
Adapted from the seam, motif, buttonhole and cord chapters of the supplied I Want to Learn Crochet (Chinese-language reference). The buttonhole above is a small practice example, not a fixed size for every project.
Step illustrations and photographs are excerpts from the supplied reference materials credited below. In-image instructional text has been translated into English and the supplied images enhanced with AI assistance. The English captions explain the pictured actions. Select a step image to view it at full size.
How to Change Colors in Crochet and Weave in Ends
A neat colour change begins before the first stitch of the new colour. Complete the last draw-through of the preceding stitch with the new yarn, then continue with it. That places the new working loop on the hook at the transition.
The same idea helps when joining another ball of the same yarn. Plan how to secure both tails instead of relying on the tension of the next few stitches to hold them forever.
In this guide
Change colour in single crochet / Change colour in double crochet / Carry the yarn or cut it? / Avoid tight floats / Fasten off and weave in / Final check
Change colour in single crochet
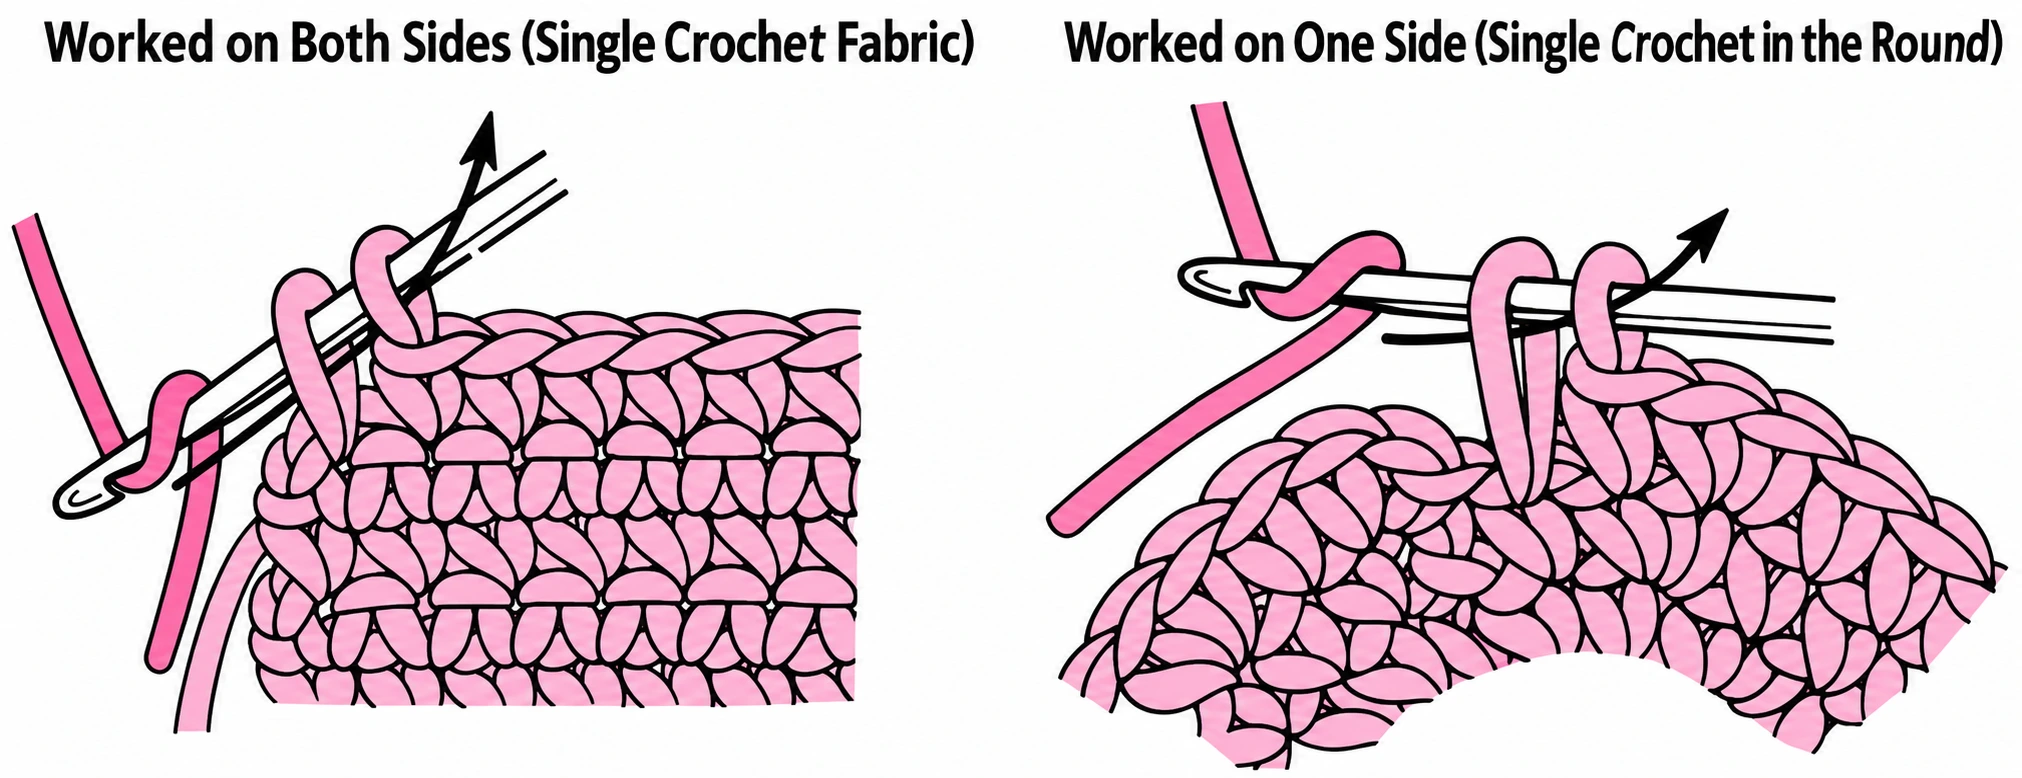
- Work the last stitch in the old colour until two loops remain on the hook.
- Lay the new working yarn over the hook.
- Pull the new yarn through both loops.
- Continue with the new colour, leaving both tails long enough to weave in.
Support the tails gently for the first few stitches. Do not pull them so hard that the stitch at the change becomes noticeably smaller.
Change colour in double crochet
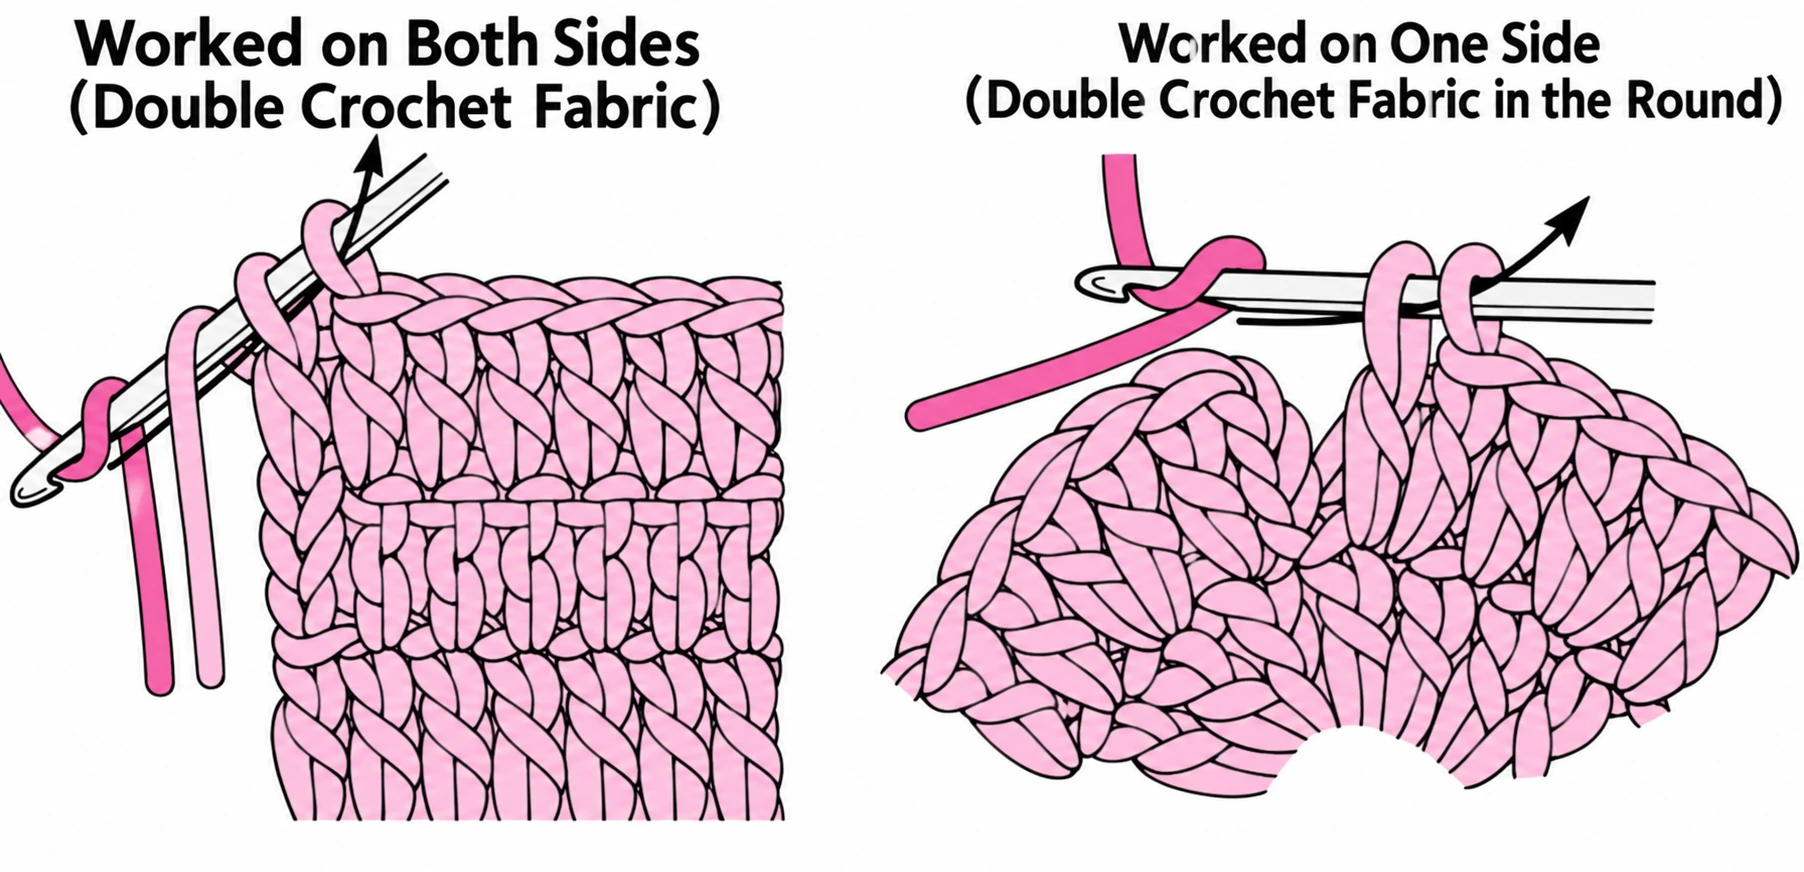
Work the last double crochet in the old colour until only its final two loops remain. Draw the new yarn through those loops, then begin the next stitch or turning chain in the new colour as directed.
This is a controlled transition, not a promise of an invisible line. Joined rounds and spirals behave differently; a continuous spiral can show a step where the colour changes. Use a project’s specific colour-change method when its appearance depends on it.
Carry the yarn or cut it?
| Situation | A useful approach |
|---|---|
| Colour will not be used again soon | Cut it with enough tail for finishing |
| Short change with yarn carried inside stitches | Enclose it gently and check that it does not show |
| Yarn carried up a row edge | Allow enough length for the height of the rows |
| Separate blocks of colour | Use separate supplies where appropriate and manage the join between them |
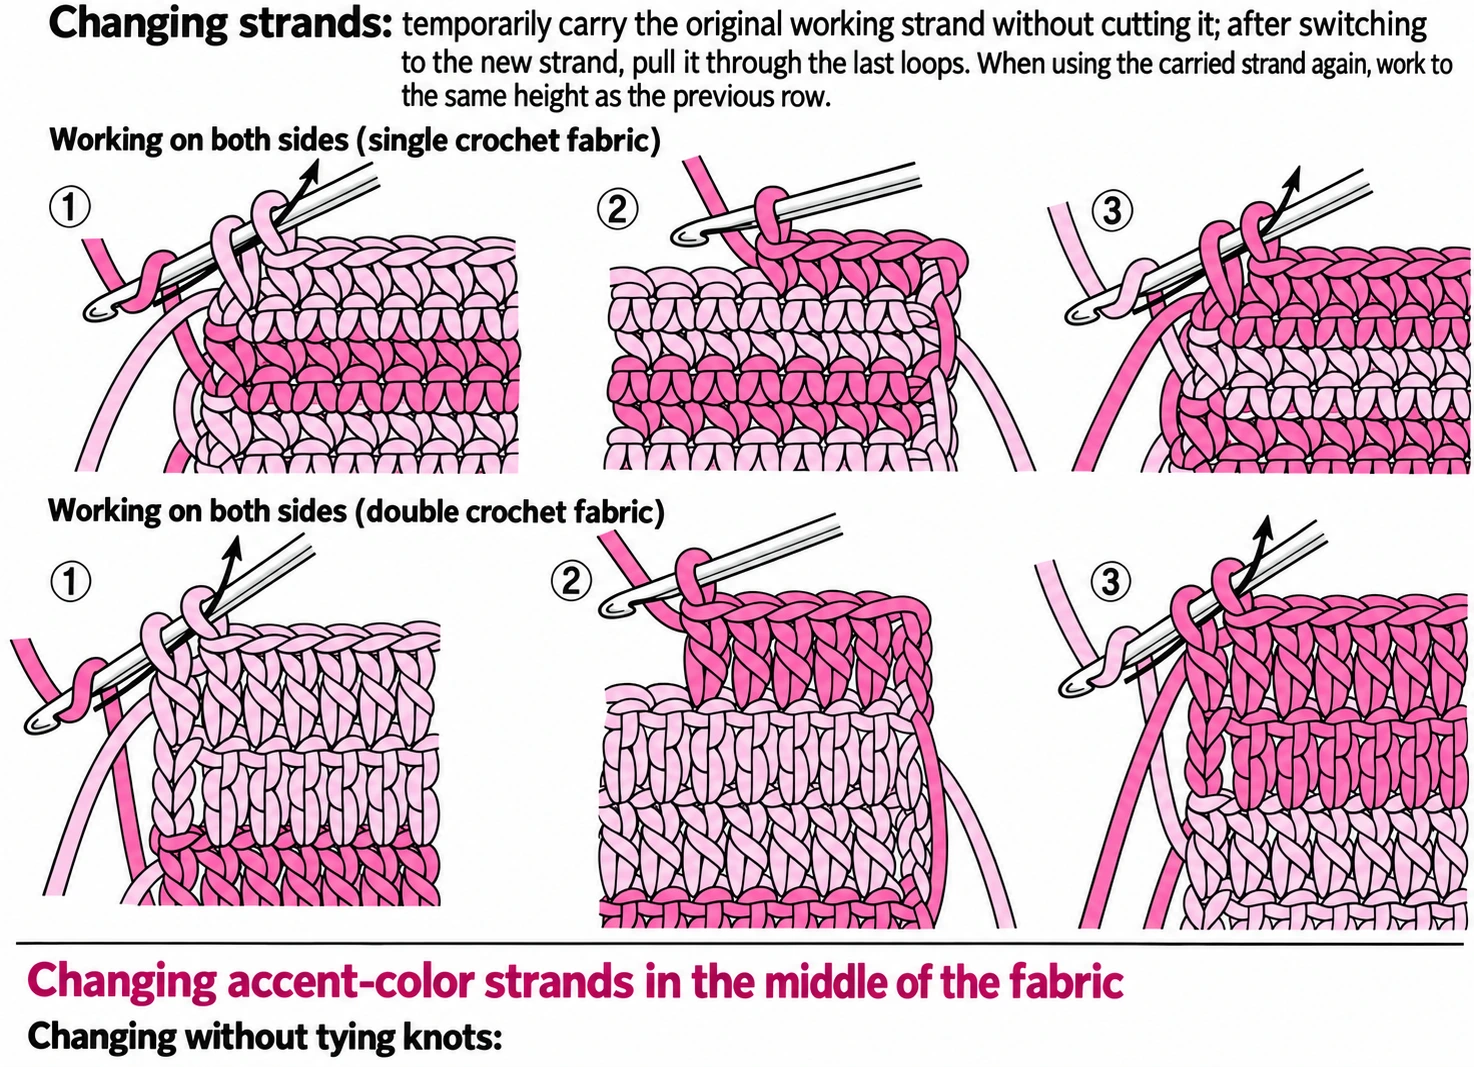
The reference illustrates yarn carried behind the fabric, enclosed inside stitches and crossed at colour boundaries. These create different backs. Inspect the reverse side as you work rather than discovering long loose strands after assembly.
Avoid tight floats
Spread the stitches to their natural width before carrying the unused colour across them. A short float can pull the piece inward; a long loose one can catch on things. Where the finished item has an exposed reverse, choose a method that suits that use.
If the unused colour shows through a pale surface, check both the fabric density and whether carrying it is appropriate. A tighter grip alone is not a reliable solution and may distort the work.
Fasten off and weave in
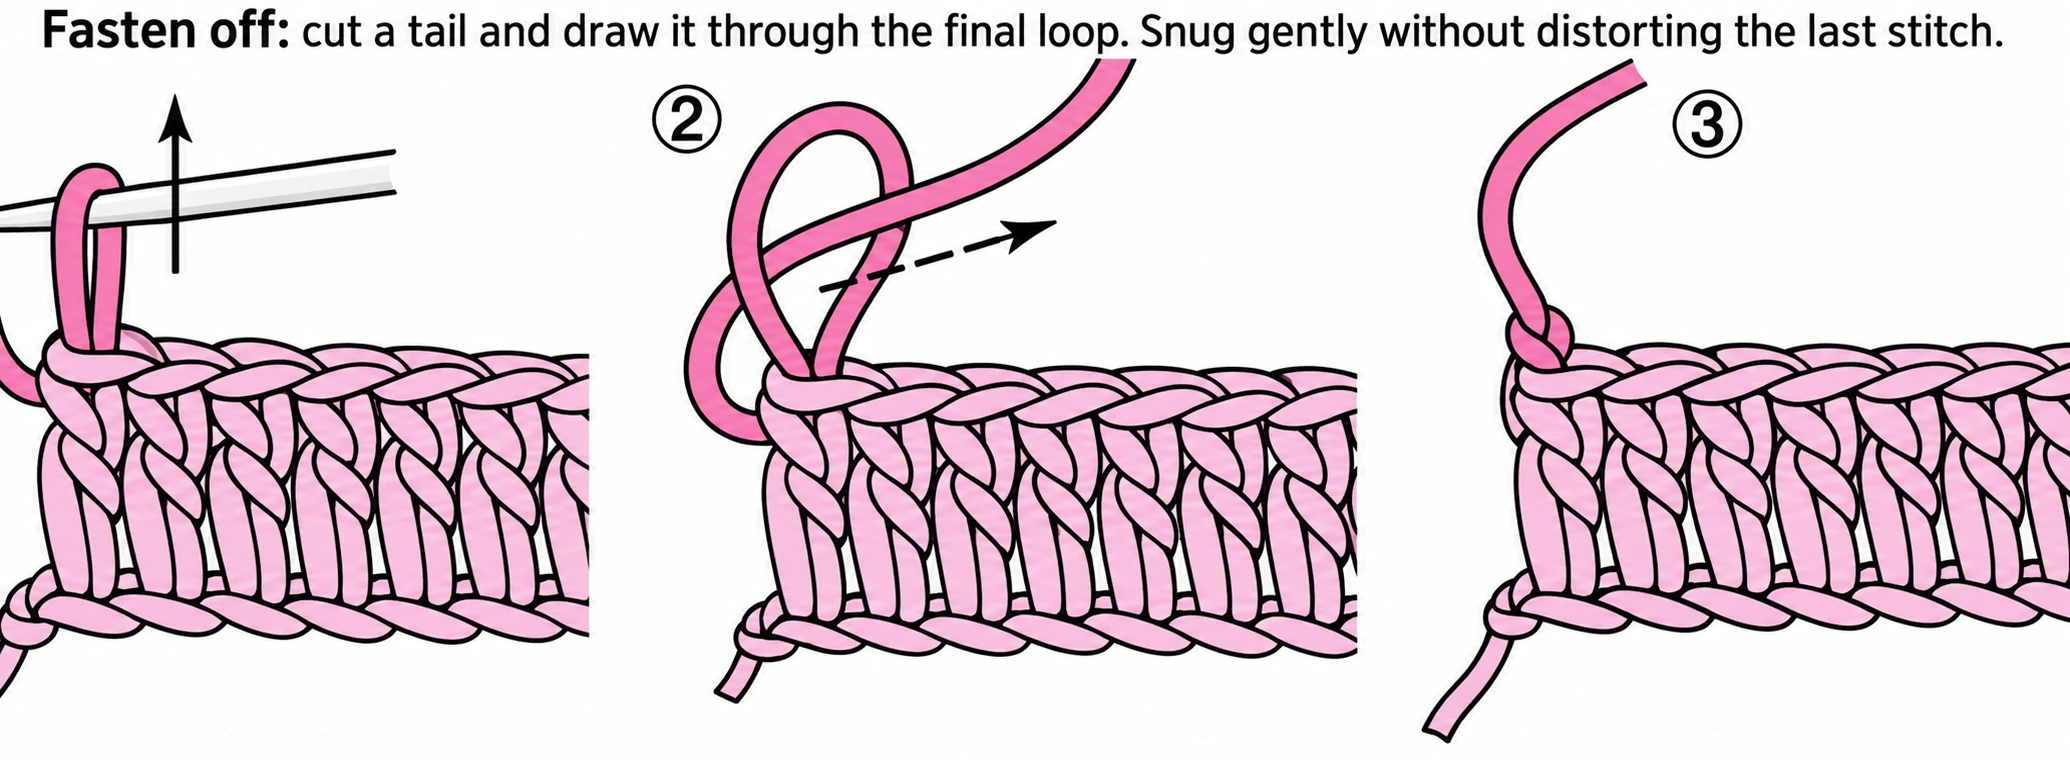
After the final stitch, cut a workable tail and draw it through the remaining loop. Thread the tail onto a tapestry needle. Pass it through the body of nearby stitches on the less visible side, following the structure without cinching it.
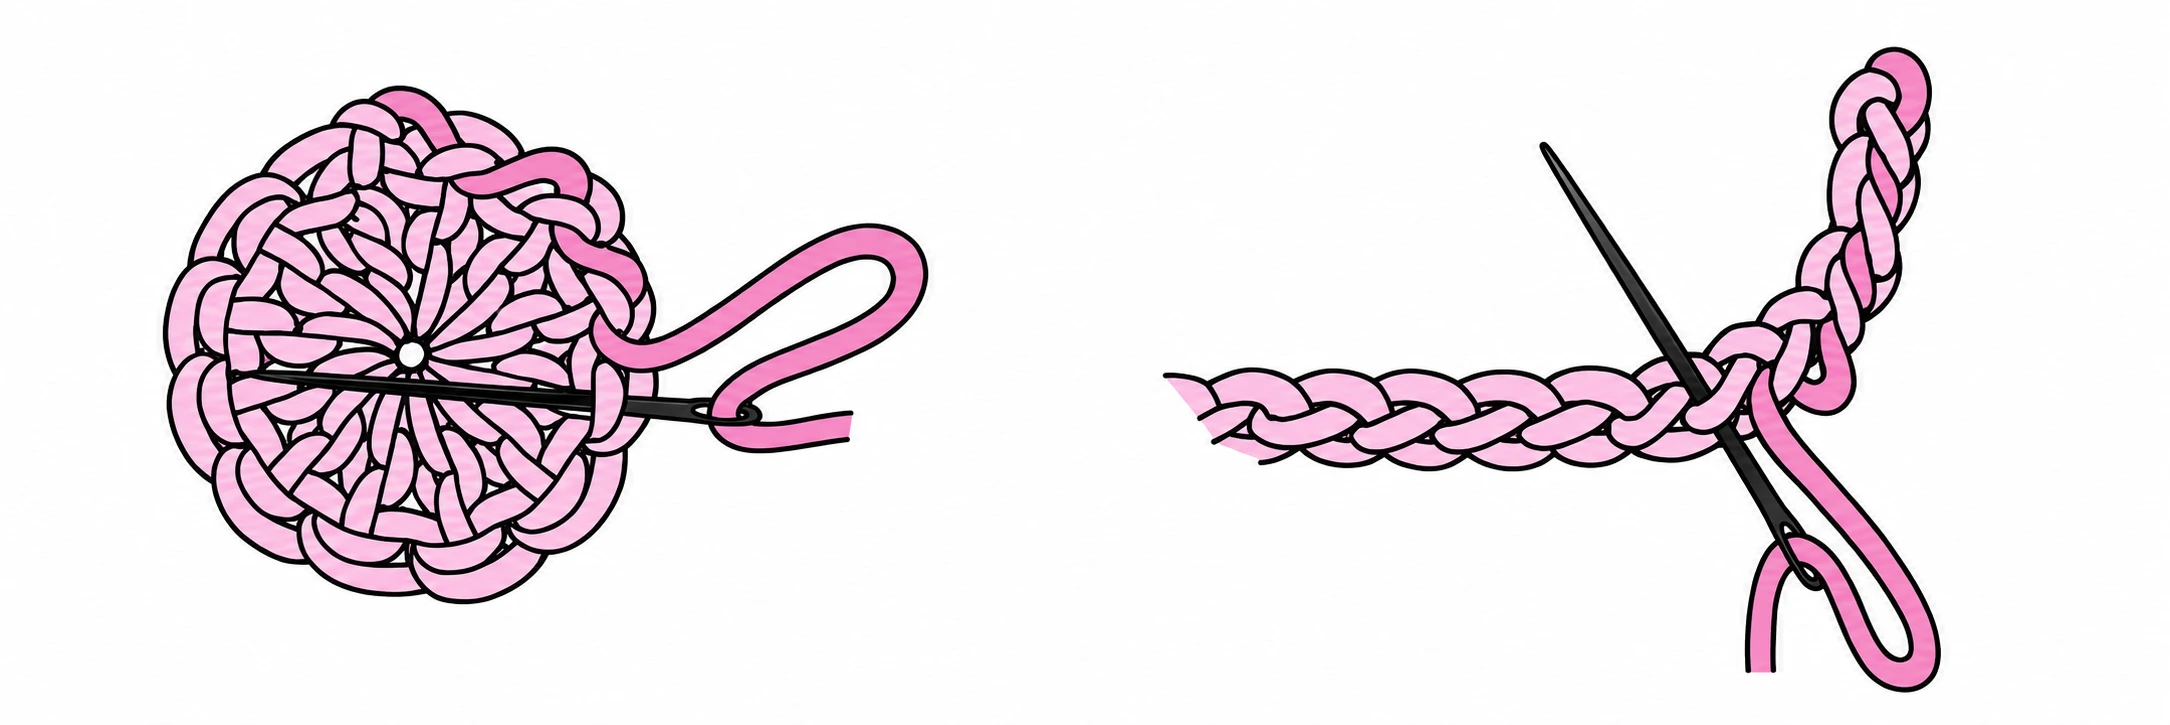
Change direction where useful to resist the tail sliding straight back out. For a stuffed piece, finish accessible tails before the opening becomes too small to reach. A tail needed for sewing an attachment should be left long enough for that job.
The reference shows several knotting methods. A knot may be part of a chosen join, but its bulk and suitability depend on the yarn and position. Do not assume a single knot makes every slippery yarn secure.
Final check
Gently stretch and relax the fabric. Check for a tight line, loose transition or visible tail. Make any adjustment before trimming the remaining ends close to the surface.
Reference notes
Adapted from the joining-yarn, colour-change and finishing sections of the supplied I Want to Learn Crochet (Chinese-language reference).
Step illustrations and photographs are excerpts from the supplied reference materials credited below. In-image instructional text has been translated into English and the supplied images enhanced with AI assistance. The English captions explain the pictured actions. Select a step image to view it at full size.
Puff vs Popcorn vs Cluster Stitch: What’s the Difference?
Several raised crochet stitches can look alike in a small photograph. The difference is how they are built: long drawn-up loops, unfinished stitches closed together, or completed stitches gathered afterward. Knowing that difference helps you read flower centres, textured petals and decorative borders.
In this guide
Three constructions to recognise / Try a small puff / Try a three-double-crochet cluster / Try a popcorn / Shells and picots / More textures in the reference
Three constructions to recognise
| Texture | Basic construction |
|---|---|
| Puff | Draw up several elongated loops, then close them together |
| Cluster or bobble variant | Work a specified group of unfinished stitches and close them together |
| Popcorn | Complete a group of stitches, then draw the last loop through the first stitch to gather them |
Names and closing chains vary between designers. Read the special-stitch definition, including how many loops or component stitches to make and whether the closing chain counts.
Try a small puff
At the chosen insertion point, yarn over and draw up a loop to the intended height. Repeat that movement twice more in the same place. You should have seven loops on the hook, including the original working loop. Yarn over and draw through all seven. Add a securing chain if the pattern calls for one.
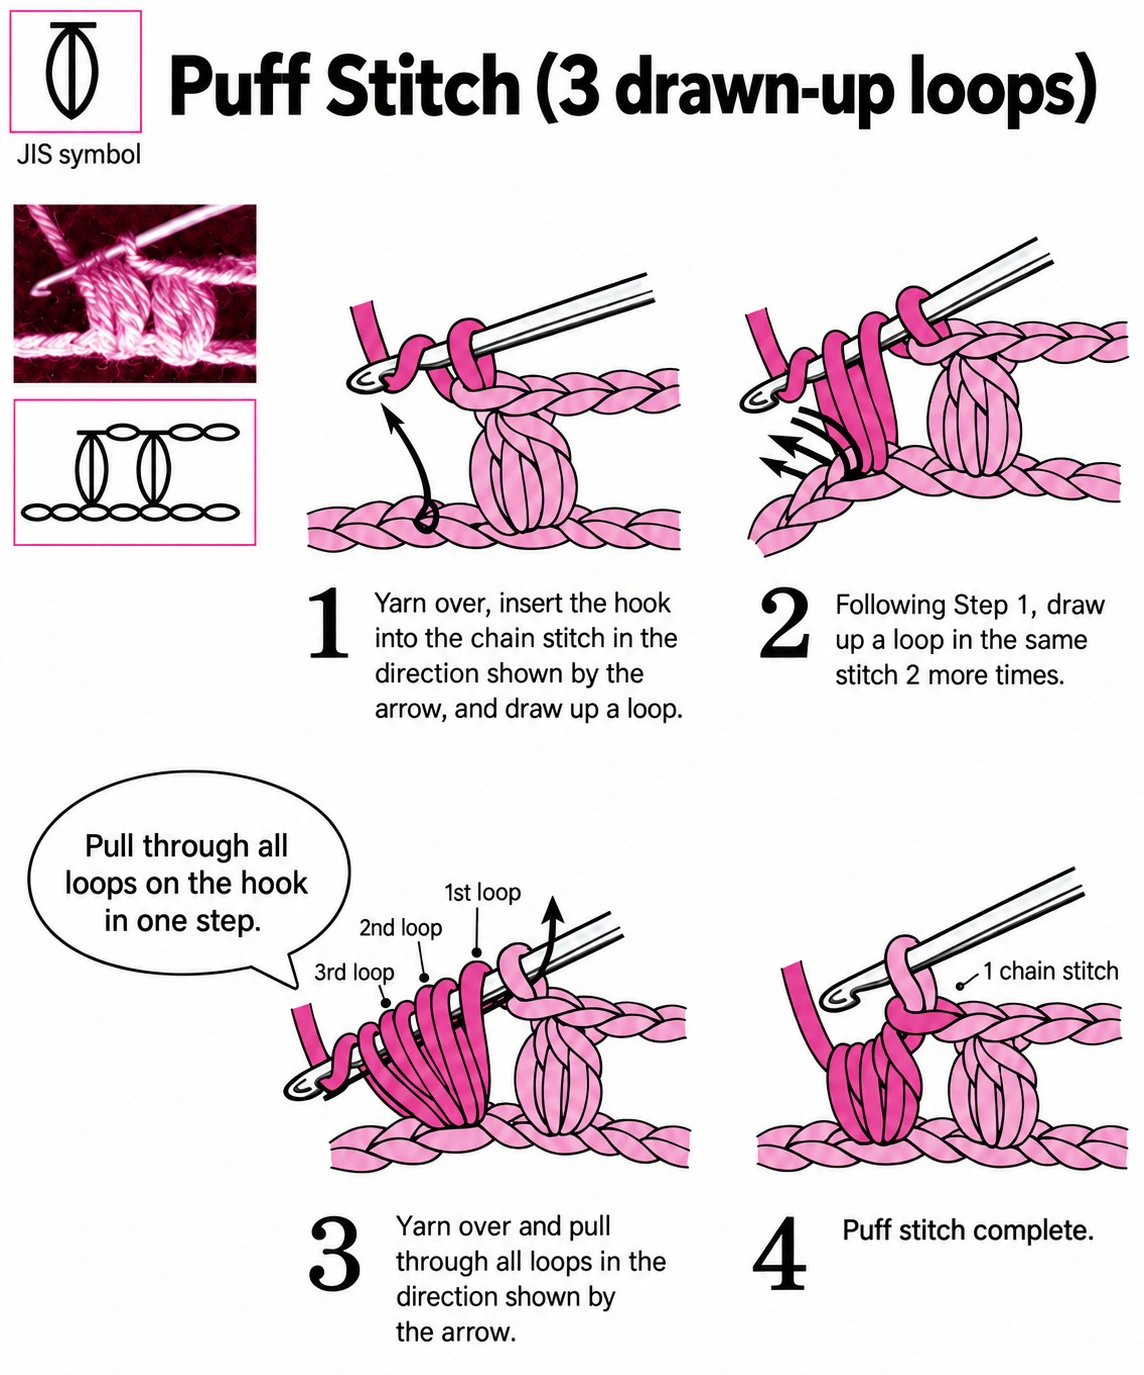
Keep the drawn-up loops at a similar height. Short, tight loops make the closing movement difficult; very loose loops can make the puff uneven. Practise on scrap yarn before placing it in a detailed project.
Try a three-double-crochet cluster
Begin a double crochet but stop before its final draw-through. Repeat twice in the same insertion point, leaving each stitch unfinished. Four loops remain on the hook. Yarn over and pull through them together.
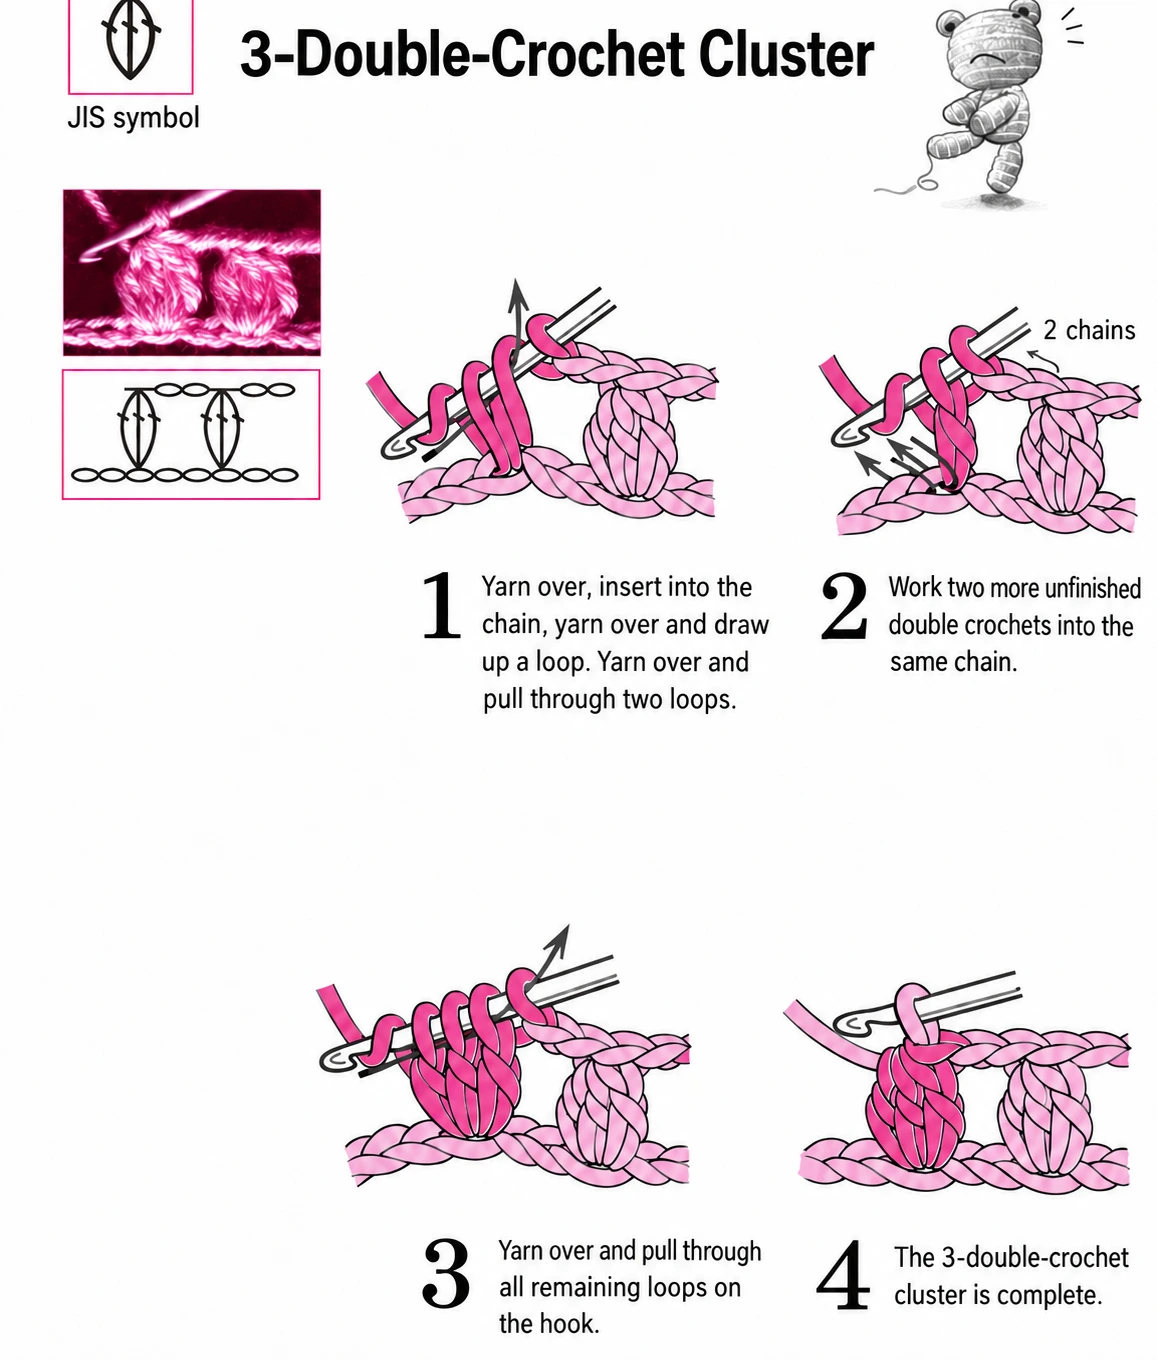
If the three unfinished stitches are spread across three different bases, the action instead brings those bases together. This is why the location of the symbol’s feet matters as much as its top.
Try a popcorn
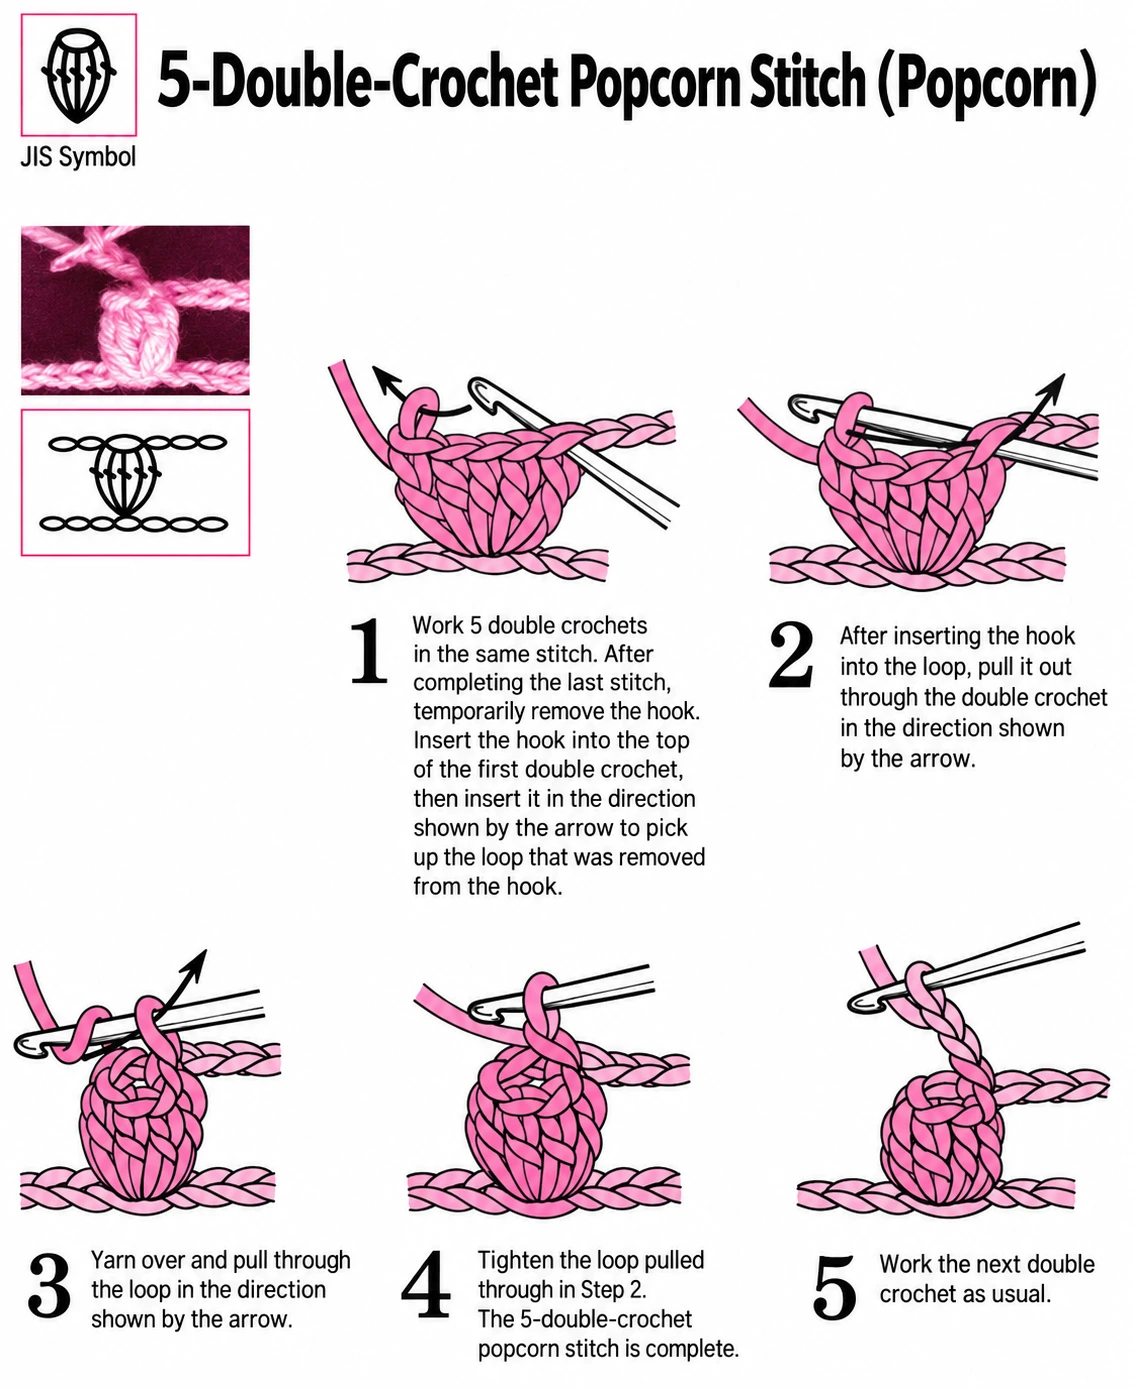
Work five complete double crochets into one insertion point. Enlarge the working loop slightly and remove the hook. Insert the hook into the first double crochet, catch the dropped loop and pull it through. Follow the pattern for any closing chain.
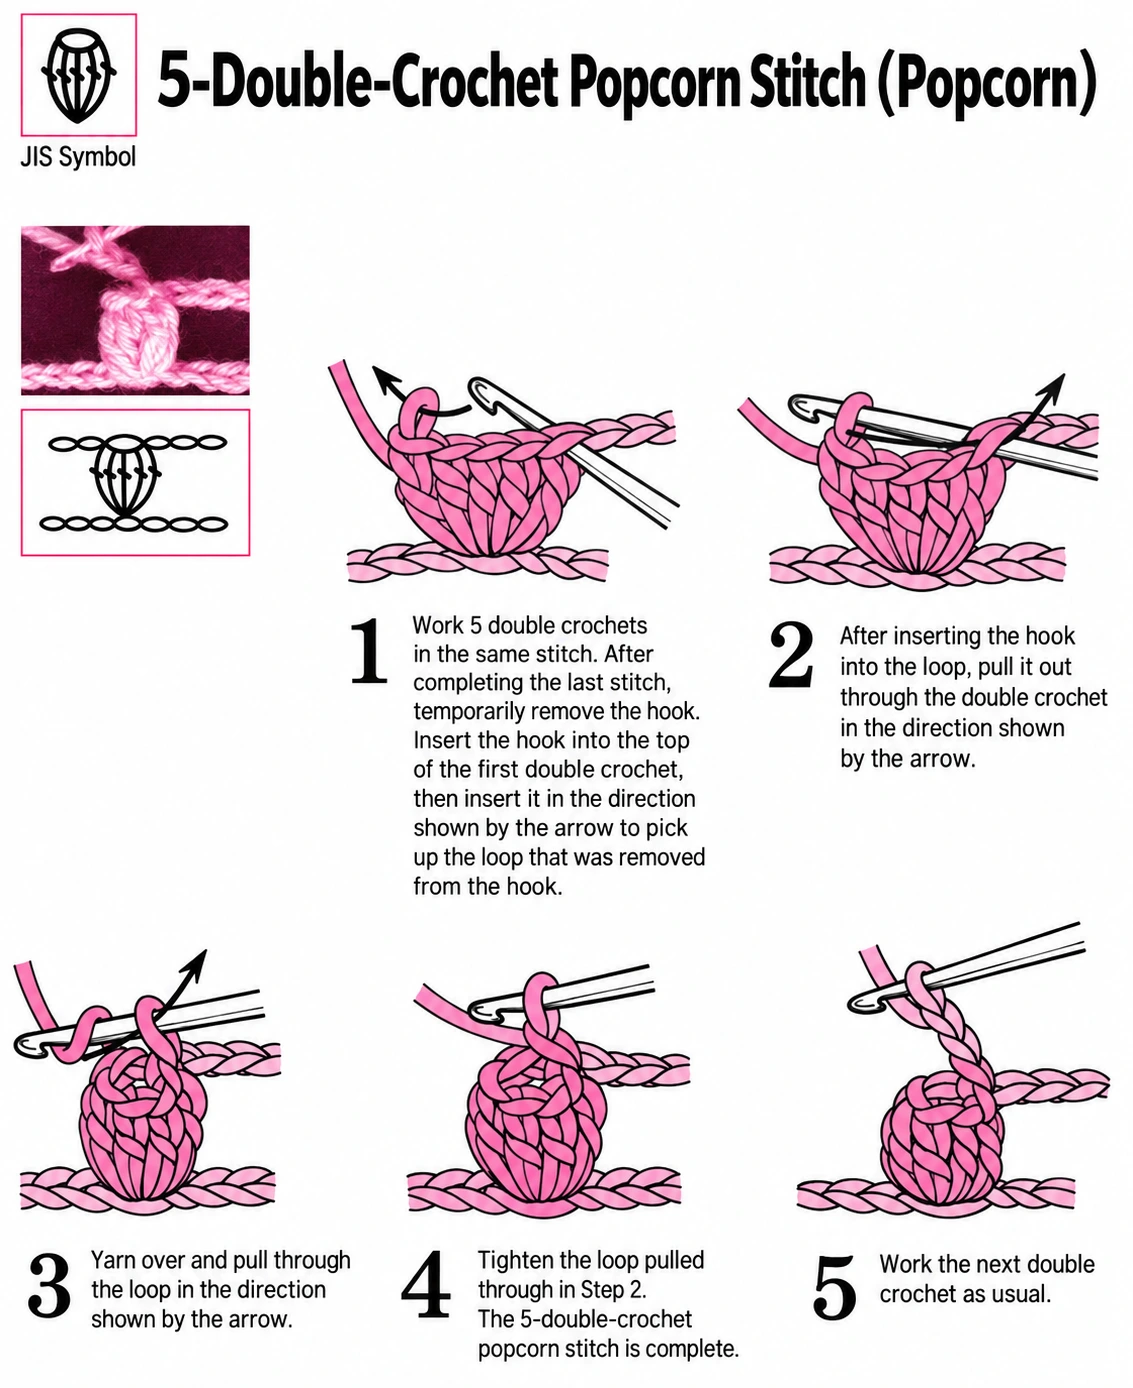
Unlike a cluster, those five double crochets were individually completed before being gathered. The supplied reference also shows popcorns made with other stitch heights and group sizes.
Shells and picots
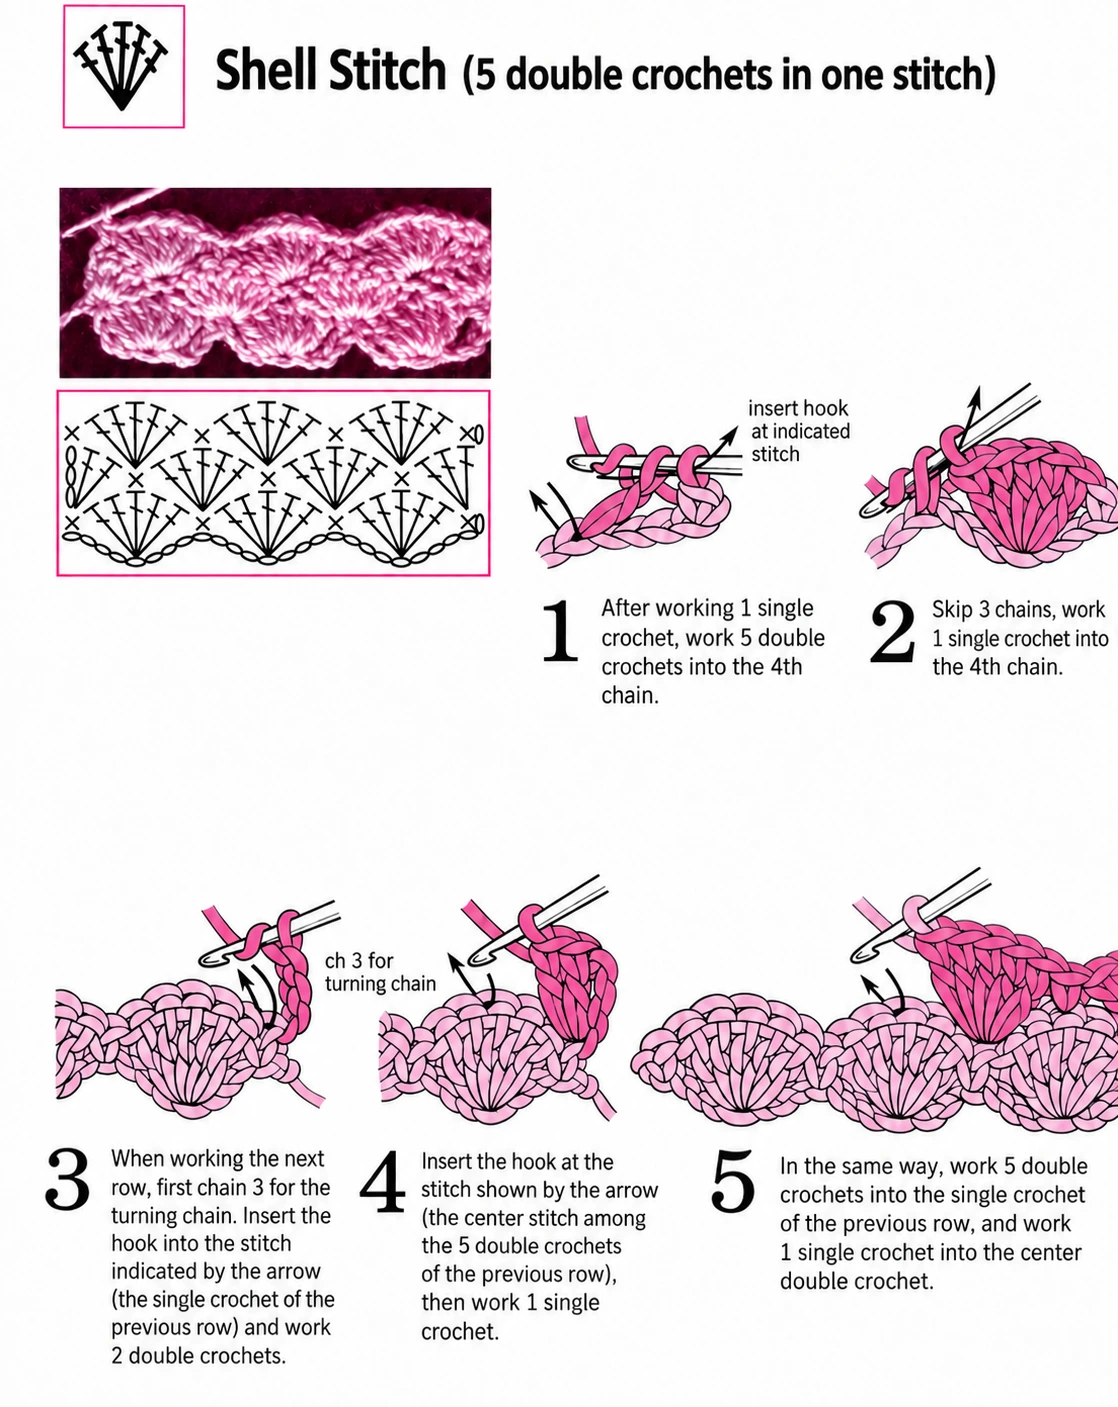
A shell fans several completed stitches out from one base. A group such as “(2 dc, ch 1, 2 dc) in the same stitch” leaves a small chain space at its centre. On later rows, the pattern may ask you to work into that space rather than a stitch top.
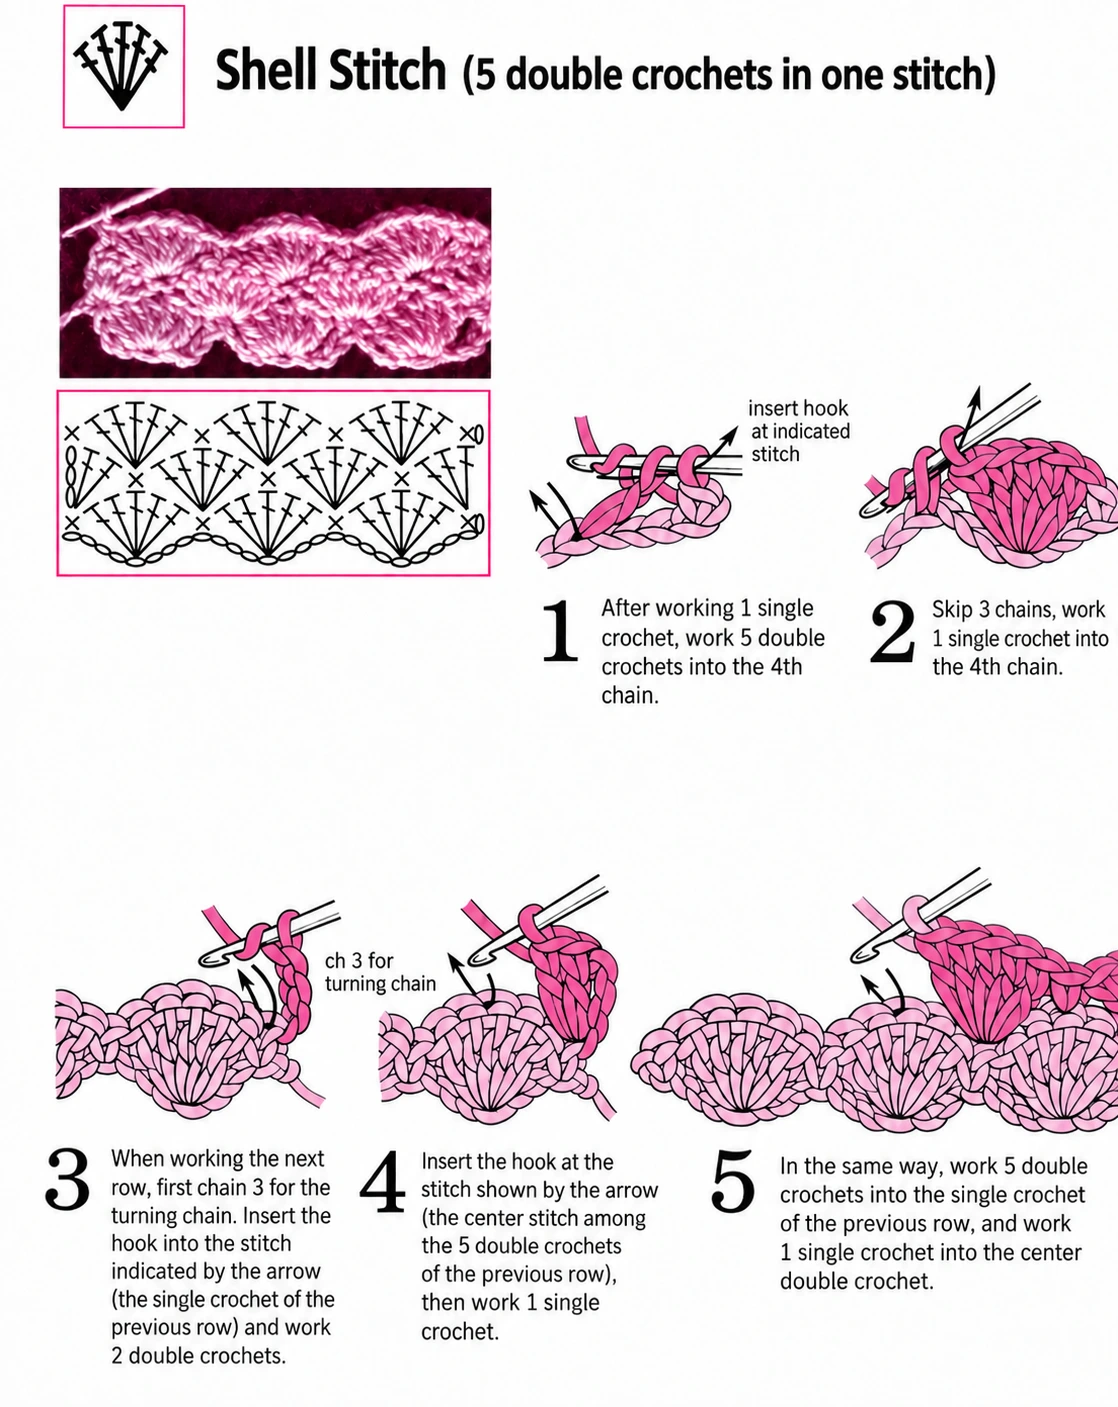
A picot makes a small point on an edge. A common version chains three and joins back with a slip stitch, but the exact join location must be stated. The reference charts show several picot variants; their star or triangle symbols are not interchangeable instructions.
More textures in the reference
- Crossed stitches change the order in which bases are worked. Keep track of the skipped base that the crossing stitch returns to.
- Loop stitches leave deliberate long loops on one face. Maintain a consistent loop length and do not cut loops unless the chosen method is intended for cut fringe.
- Reverse single crochet works back along an edge; for a right-handed crocheter this is commonly left to right.
- Filet and chain mesh combine solid stitches with planned spaces. Count spaces as well as posts.
- Tall Y-shaped stitches, bullion stitches and elongated-loop lace use specialised constructions. Their diagrams need their own full instructions rather than a guessed English label.
The letter Q is not enough to specify a texture. Confirm the component stitch, number of repetitions, insertion point and closing method.
Reference notes
Adapted from the texture-stitch and openwork sections of the supplied I Want to Learn Crochet (Chinese-language reference) and the advanced-letter chart. This guide groups the main constructions rather than reproducing every decorative variation.
Step illustrations and photographs are excerpts from the supplied reference materials credited below. In-image instructional text has been translated into English and the supplied images enhanced with AI assistance. The English captions explain the pictured actions. Select a step image to view it at full size.
How to Increase and Decrease in Crochet: sc, hdc and dc
Increases add width or circumference. Decreases remove it. Together they shape rounded heads, leaves, petals and clothing pieces. The useful habit is to track how many old stitches an instruction uses and how many new tops it produces.
In this guide
One stitch becomes two / Two stitches become one / The same principle applies to taller stitches / Check a repeat before crocheting it / Put shaping where the pattern needs it / When the count is wrong
One stitch becomes two
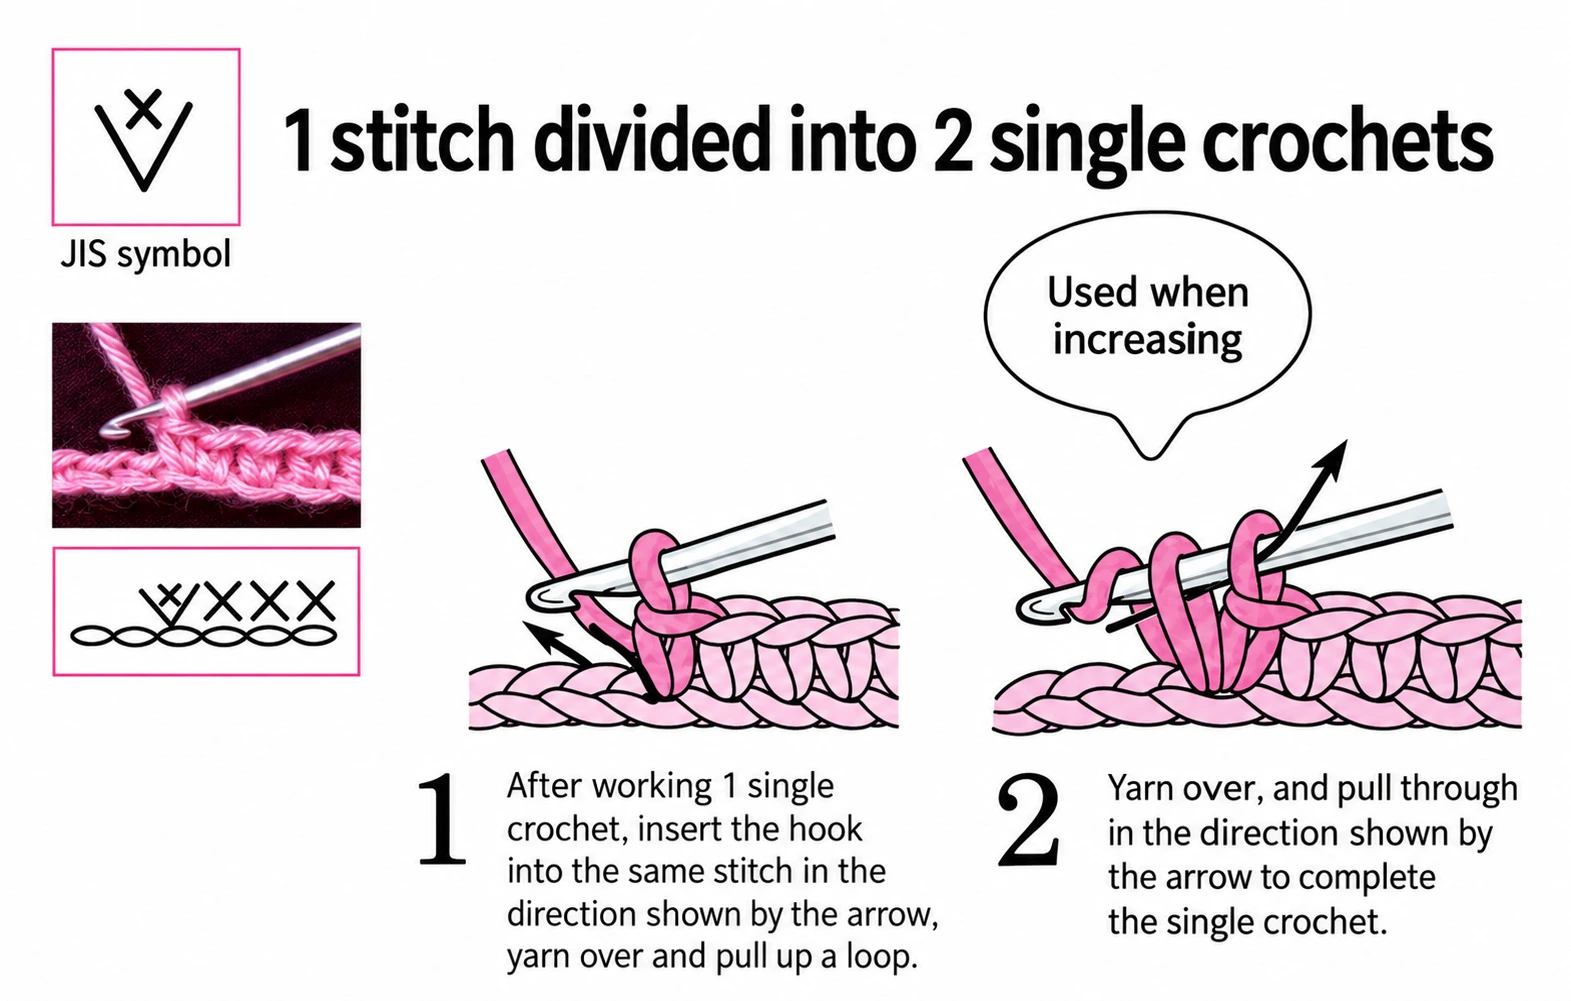
For a single-crochet increase, complete one single crochet in the next stitch, then complete another in exactly the same stitch. One base stitch produces two new stitches, so the total grows by one.
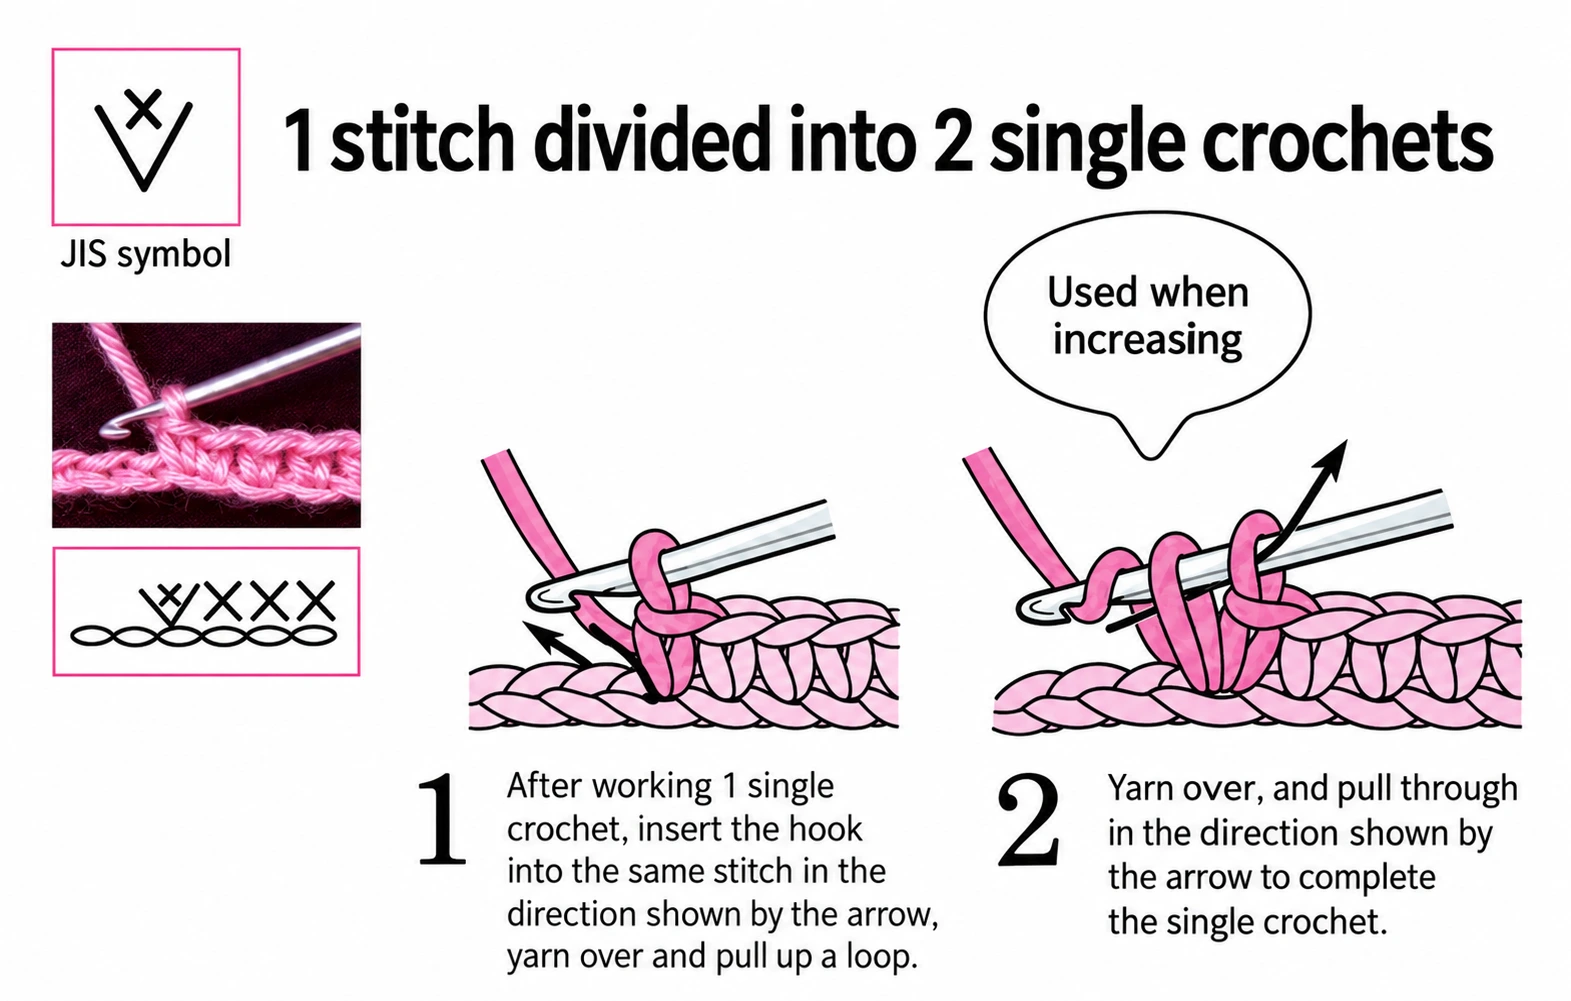
The reference letter V describes this operation. W makes three single crochets in one stitch, adding two to the total. Do not read “two stitches in one” as an increase of two; one stitch would already have been there.
Two stitches become one
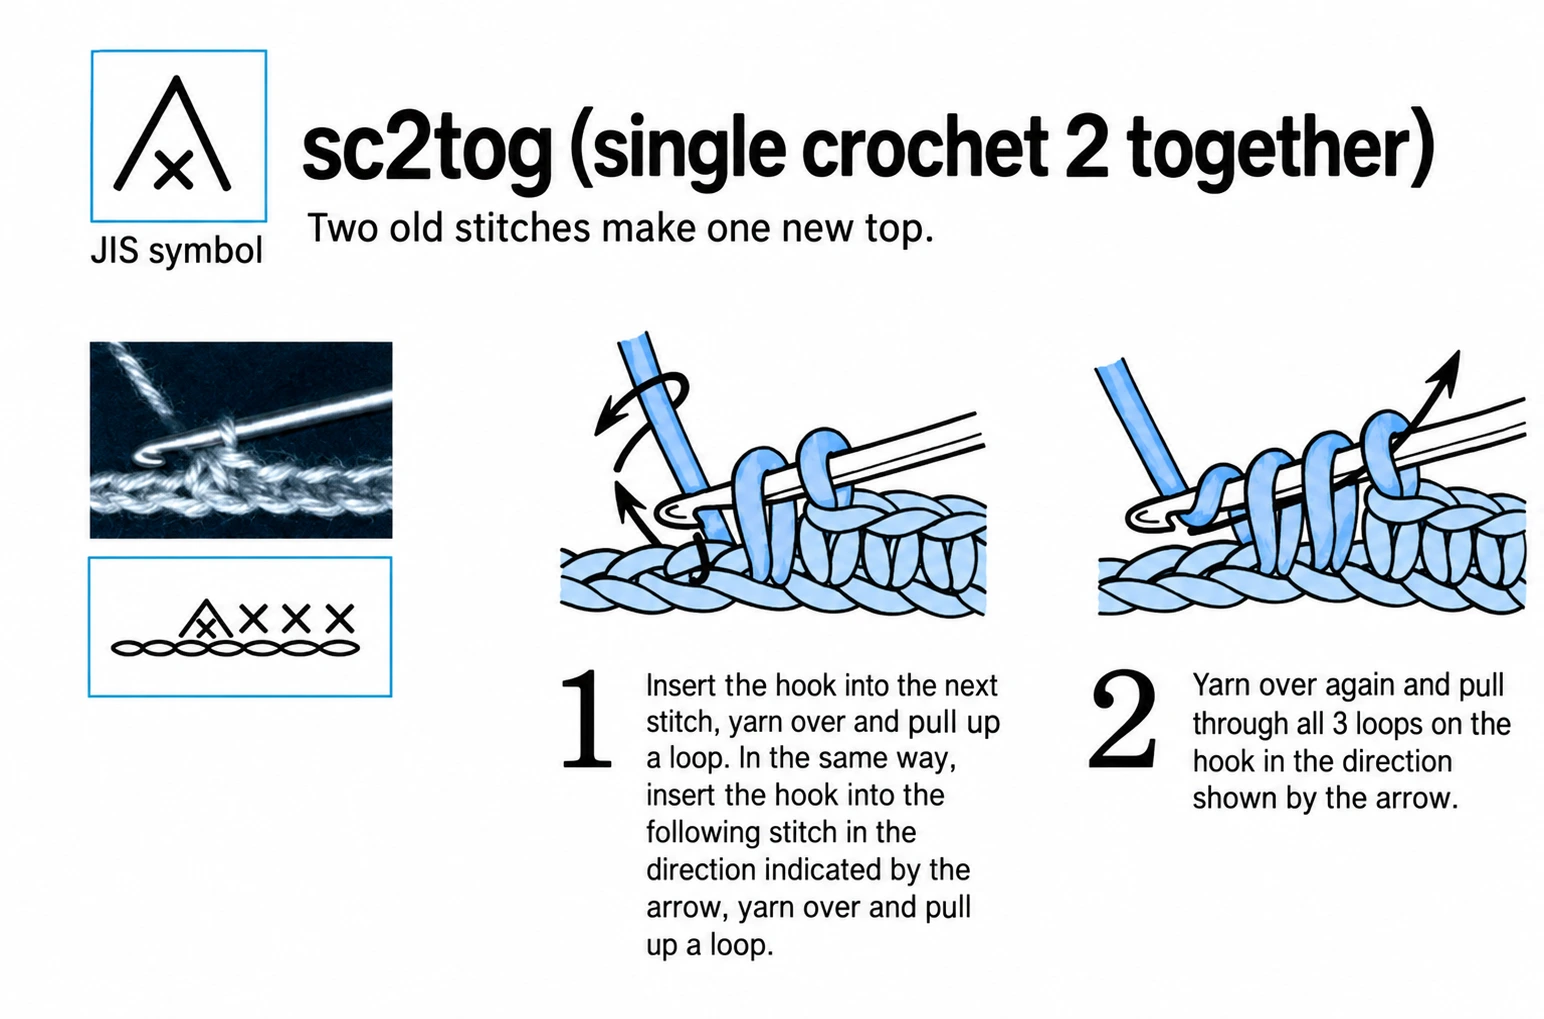
To work a regular sc2tog, insert the hook into the first stitch, yarn over and draw up a loop. Repeat in the next stitch. With three loops on the hook, yarn over and draw through all three. Two base stitches now share one top.
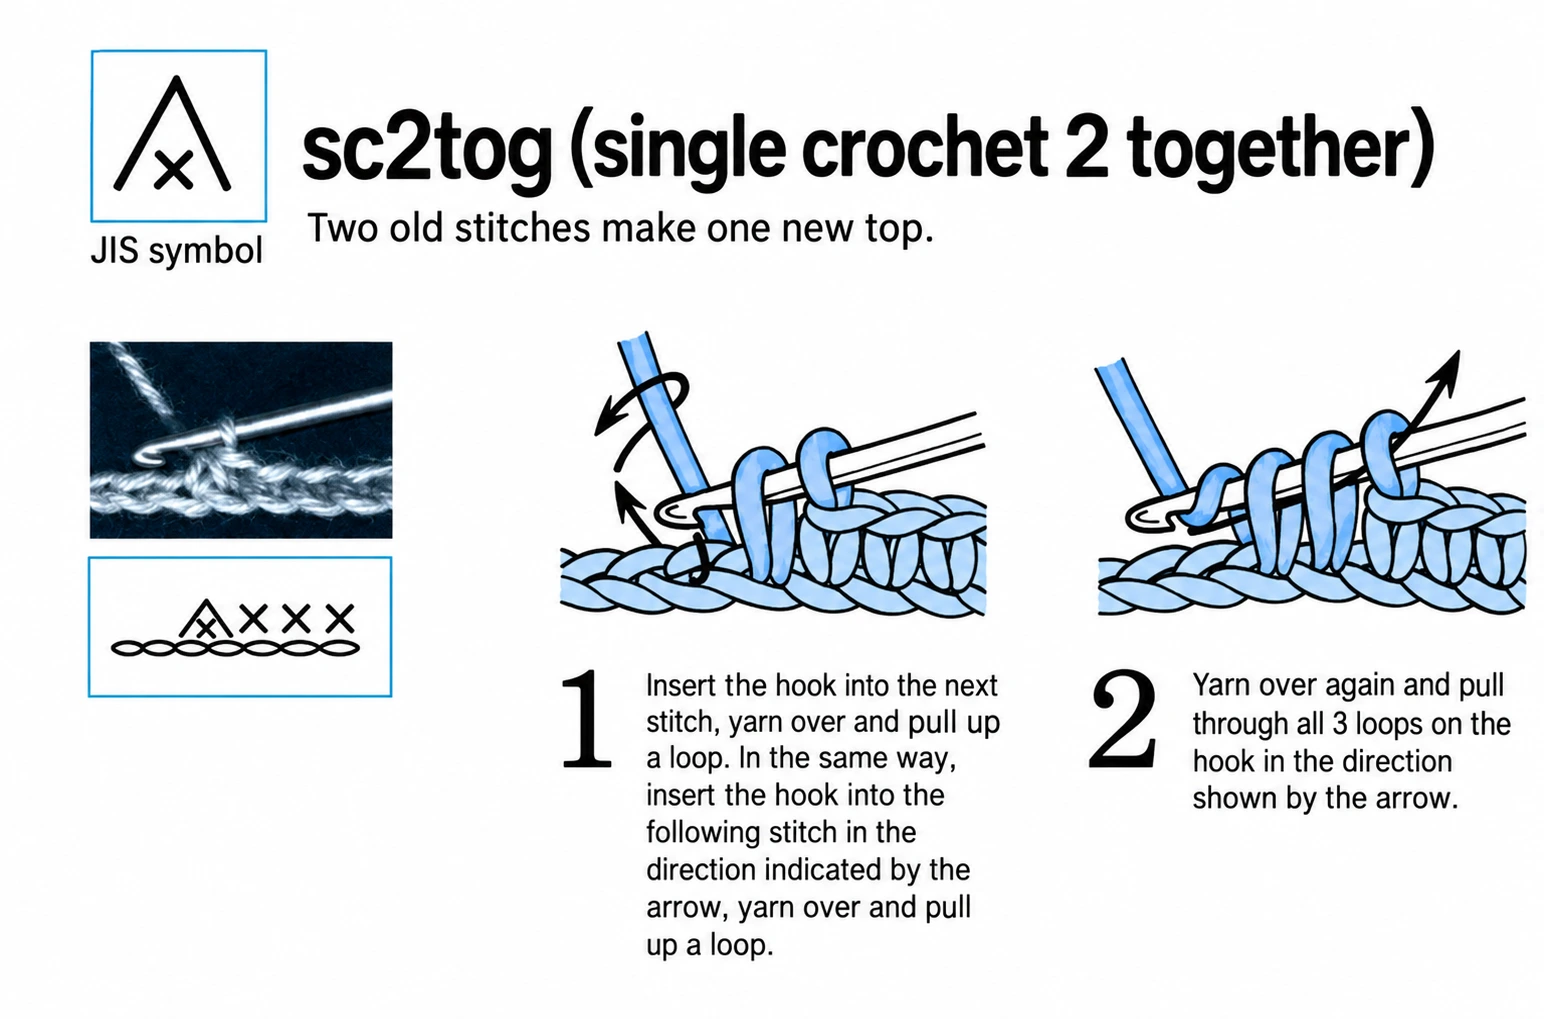
For sc3tog, draw up a loop in each of three stitches before completing the decrease through the four loops on the hook. This removes two stitches from the total. The reference letters A and M represent these two operations.
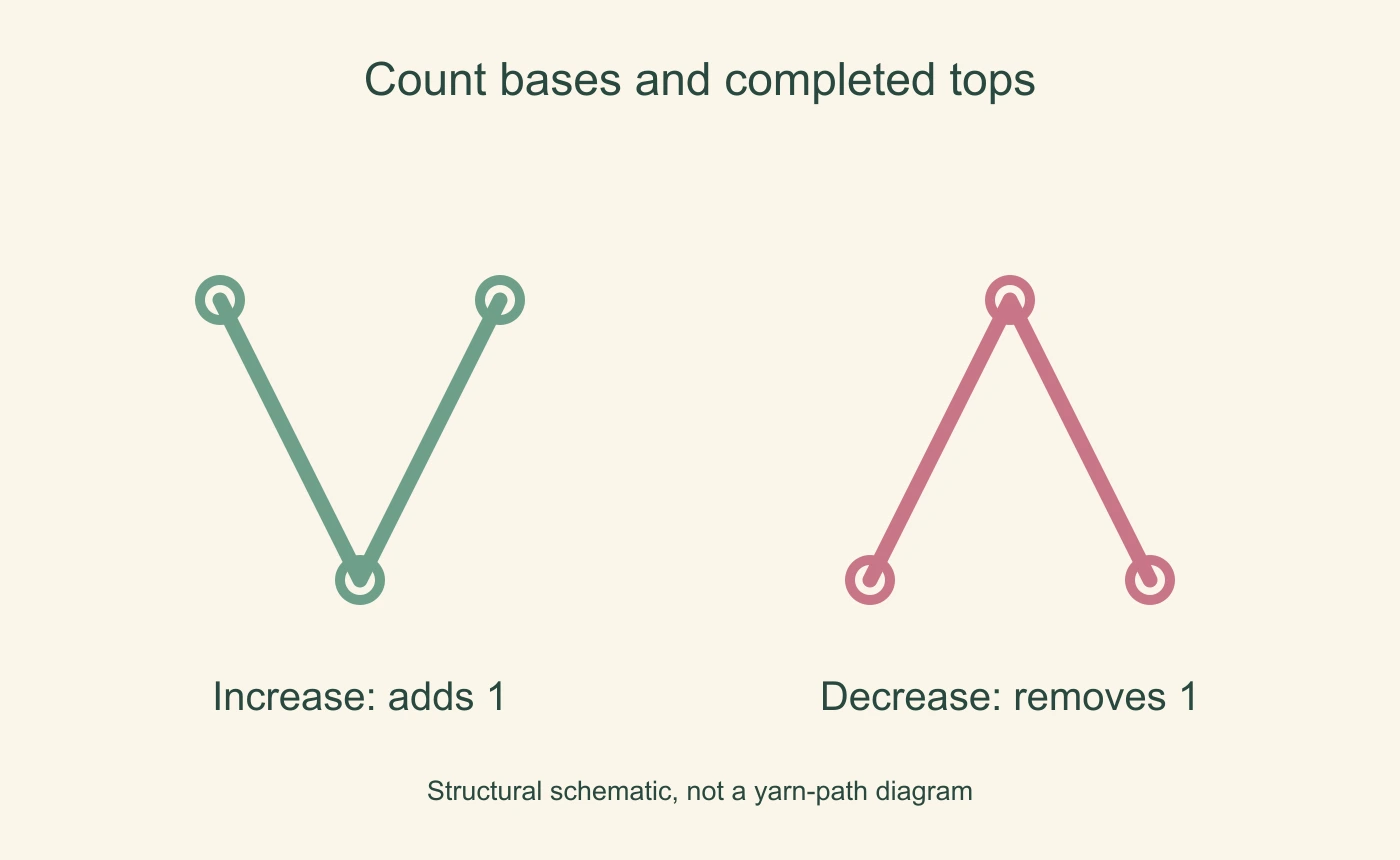
The same principle applies to taller stitches
| Stitch family | Two in one base | Two together |
|---|---|---|
| Single crochet | 2 sc in next st | sc2tog |
| Half double crochet | 2 hdc in next st | hdc2tog |
| Double crochet | 2 dc in next st | dc2tog |
| Treble crochet | 2 tr in next st | tr2tog |
For a double-crochet decrease, begin a double crochet in the first base but leave its last draw-through unfinished. Do the same in the second base, then yarn over and pull through the three remaining loops. Both unfinished stitches close together.
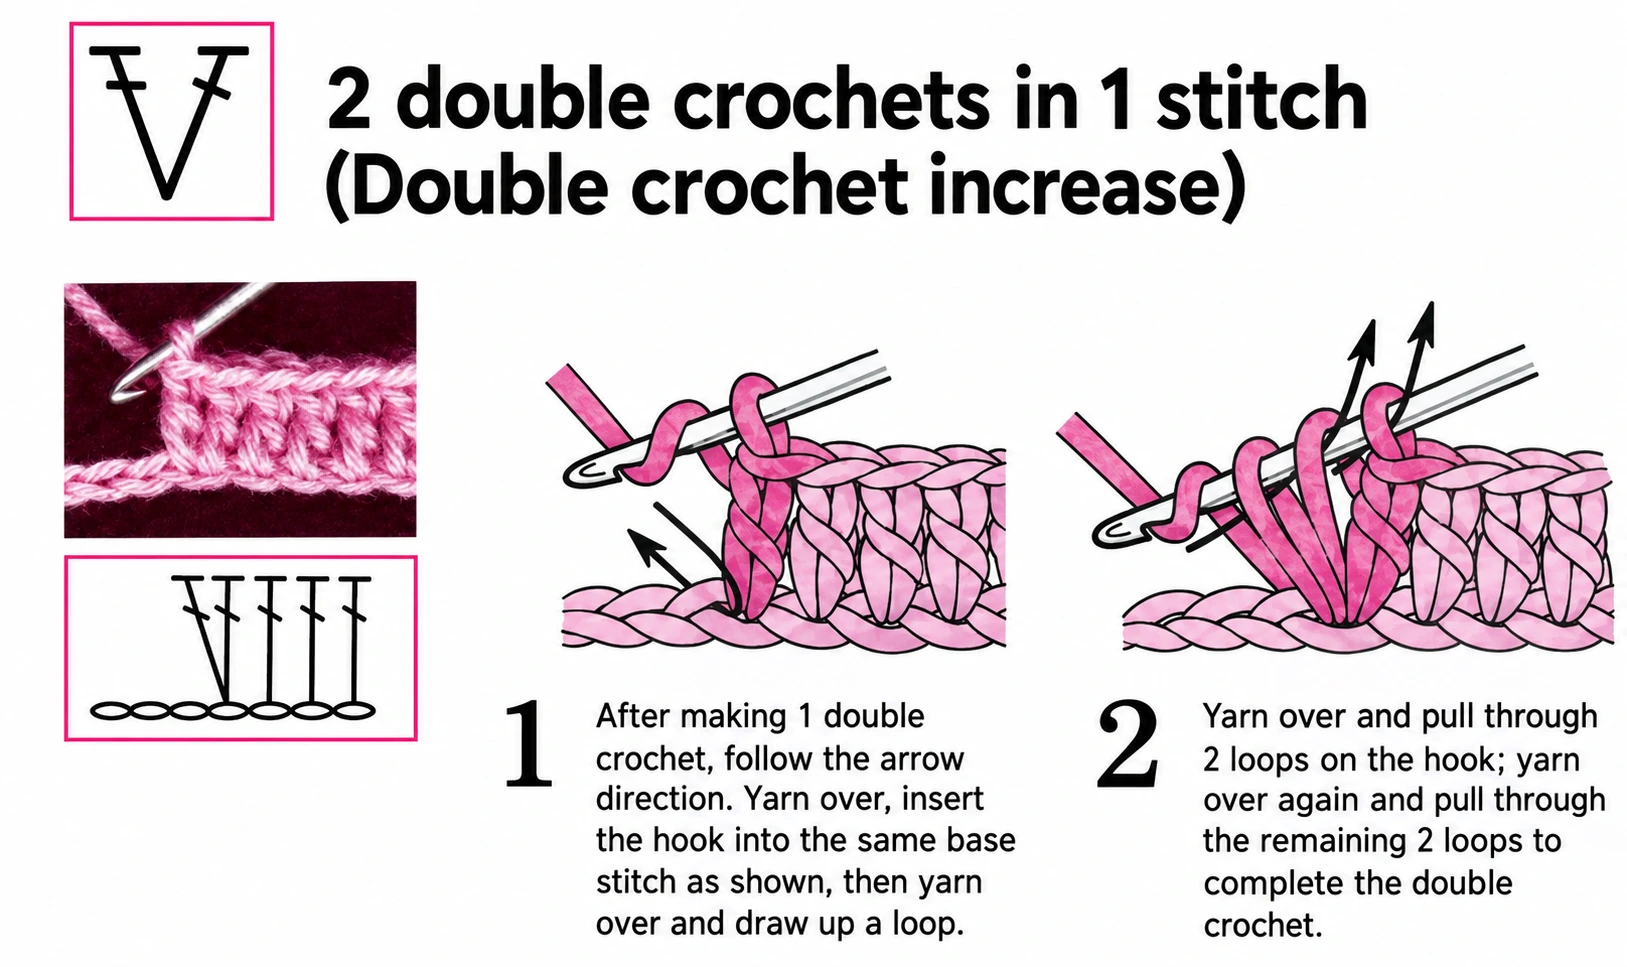
A group of unfinished stitches worked in the same base can make a raised cluster instead. It may look similar at the top, but it does not consume several neighbouring base stitches in the same way.
Check a repeat before crocheting it
Suppose a round has 18 stitches and says “(2 sc, inc) six times.” Each repeat uses three old stitches: two for the ordinary stitches and one for the increase. It creates four new stitches. Six repeats therefore use all 18 old stitches and produce 24 new ones.
Now take 24 stitches and work “(2 sc, sc2tog) six times.” Each repeat uses four old stitches and creates three new stitches. The result is 18.
These examples illustrate the arithmetic, not a complete doll pattern. Use the shaping schedule belonging to the project you are making.
Put shaping where the pattern needs it
The reference shows increases and decreases at the beginning, middle and end of rows. Their position matters: repeated changes at the same edge can create a slope, while changes around a round affect its outline.
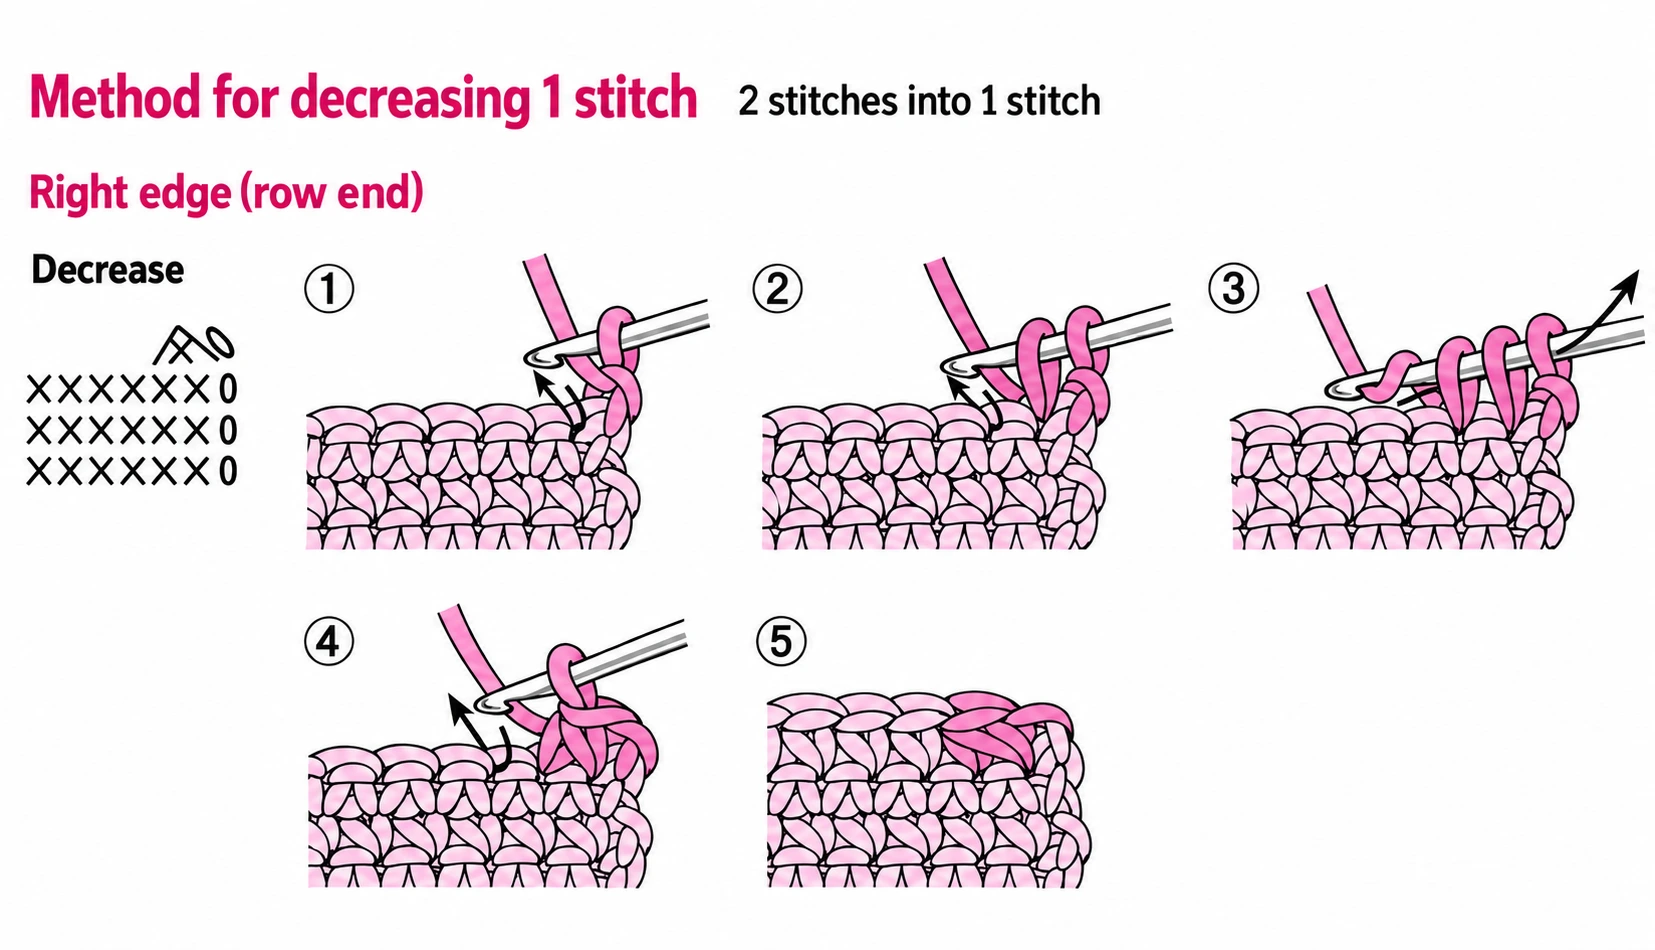
Do not move increases just to make the instruction easier to remember. A leaf tip or shaped head may depend on their placement. Use extra markers to separate repeats when a round is difficult to track.
When the count is wrong
- Recount from the start marker.
- Check whether an increase used the same base twice.
- Check whether the decrease consumed the intended number of bases.
- Look for an accidentally counted turning chain or joining slip stitch.
- Correct the error before stuffing or attaching another piece.
Reference notes
Adapted from the increase and decrease sections of the supplied I Want to Learn Crochet (Chinese-language reference) and its accompanying letter charts. The counting examples are written for this guide.
Step illustrations and photographs are excerpts from the supplied reference materials credited below. In-image instructional text has been translated into English and the supplied images enhanced with AI assistance. The English captions explain the pictured actions. Select a step image to view it at full size.
Crochet Rows vs Rounds: Turning Chains, FLO, BLO and Third Loop
Knowing the stitch is only half of reading a pattern. You also need to know where to insert the hook, which direction to work and when to turn. These choices change the surface of the fabric even when the stitch name stays the same.
In this guide
Rows and three ways of working rounds / What does a turning chain count as? / Find the top V / The chain bump and the half-double-crochet third loop / Front post and back post are different from FLO and BLO / Keep the count steady
Rows and three ways of working rounds
| Method | What happens at the end |
|---|---|
| Back-and-forth rows | Turn the fabric and work across the other face |
| Continuous spiral | Continue into the next round without a slip-stitch join |
| Joined rounds | Join as directed, then begin the next round |
| Joined and turned rounds | Join, turn and begin again from the opposite face |
In a spiral, place a marker in the first stitch and move it up as you begin each new round. In joined rounds, keep the joining slip stitch separate from the first working stitch unless the instructions explicitly count it.
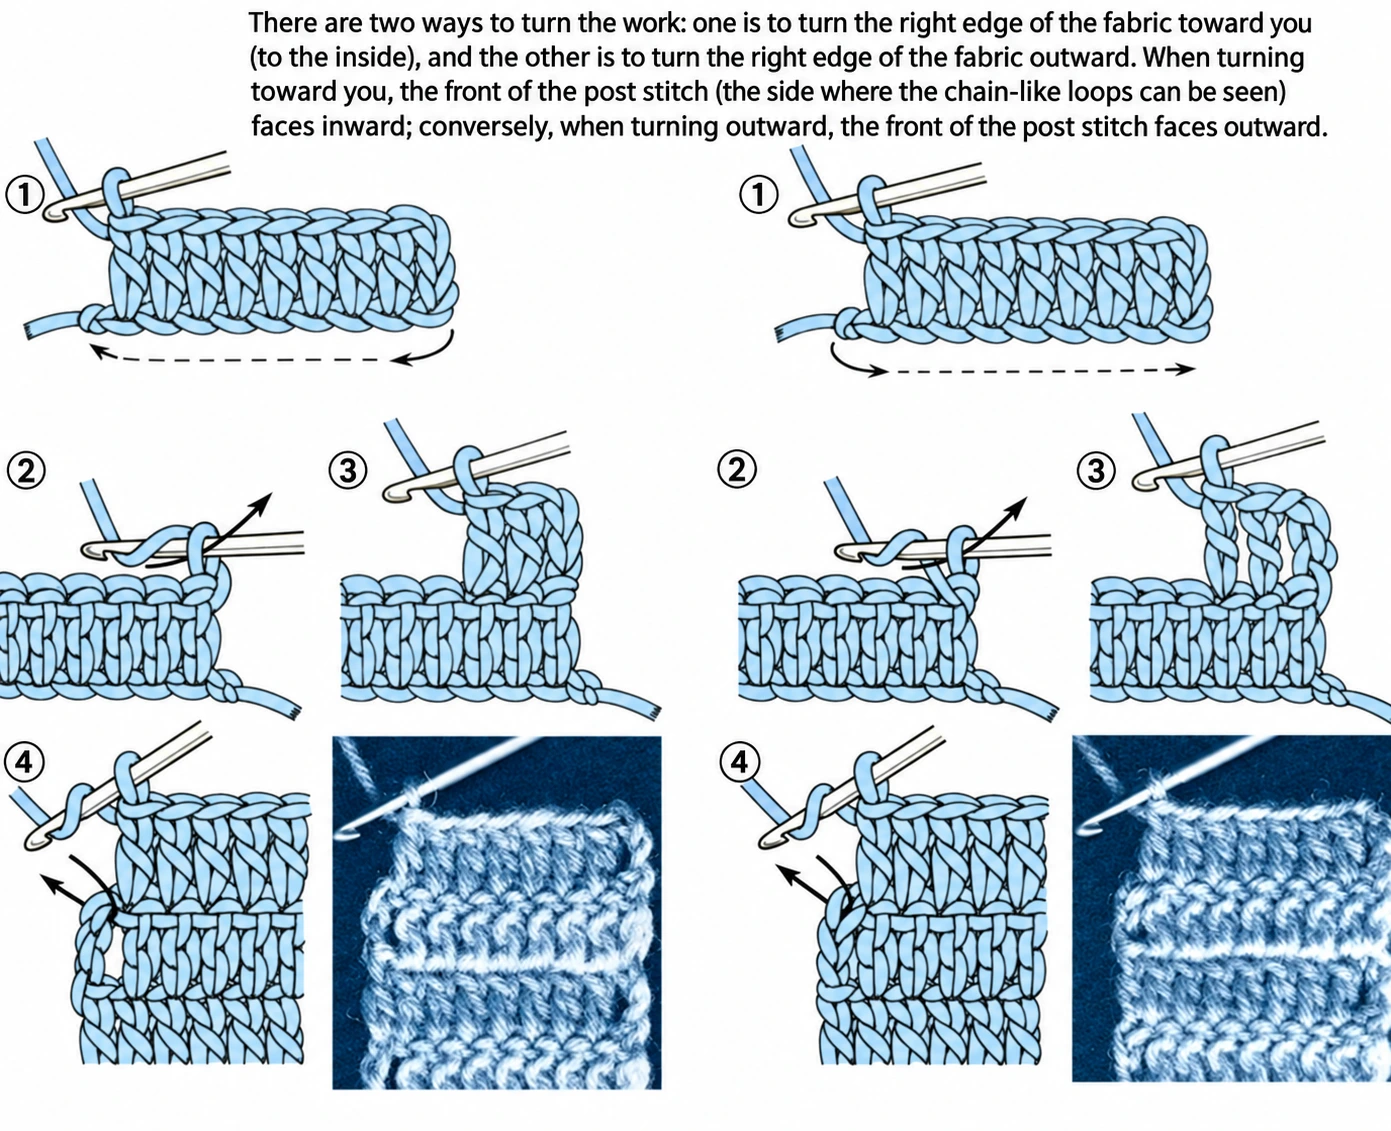
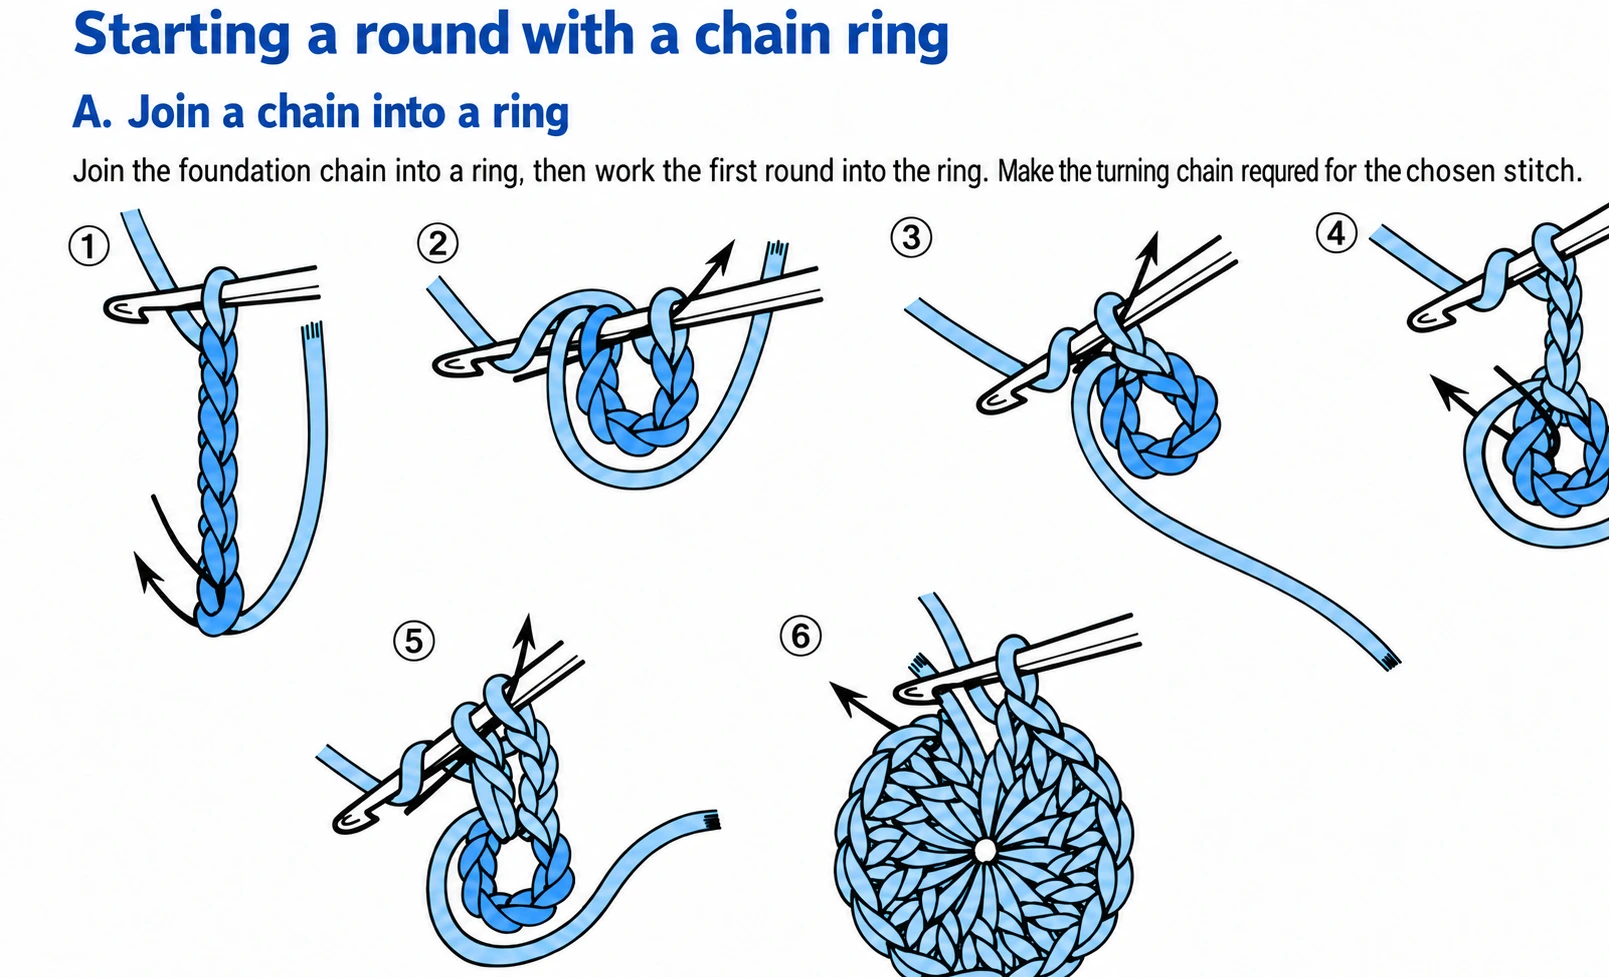
The reference also shows flat pieces worked repeatedly from the same side, with yarn cut and rejoined. This is a deliberate construction choice rather than the default for an ordinary practice swatch.
What does a turning chain count as?
A turning chain brings the hook up to the height of the next row. Some patterns count it as a stitch; others do not. The supplied book commonly counts the chains for taller stitches, but that convention is not universal.
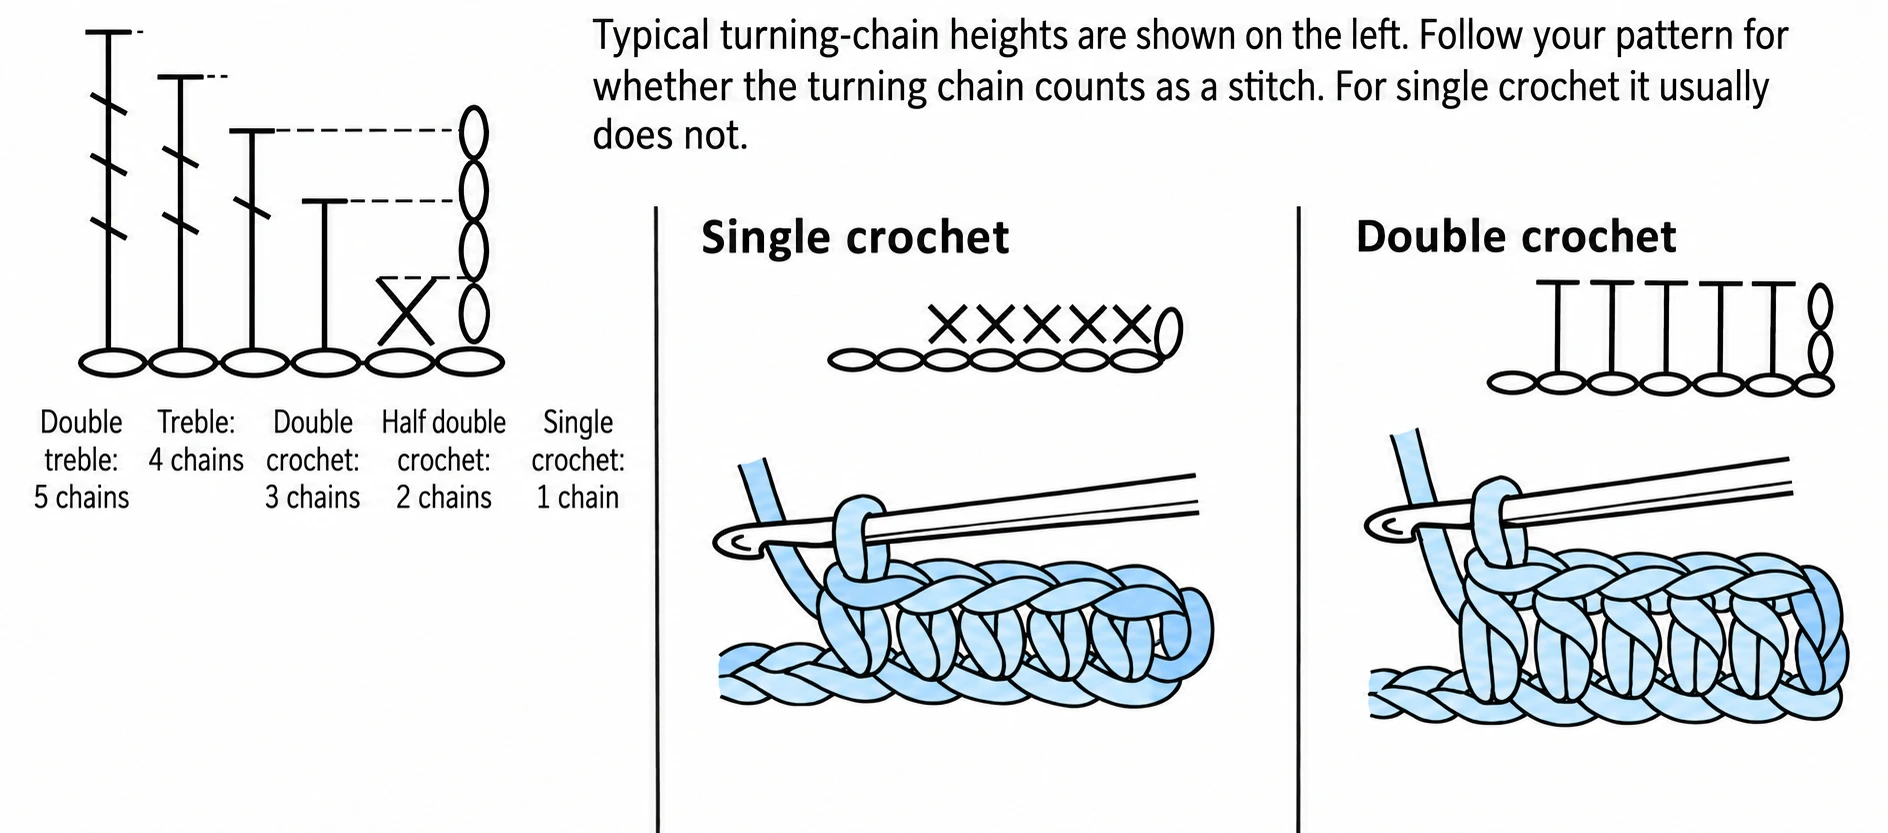
When it does count, it occupies the first stitch position and may need to be worked into at the end of the following row. When it does not count, work the first actual stitch into the first base stitch as instructed. Mark both row ends while learning so you can find them again.
Find the top V
Hold the fabric as you are about to work into it. The top of an ordinary stitch has two strands forming a V. The front loop is nearer you; the back loop is farther away. Working under both is the usual choice unless the pattern specifies otherwise.
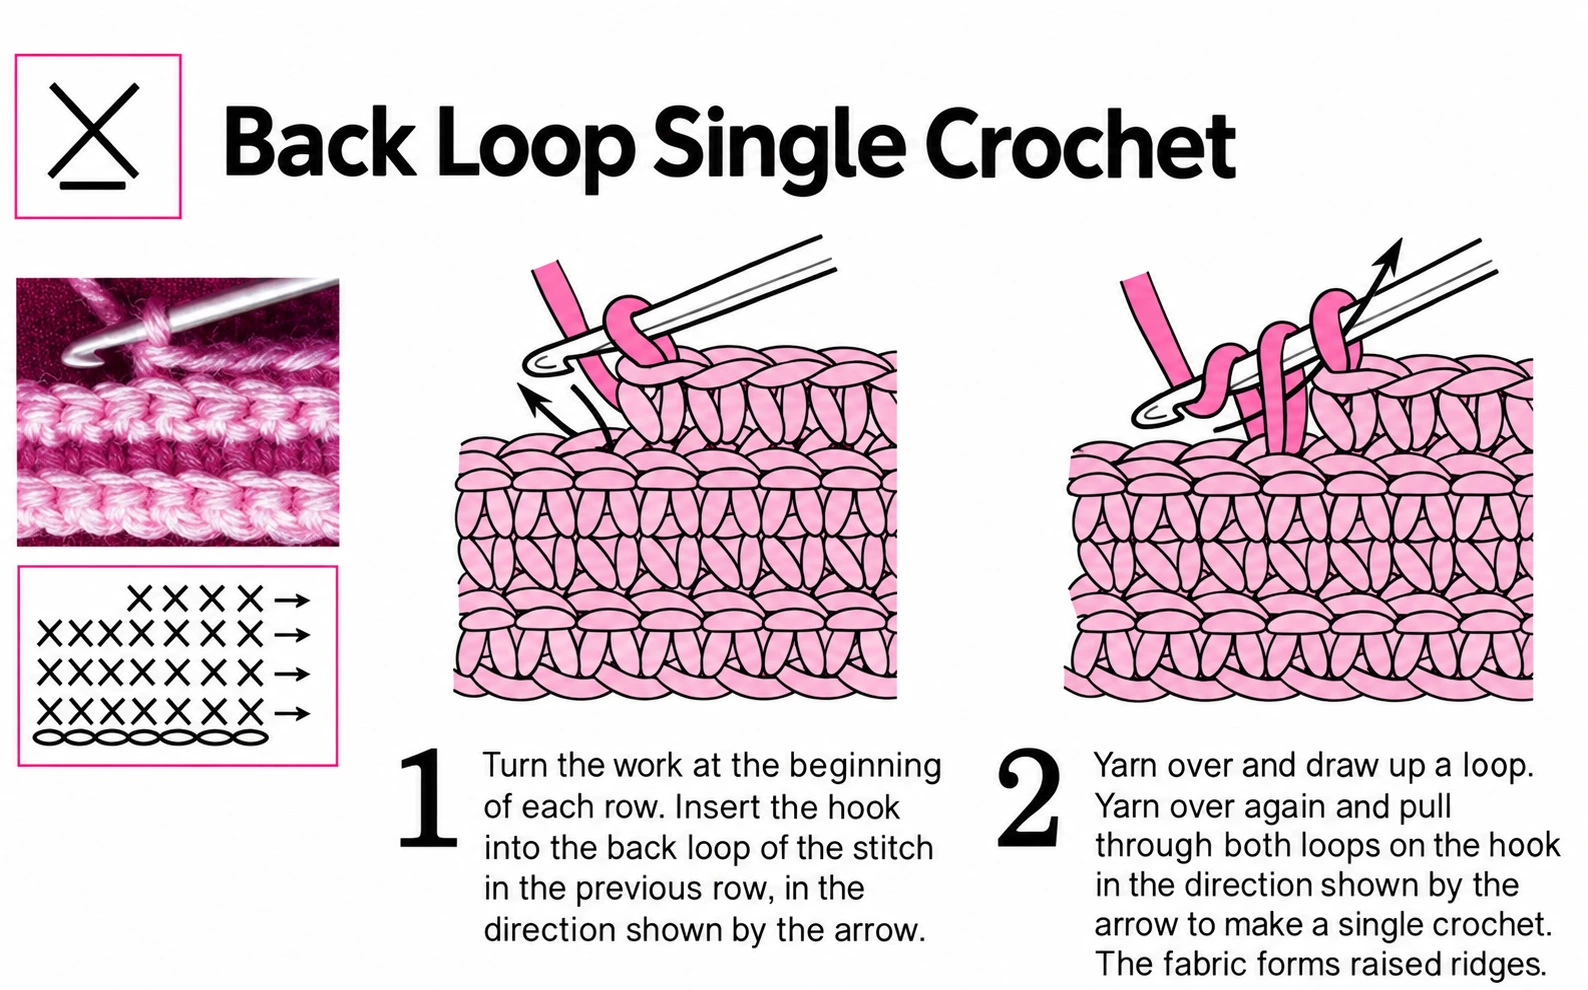
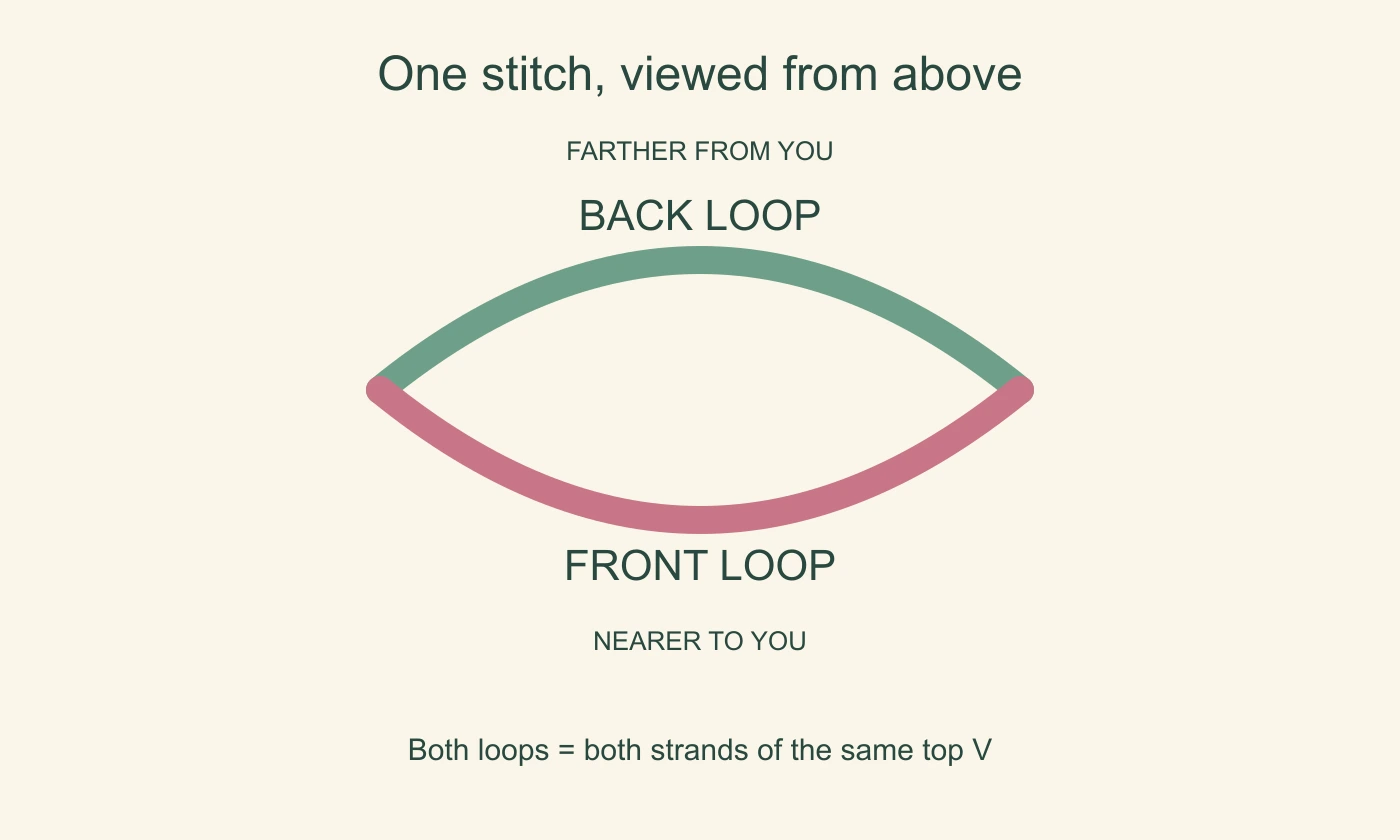
- FLO means work under the front loop only.
- BLO means work under the back loop only.
- Both loops means use the two strands together.
Turning the fabric changes which face is toward you. Do not permanently identify a loop by its colour or by which side faced you on the previous row.
The chain bump and the half-double-crochet third loop
The small bump behind a foundation chain is separate from its front V. Working into that bump can leave a neat chain edge. The extra bar below a half double crochet’s top V is another structure again. These are not interchangeable instructions.
Front post and back post are different from FLO and BLO
A post stitch goes around the vertical body of a stitch, not through one of its top loops. For a front-post stitch, enter from the front, go behind the target post and return to the front. For a back-post stitch, enter from the back, pass across the front of the post and return to the back. Finish the specified stitch with that post as its anchor.
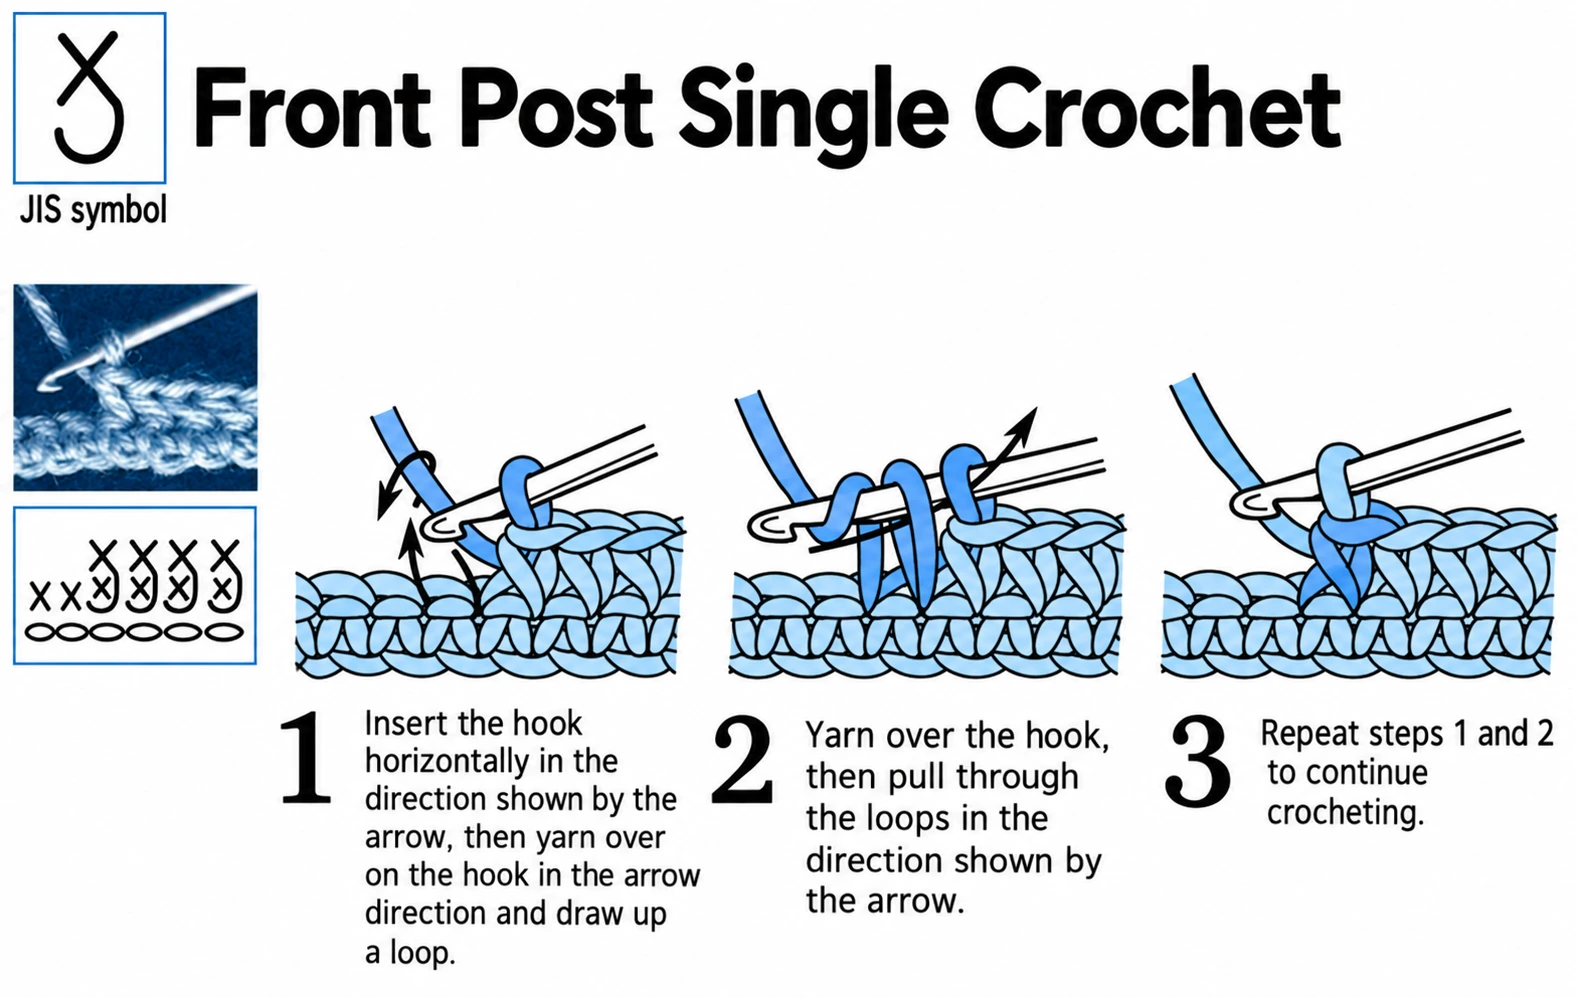
In the supplied advanced chart, WX, WT and WF refer to front-post versions; NX, NT and NF refer to back-post versions. Use that key only for patterns that define it the same way.
Keep the count steady
Count completed top Vs, not the loop on the hook. Check both ends of every row and the marked start of each round. If the fabric suddenly grows wider, look for an extra stitch in a turning chain or join. If it narrows, check whether an edge stitch was missed.
Reference notes
Adapted from the supplied loop definitions, advanced-letter chart and the row, round, turning and insertion-point chapters of I Want to Learn Crochet (Chinese-language reference). Front and back are described relative to the fabric as it is being worked.
Step illustrations and photographs are excerpts from the supplied reference materials credited below. In-image instructional text has been translated into English and the supplied images enhanced with AI assistance. The English captions explain the pictured actions. Select a step image to view it at full size.
6 Basic Crochet Stitches for Beginners: US Terms and Pictures
Chain, slip stitch, single crochet, half double crochet, double crochet and treble crochet form a useful foundation for flowers, small decorations and amigurumi. Learn their movements on a small practice piece before following a shaped project.
This guide uses US names. You will also see the Chinese reference letters CH, SL, X, T, F and E. The loop already sitting on your hook is the working loop; it is not an extra completed stitch.
In this guide
Prepare your practice yarn / 01. Chain — ch / CH / 02. Slip stitch — sl st / SL / 03. Single crochet — sc / X / 04. Half double crochet — hdc / T / 05. Double crochet — dc / F / 06. Treble crochet — tr / E / Compare the movements / A small exercise
Prepare your practice yarn
Use smooth yarn, a matching hook and a stitch marker. Make a slip knot that can slide along the hook shaft. Hold the yarn gently enough to draw it through a loop without forcing the hook.
01. Chain — ch / CH
Catch the working yarn with the hook and draw it through the loop already on the hook. That makes one chain. Repeat to build a flexible foundation.
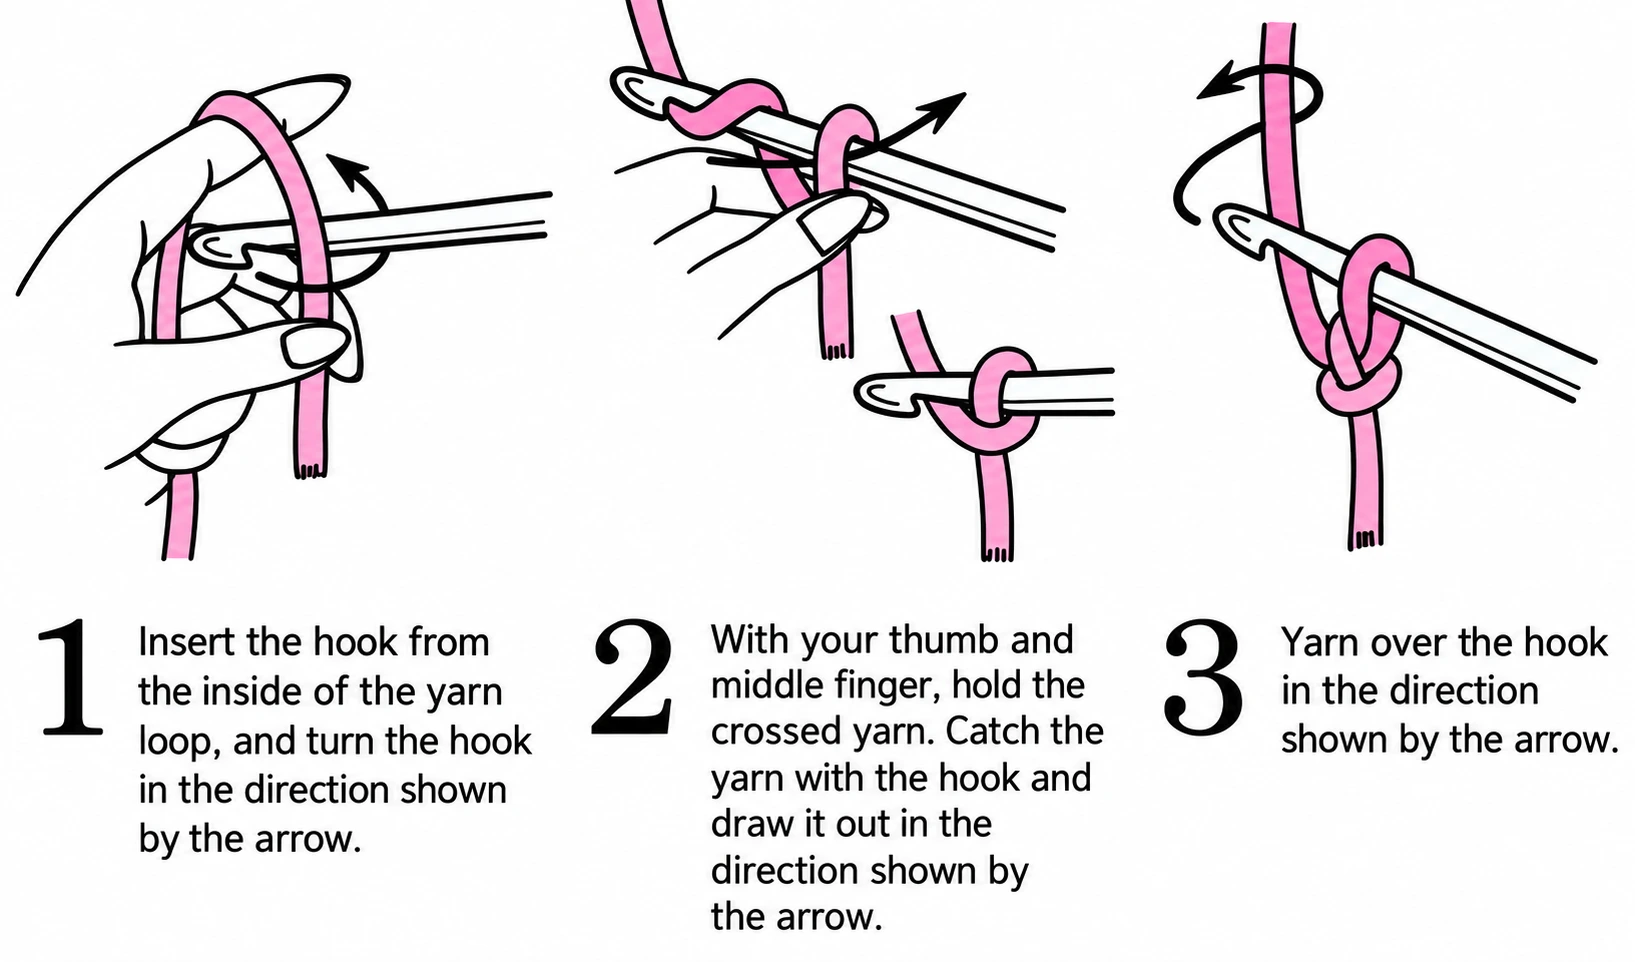
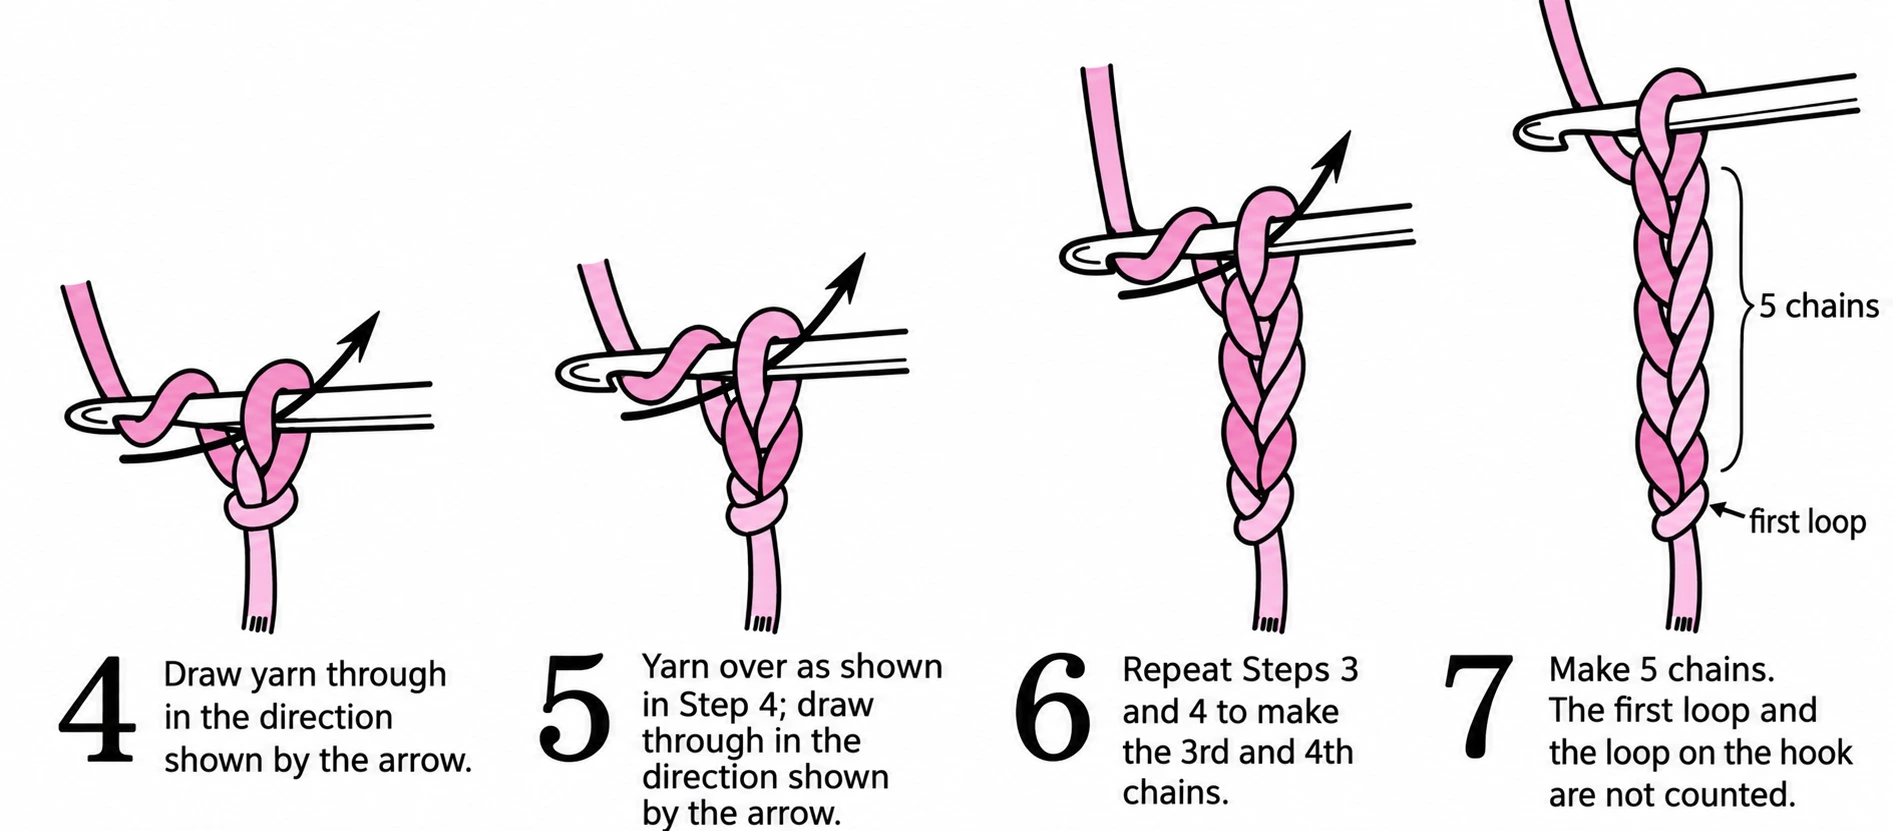
Count the completed V shapes, leaving out the slip knot and the working loop. A chain has a front V and a separate bump on its reverse. A pattern may tell you which part to use when working the first row.
02. Slip stitch — sl st / SL
Insert the hook into the specified stitch or space. Yarn over and pull through the insertion point and the loop on your hook in one movement.
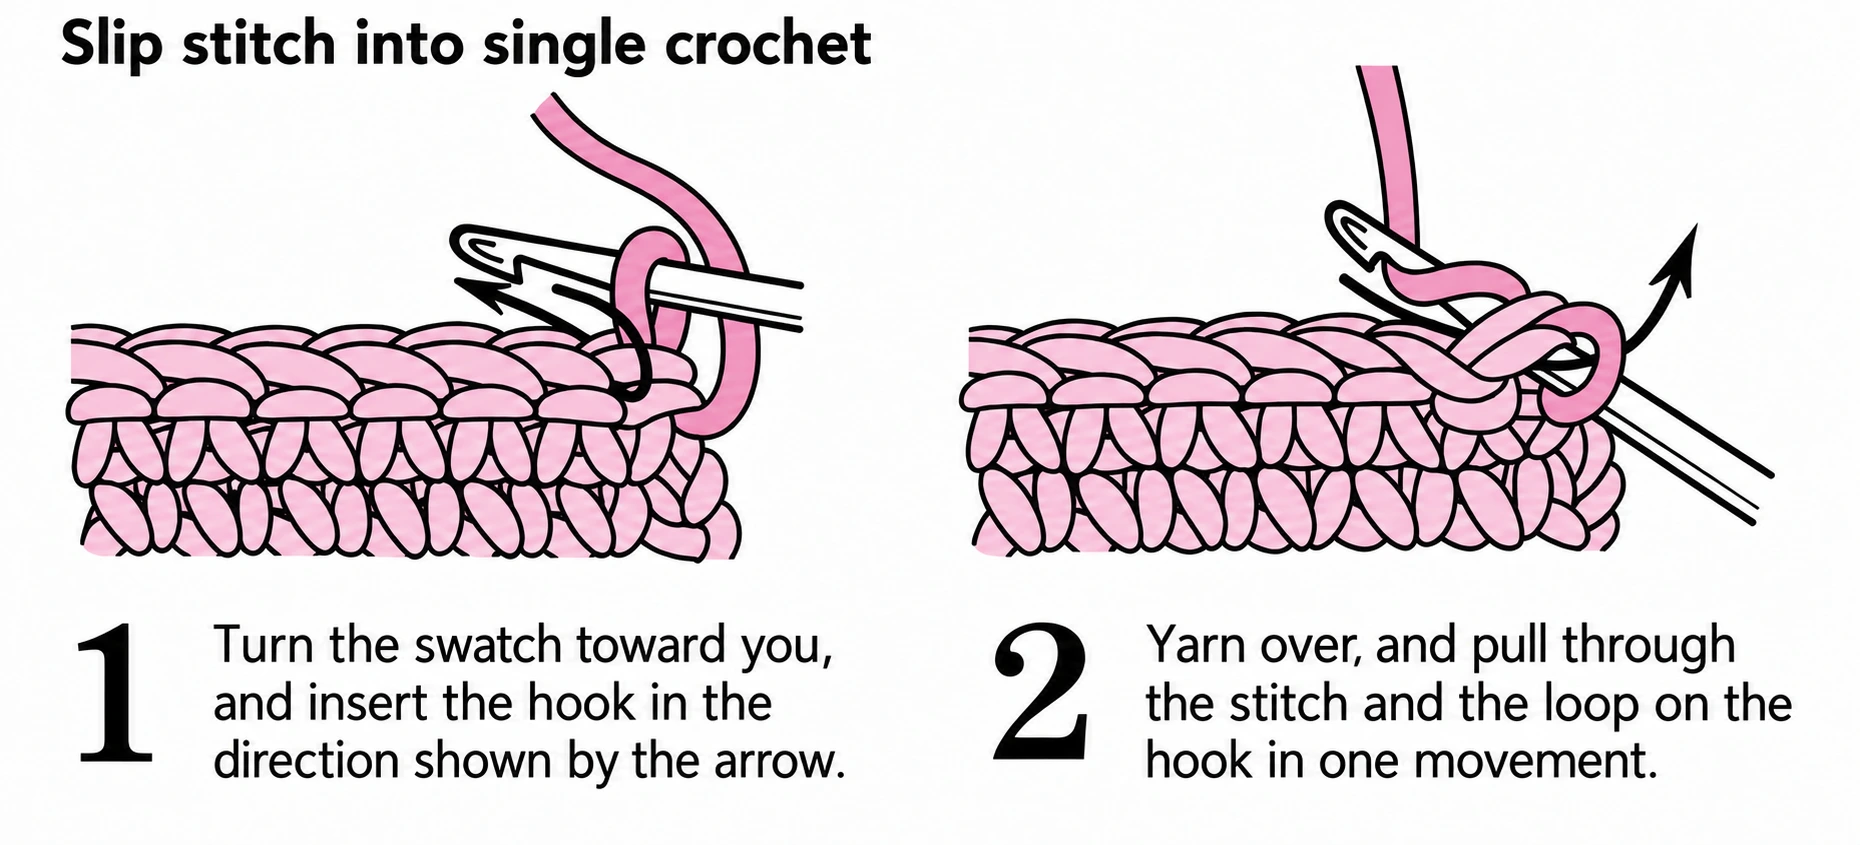
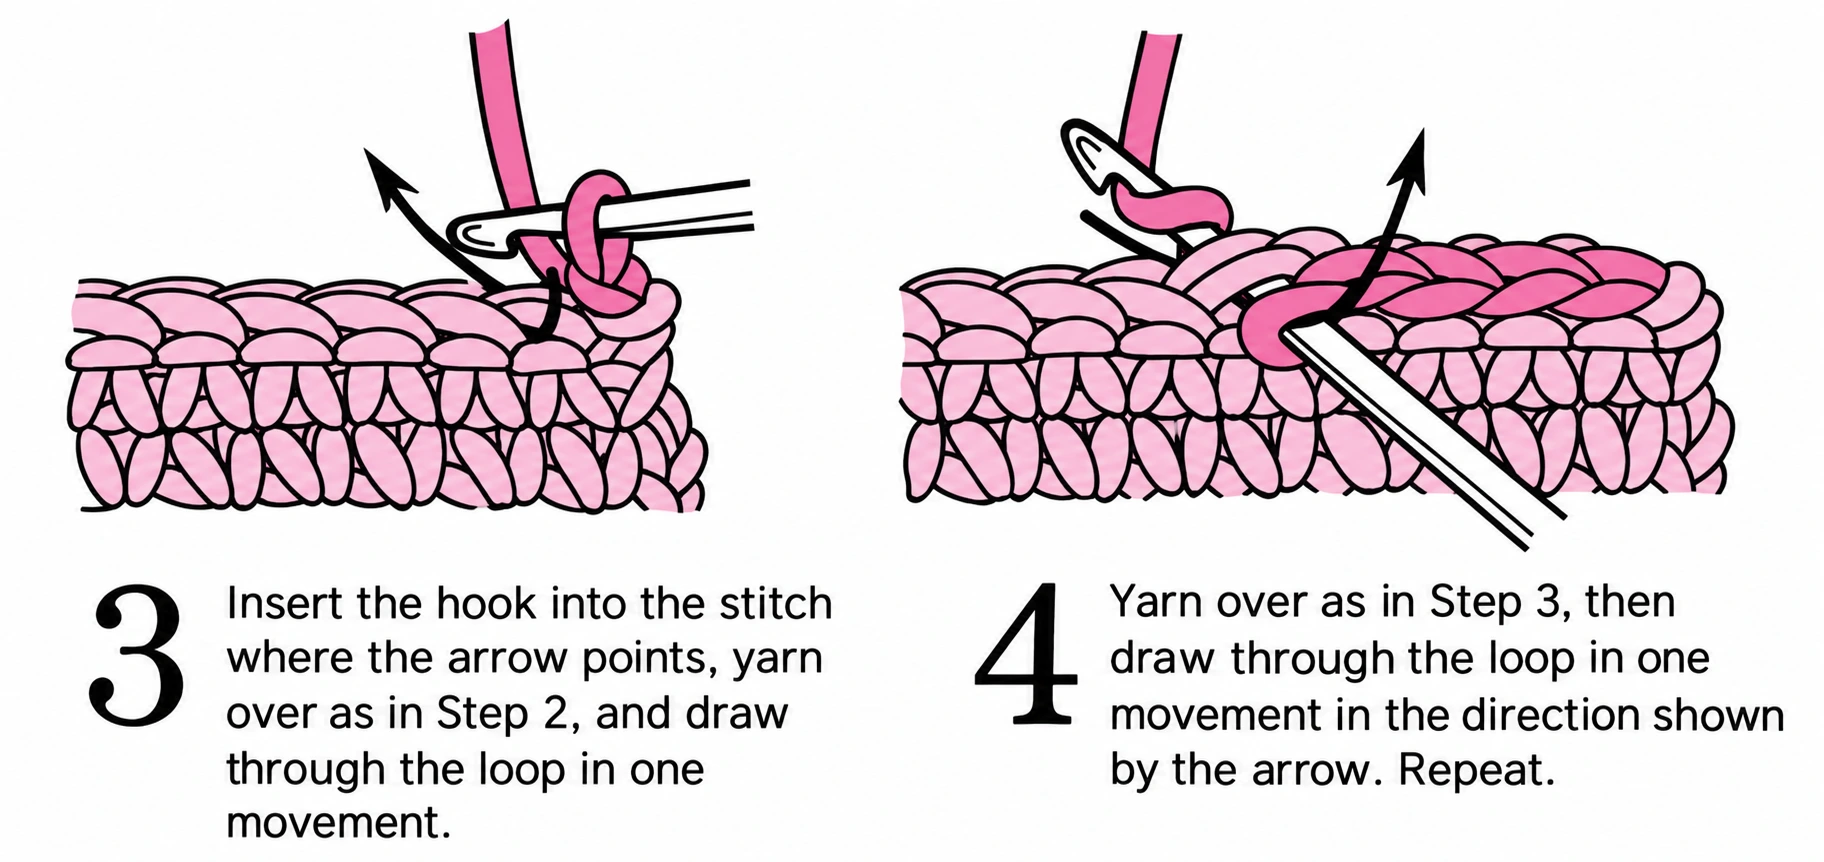
Slip stitches are useful for joining, moving along an edge or creating a low-profile finish. Keep them relaxed; an excessively tight slip stitch can be difficult to work into later.
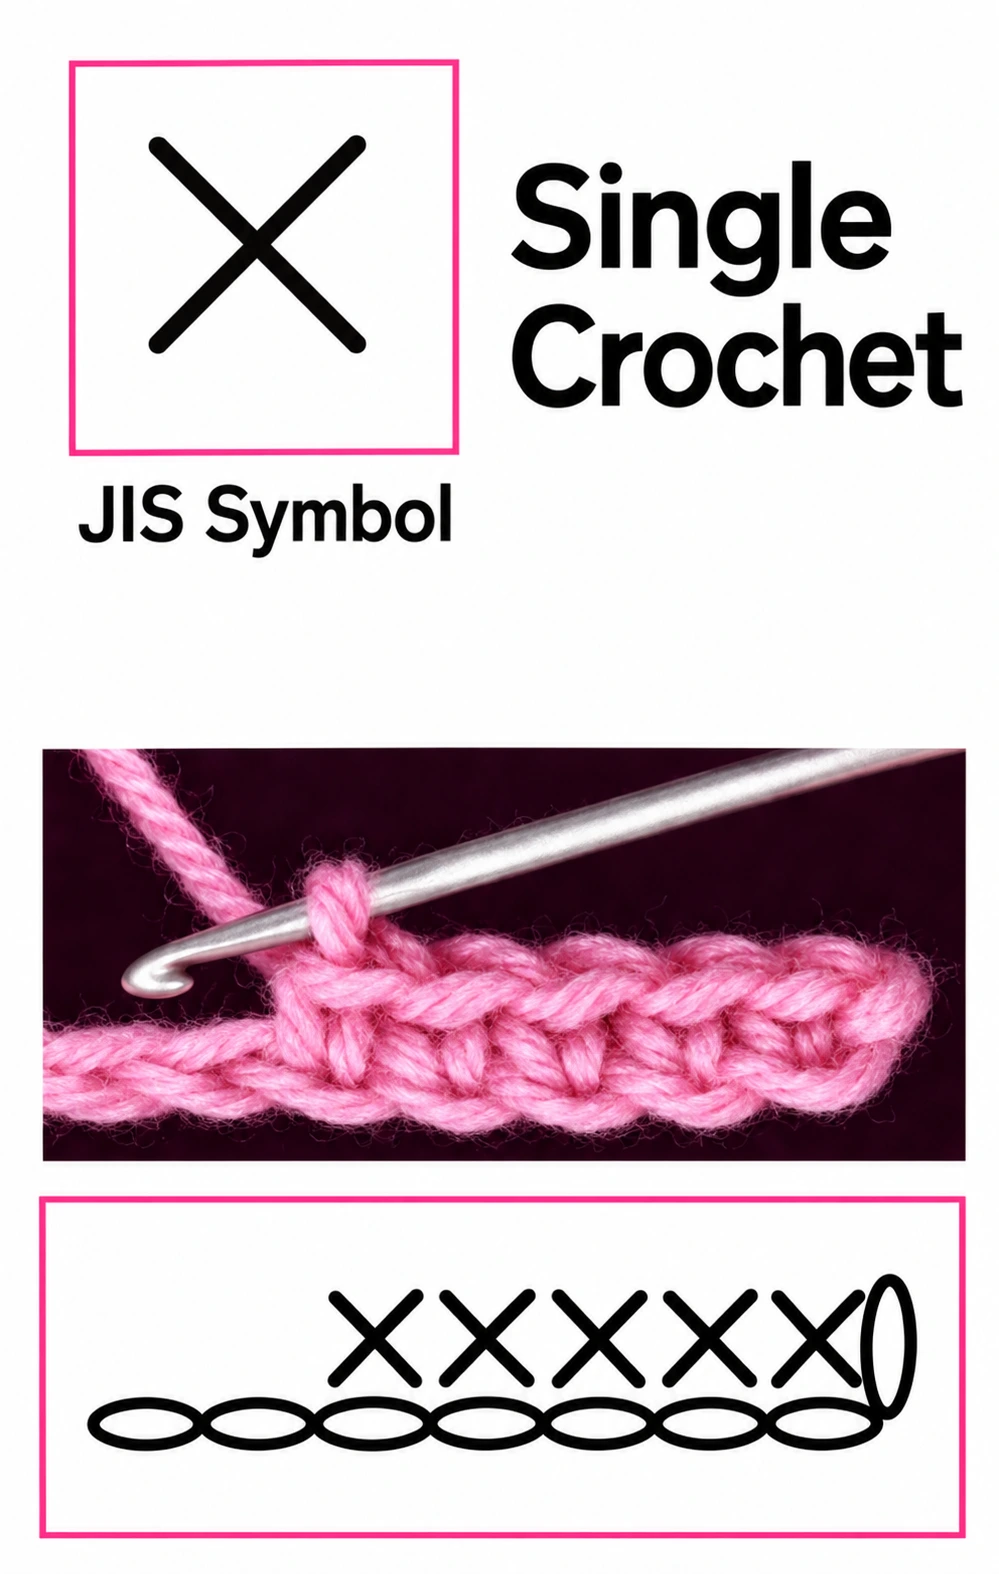
03. Single crochet — sc / X
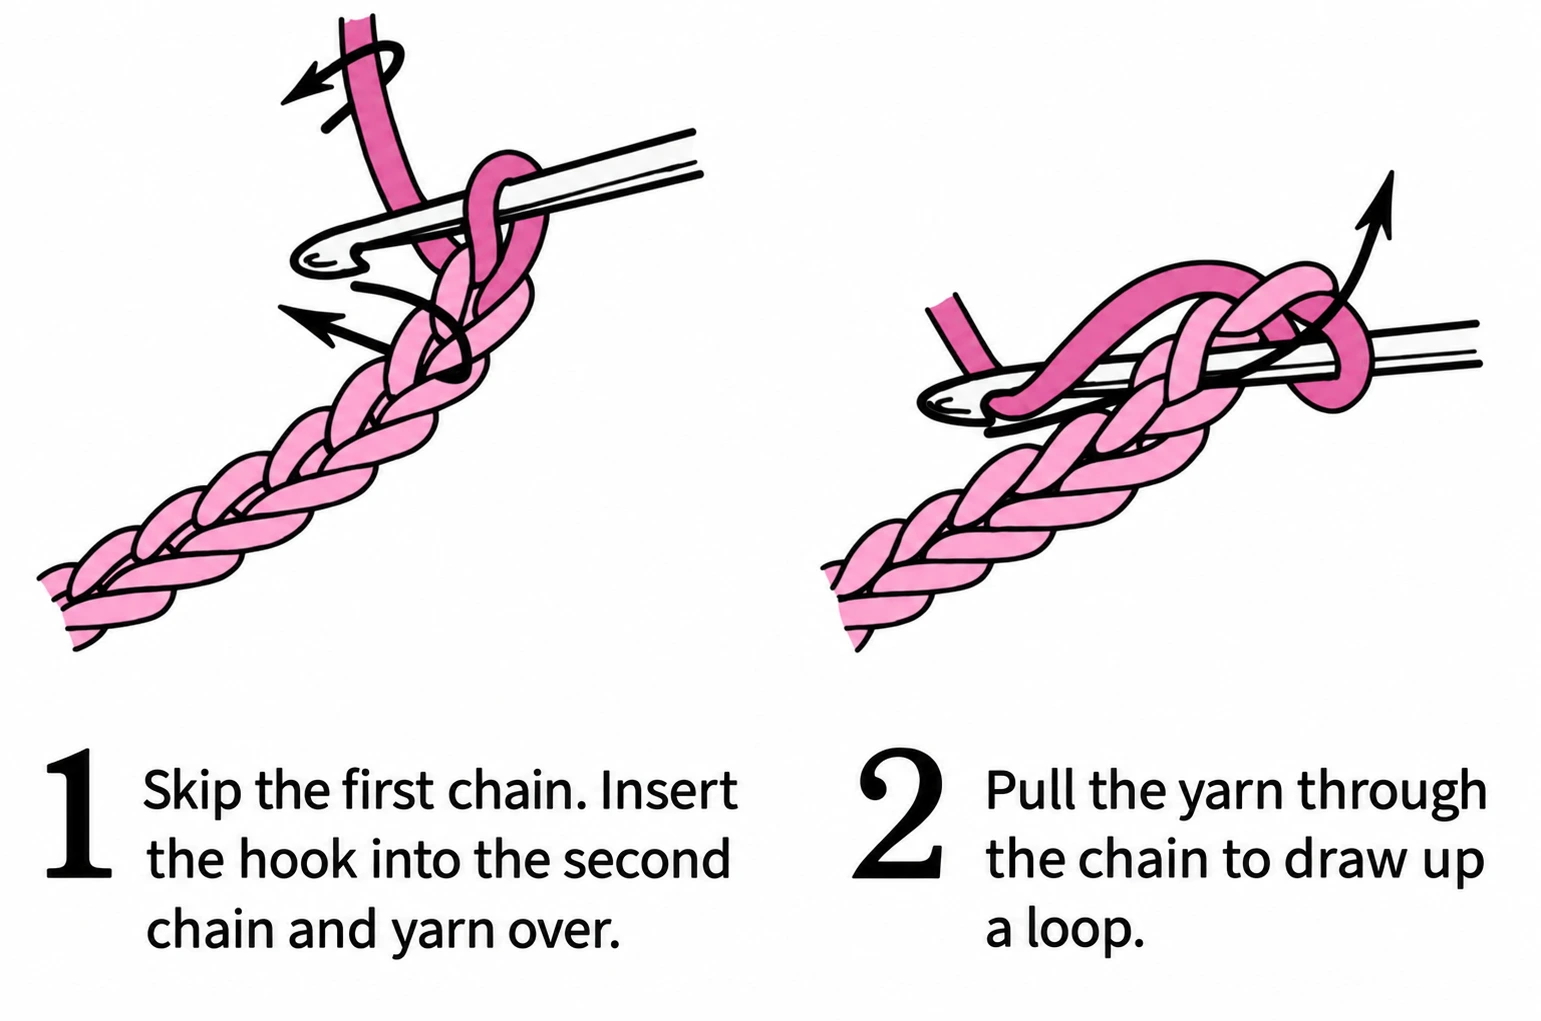
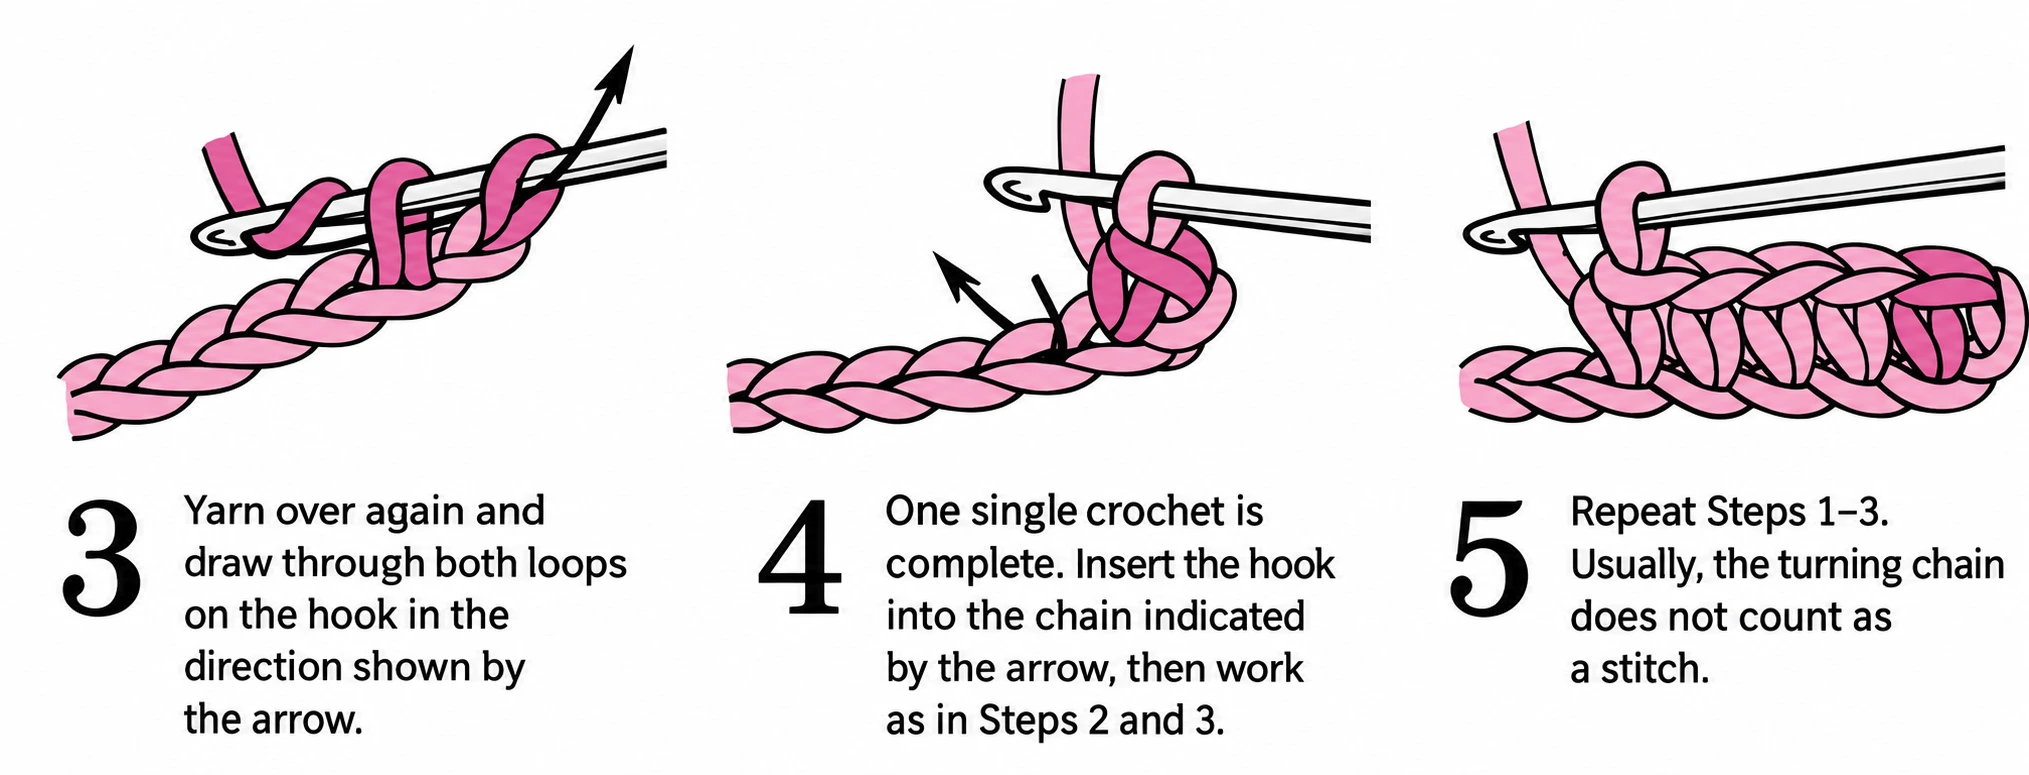
- Insert the hook into the specified stitch.
- Yarn over and draw up a loop. You now have two loops.
- Yarn over again and pull through both loops.
One loop remains on the hook. When practising into a foundation chain, begin in the second chain from the hook unless your pattern gives a different setup.
04. Half double crochet — hdc / T
Yarn over before inserting the hook. Insert it, yarn over and draw up a loop. Three loops are now on the hook. Yarn over and pull through all three in one movement.
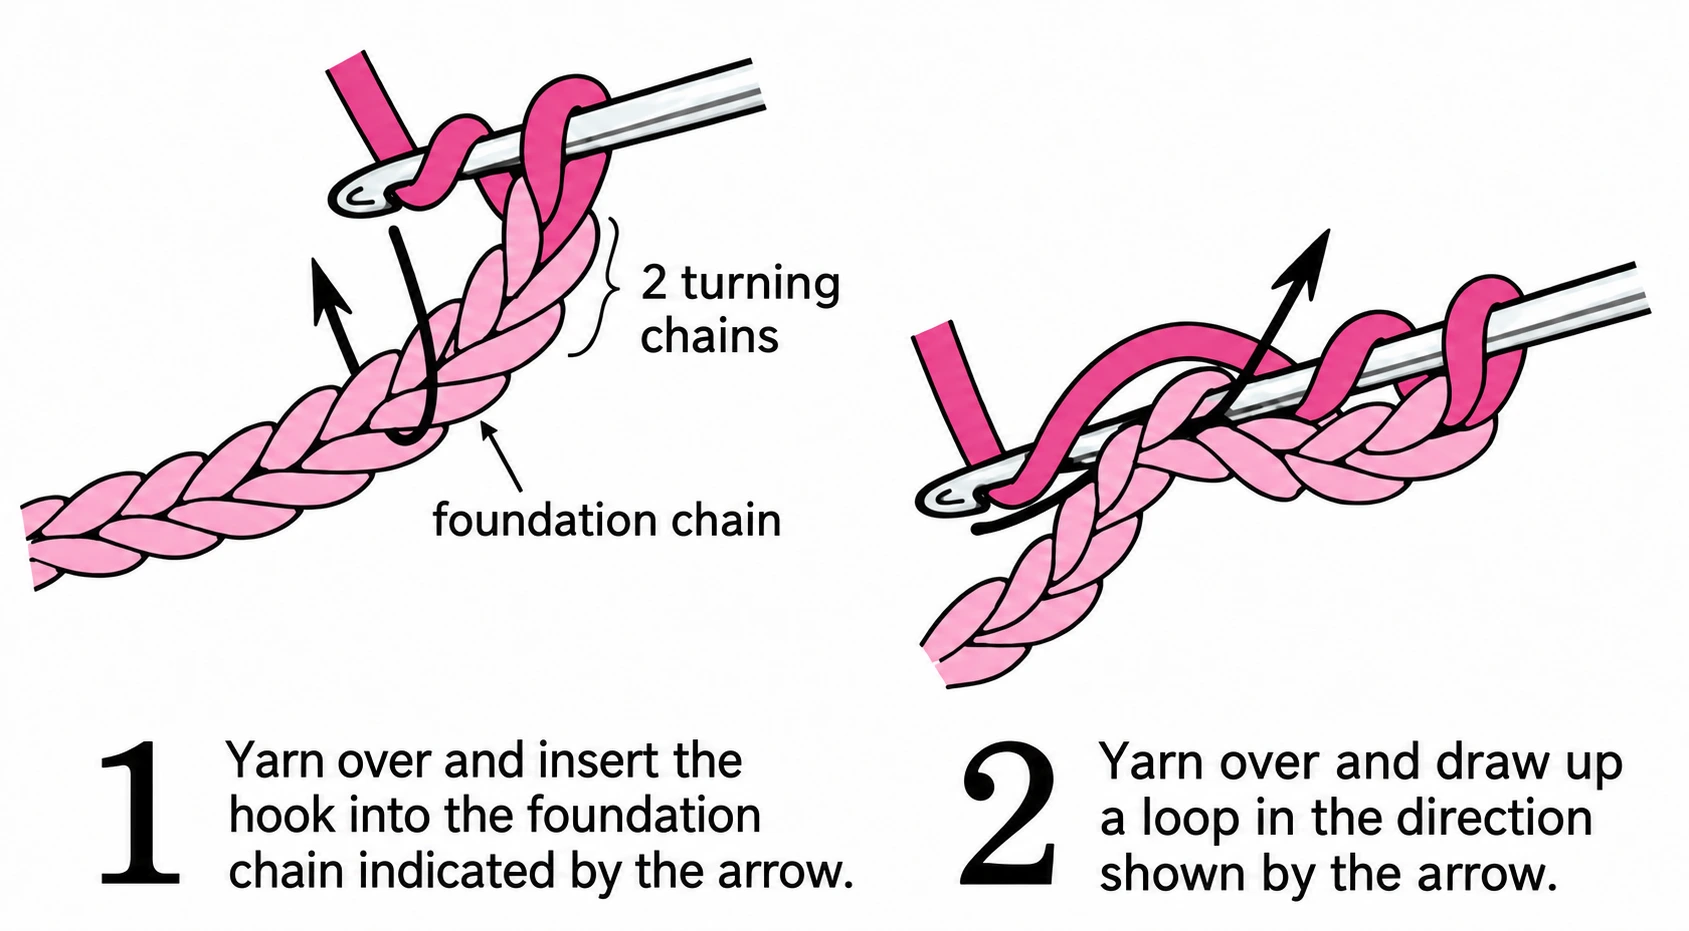
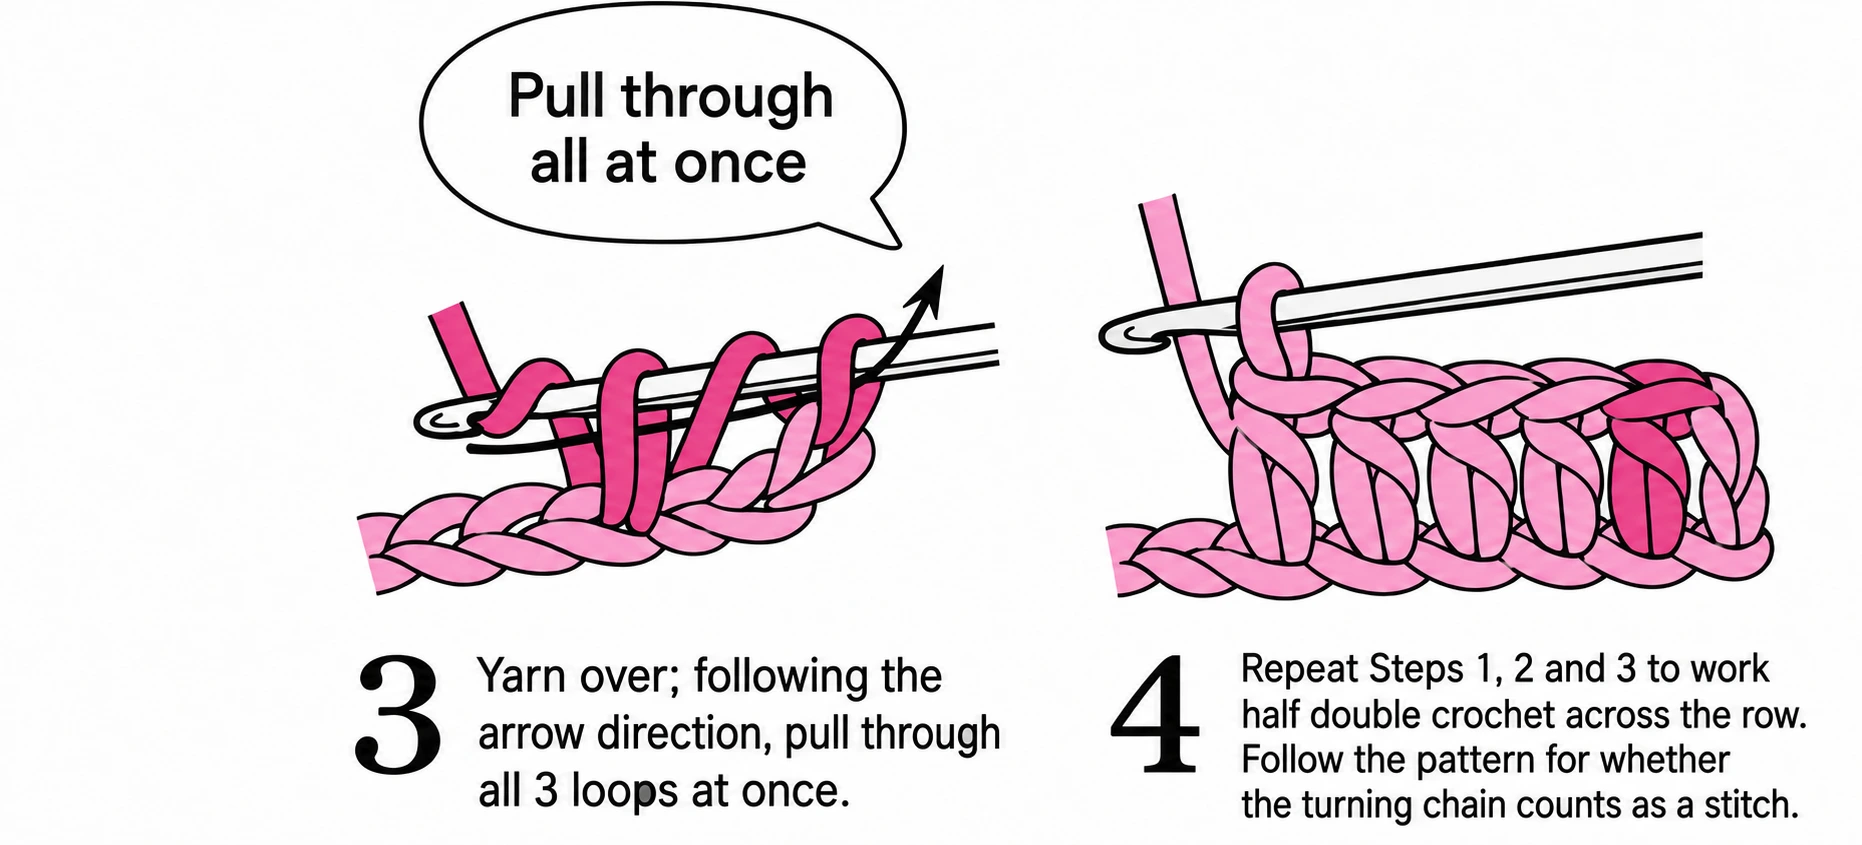
Keep the initial yarn over on the shaft until you draw through the loops. Accidentally dropping it changes the stitch. Half double crochet also has an additional bar below its top V; use that bar only when the pattern asks for it.
05. Double crochet — dc / F
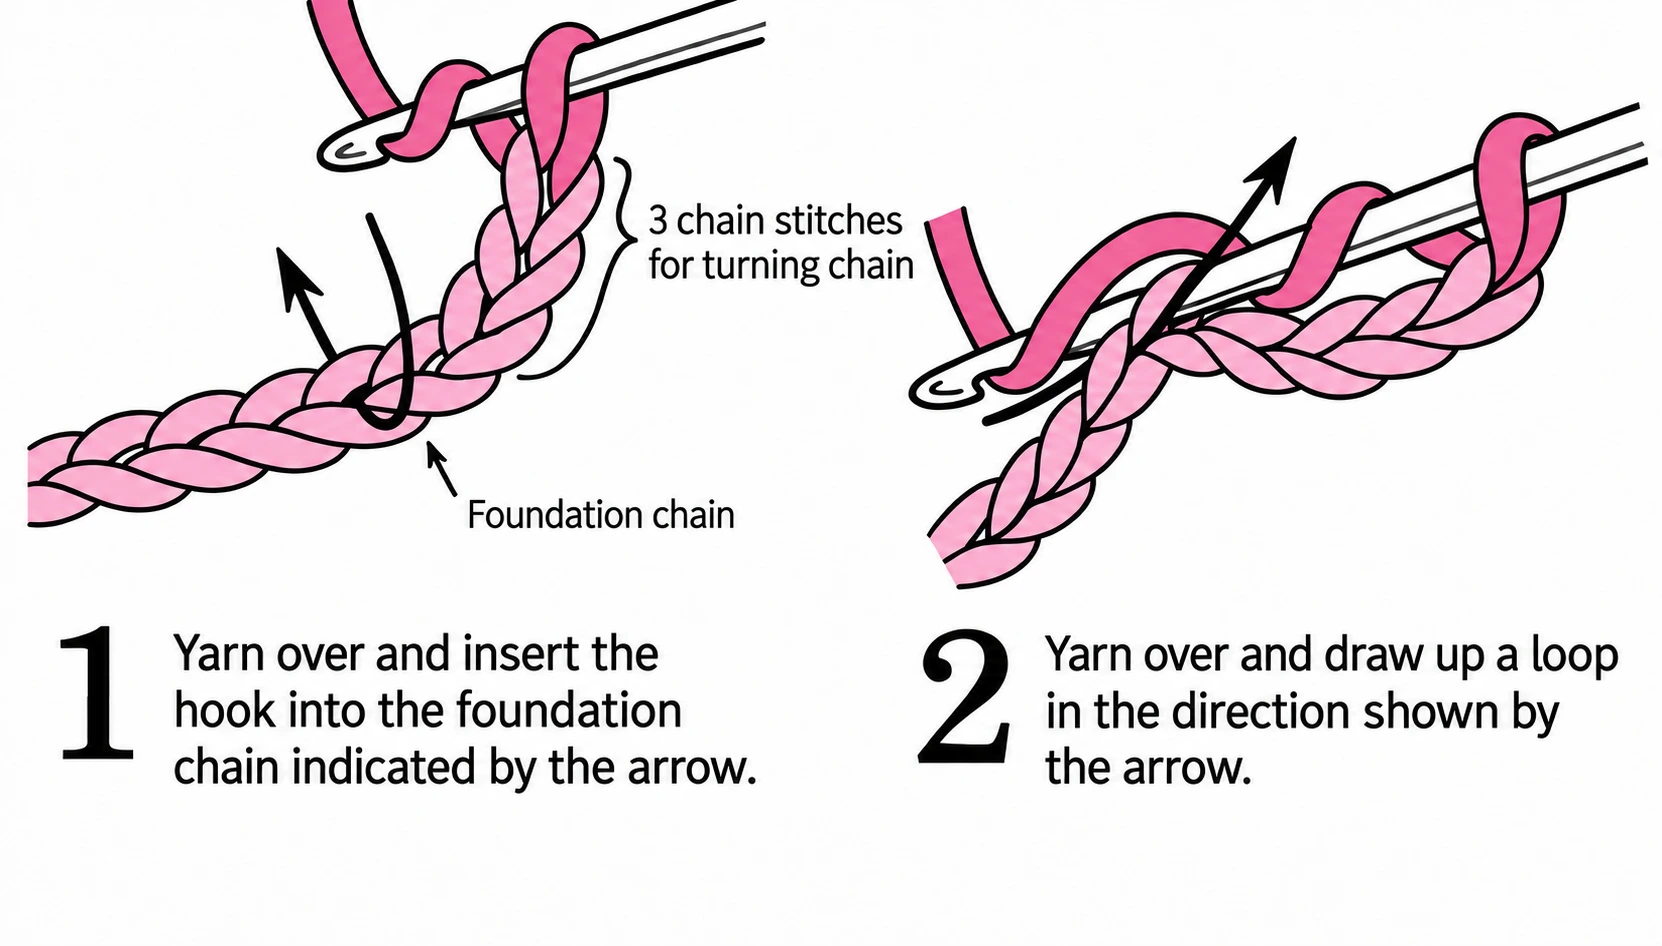
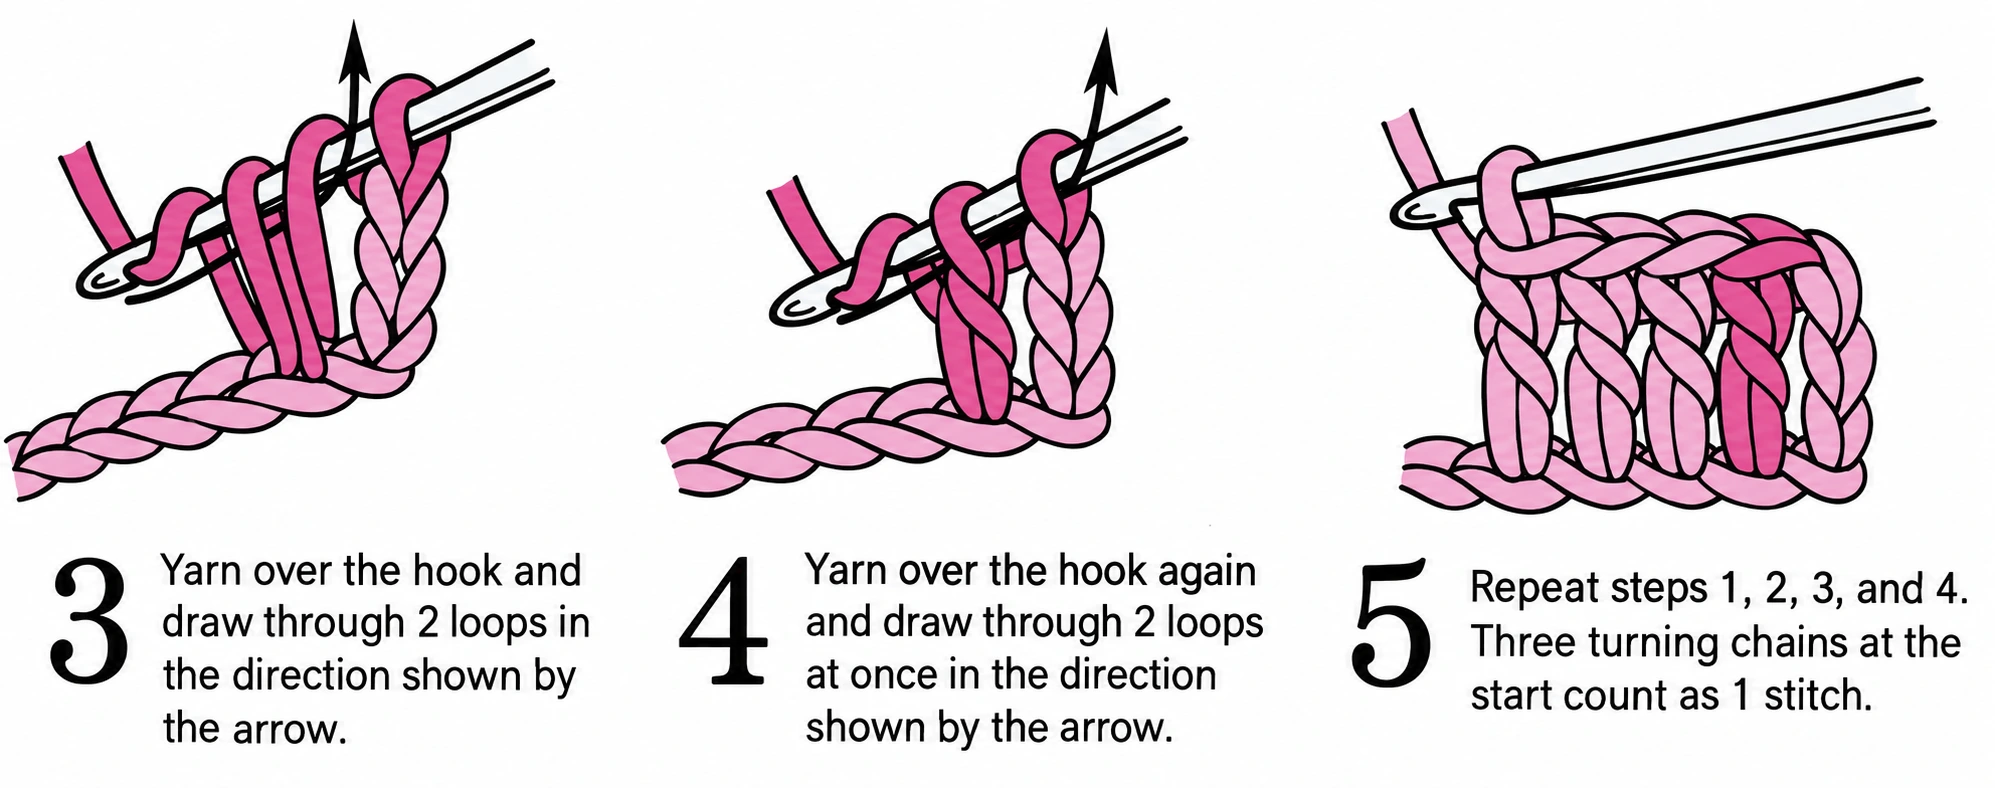
- Yarn over, insert the hook, yarn over and draw up a loop.
- Yarn over and pull through two loops.
- Yarn over and pull through the remaining two loops.
The two separate draw-through movements create a taller stitch. Avoid pulling the first loop much higher than its neighbours, or the row may look uneven.
06. Treble crochet — tr / E
Yarn over twice before inserting the hook. Yarn over and draw up a loop; there are now four loops on the hook. Yarn over and pull through two loops three times, until only the working loop remains.
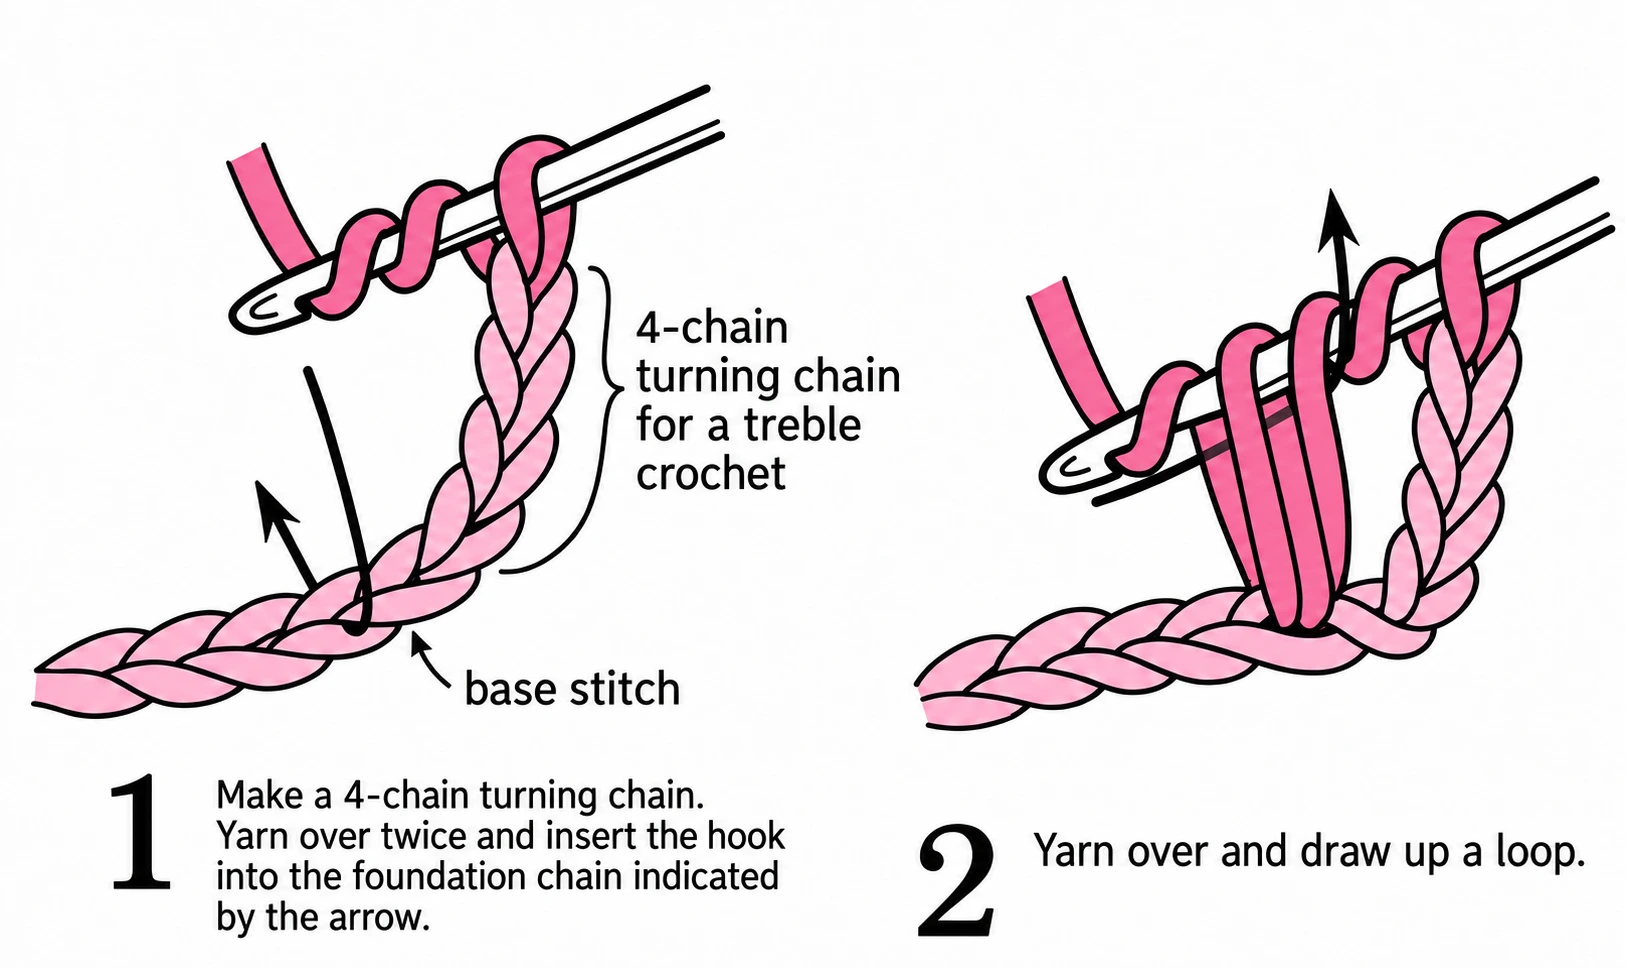

The taller post gives more height and openness. The reference also shows stitches with three or four initial yarn overs. Treat these as later extensions of the same draw-through-two principle, with their own pattern instructions.
Compare the movements
| US stitch | Yarn overs before insertion | How to finish after drawing up a loop |
|---|---|---|
| sc | 0 | Through 2 loops |
| hdc | 1 | Through all 3 loops |
| dc | 1 | Through 2, then 2 |
| tr | 2 | Through 2, then 2, then 2 |
A small exercise
Chain 11. Work one single crochet into the second chain and each remaining chain: ten stitches. Chain one, turn, and work ten single crochets across. Repeat a few rows, counting after each row. This exercise treats the turning chain as height only, not as a stitch.
For taller-stitch samples, follow a practice pattern that states whether its turning chain counts. The starting-chain setup is not identical in every tutorial.
Reference notes
Adapted from the chain, slip-stitch and basic-stitch pages of the supplied I Want to Learn Crochet (Chinese-language reference). Illustrations show stitch structure; the written instructions describe the working movements.
Step illustrations and photographs are excerpts from the supplied reference materials credited below. In-image instructional text has been translated into English and the supplied images enhanced with AI assistance. The English captions explain the pictured actions. Select a step image to view it at full size.
How to Choose Yarn and Crochet Hook Size for Beginners
Choose the yarn and hook together. A hook that works well for a soft scarf may make a loose, hole-filled fabric in a small stuffed character. Begin with the project instructions, then check the fabric you actually produce.
The reference guide introduces fibre types, hook sizes and yarn handling. Here is a practical way to turn that information into a small, useful starter kit.
In this guide
Read the yarn label before choosing a colour / Compare hooks in millimetres / Make a swatch before committing / Hold the yarn so it can move / Keep the first kit small
Read the yarn label before choosing a colour
Look for fibre content, yarn thickness, suggested hook size and care instructions. Cotton, wool and synthetic fibres can behave differently even when they are sold in a similar thickness. A change of fibre can alter the drape, stretch and appearance of the finished piece.
For practice, choose a smooth yarn in a colour that lets you see the top of each stitch. Strongly textured or very fluffy yarn can hide the loops you need to find. You can explore those effects after learning to recognise the stitch structure.
“Ply” can describe how strands are combined, but it does not give a dependable thickness comparison across every yarn system. Two eight-ply products, or two Chinese yarns described with the same strand count, need not behave identically.
Compare hooks in millimetres
The supplied book uses Japanese hook numbers alongside metric diameters. US letters and steel-hook numbers use other systems. When substituting a hook, compare the marked millimetre size rather than matching the number alone.
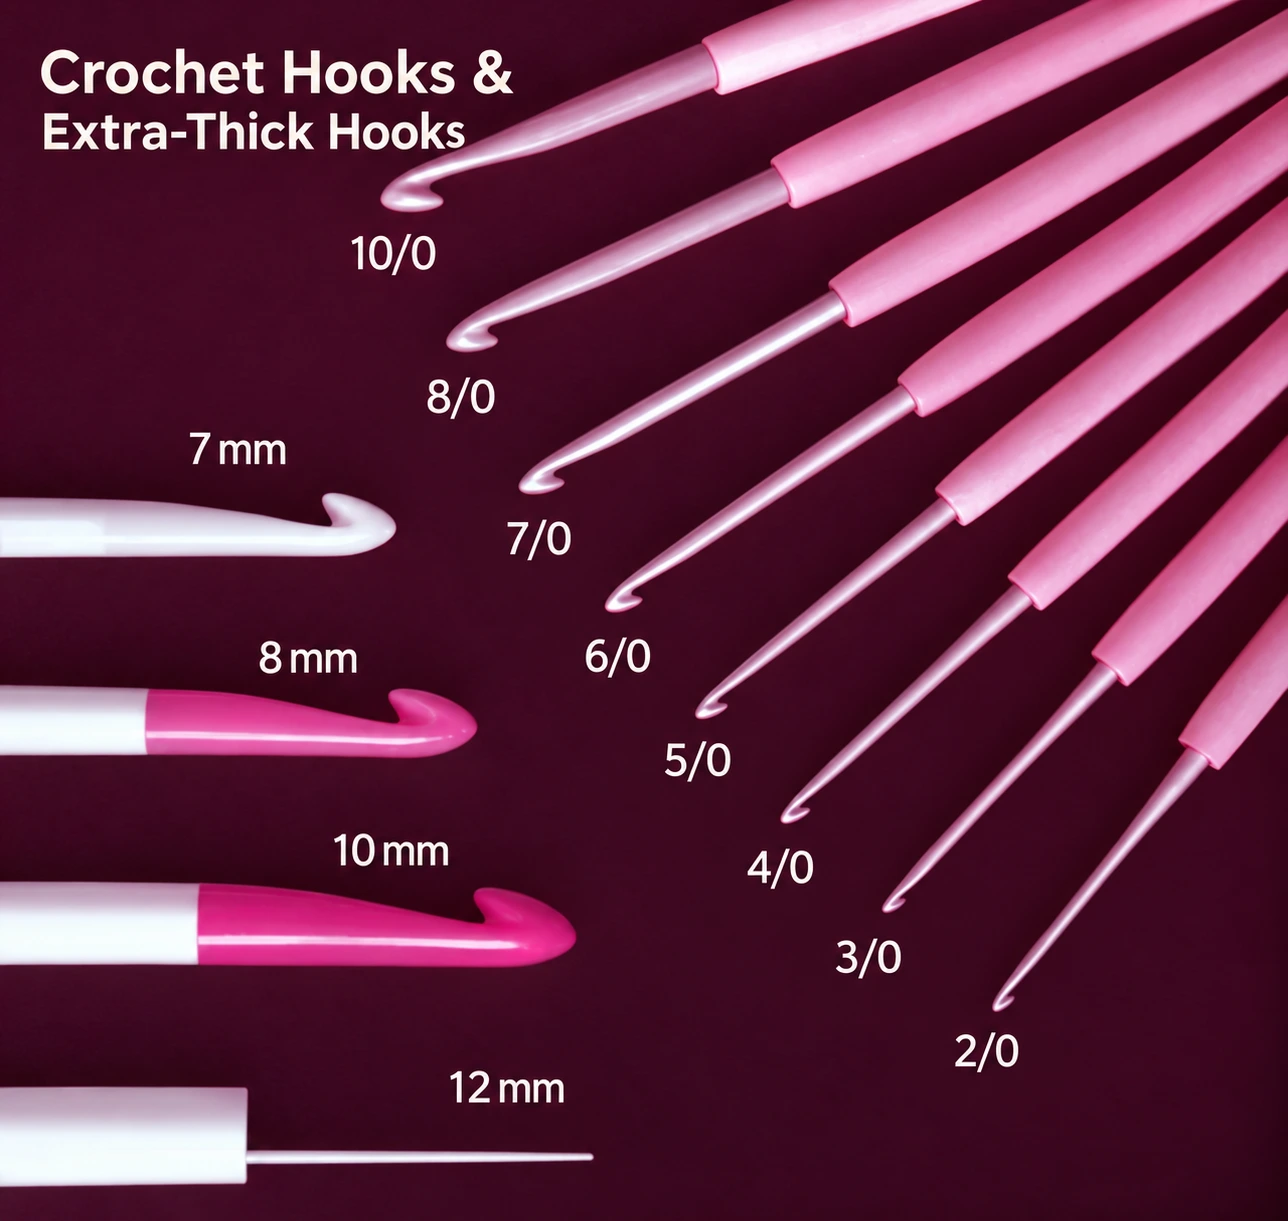
| Check | Why it matters |
|---|---|
| Metric diameter | A direct size reference across differently labelled hooks |
| Yarn recommendation | A starting point for a suitable fabric |
| Pattern gauge | The measurement the finished project depends on |
| Handle and grip | Whether you can move the hook comfortably |
A smaller hook usually gives a denser fabric with the same yarn and technique; a larger hook usually gives a more open fabric. Your own tension also affects the result. For stuffed work, inspect whether filling shows through rather than choosing the smallest hook you can force through the stitches.
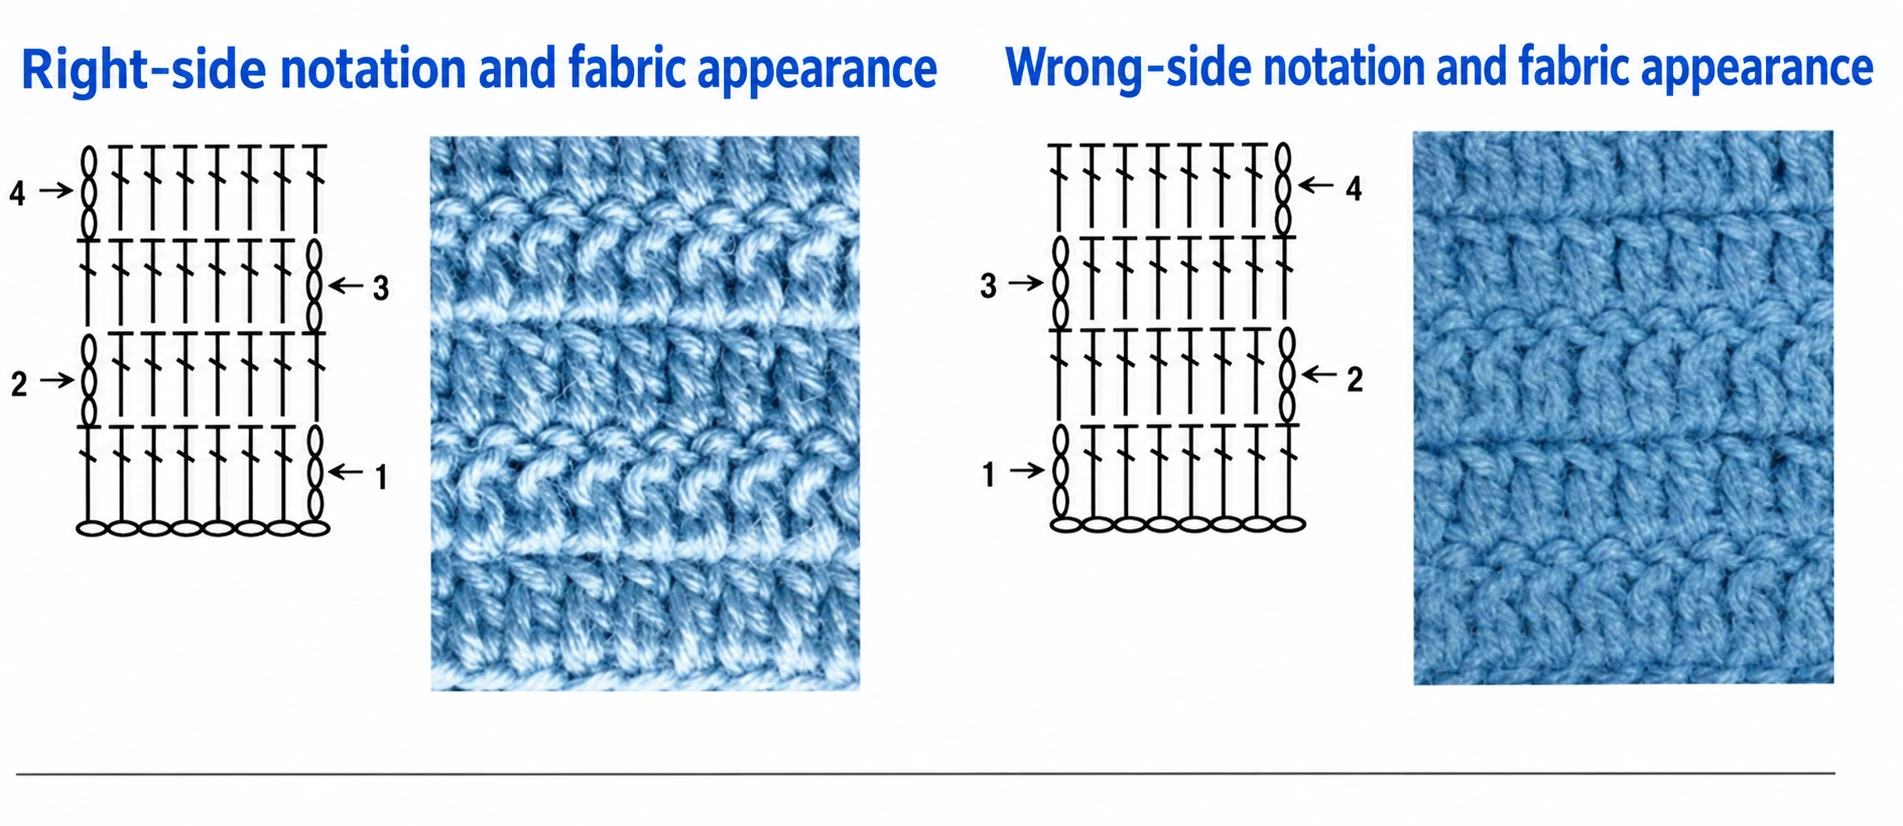
Make a swatch before committing
- Use the yarn, hook and stitch intended for the project.
- Make a sample larger than the area you need to measure.
- Let the fabric relax and follow the pattern’s washing or blocking directions where relevant.
- Count stitches and rows across the specified distance, away from the edges.
- Compare with the pattern, adjust and test again if size matters.
If you have too many stitches across the measured width, try a larger hook. If you have too few, try a smaller one. Recheck the resulting texture as well as the number.
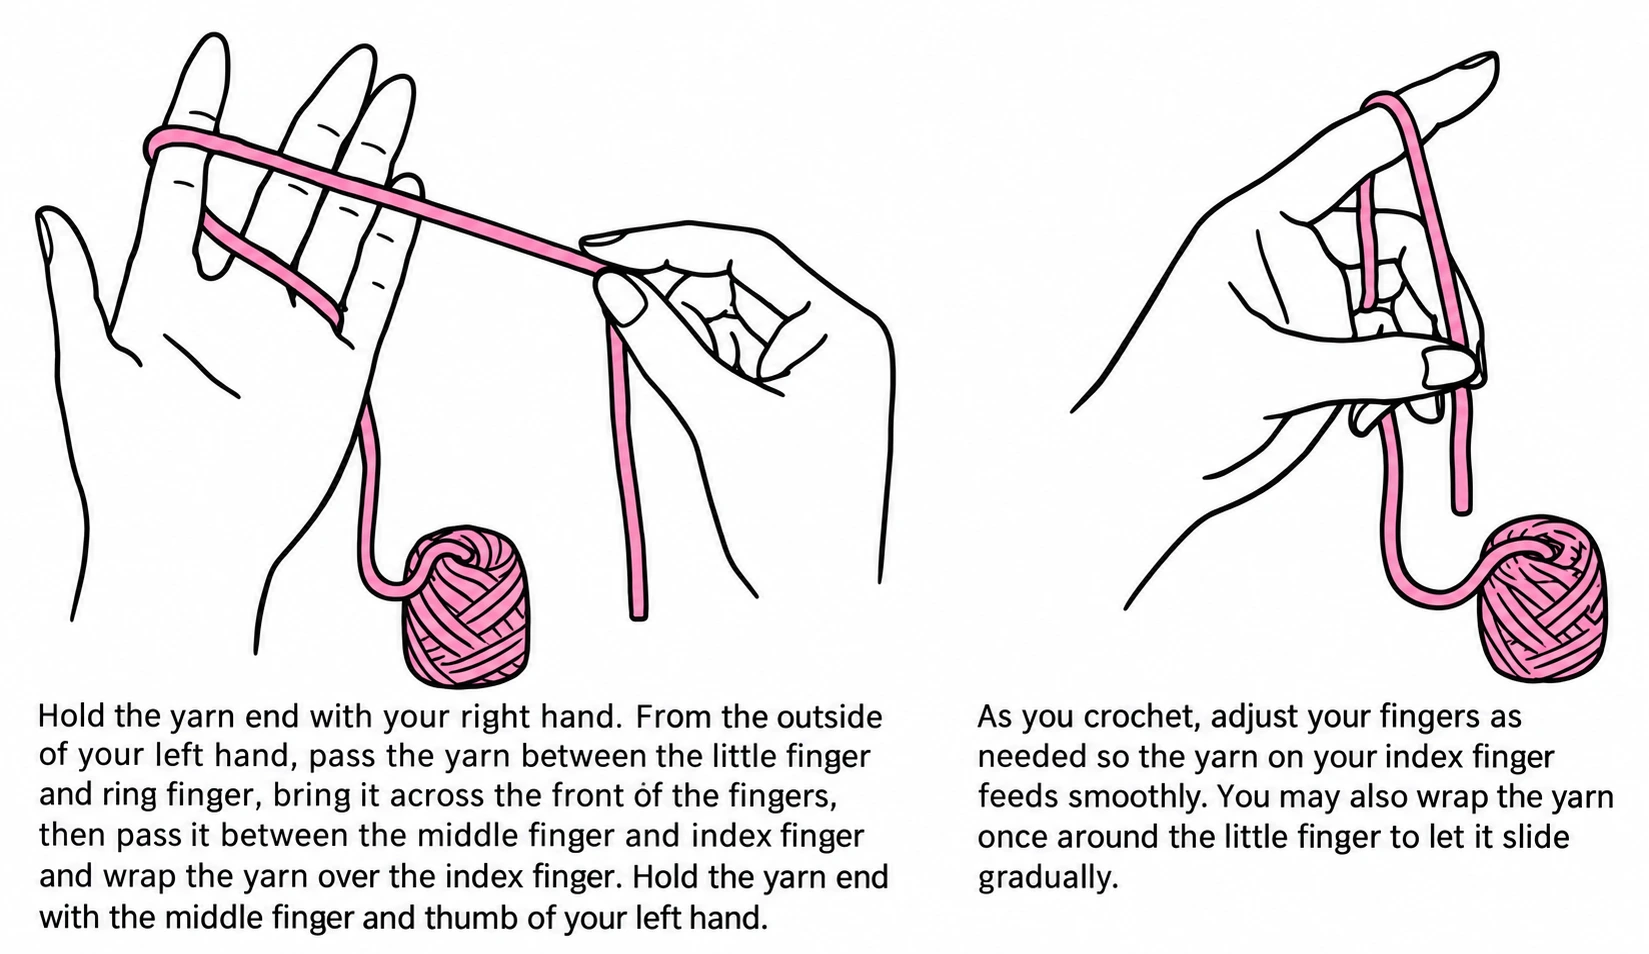
Hold the yarn so it can move
The reference shows yarn passing through the fingers of the non-hook hand, with the working fabric held near the active stitch. The purpose is a steady supply of yarn, not a rigid hand position.
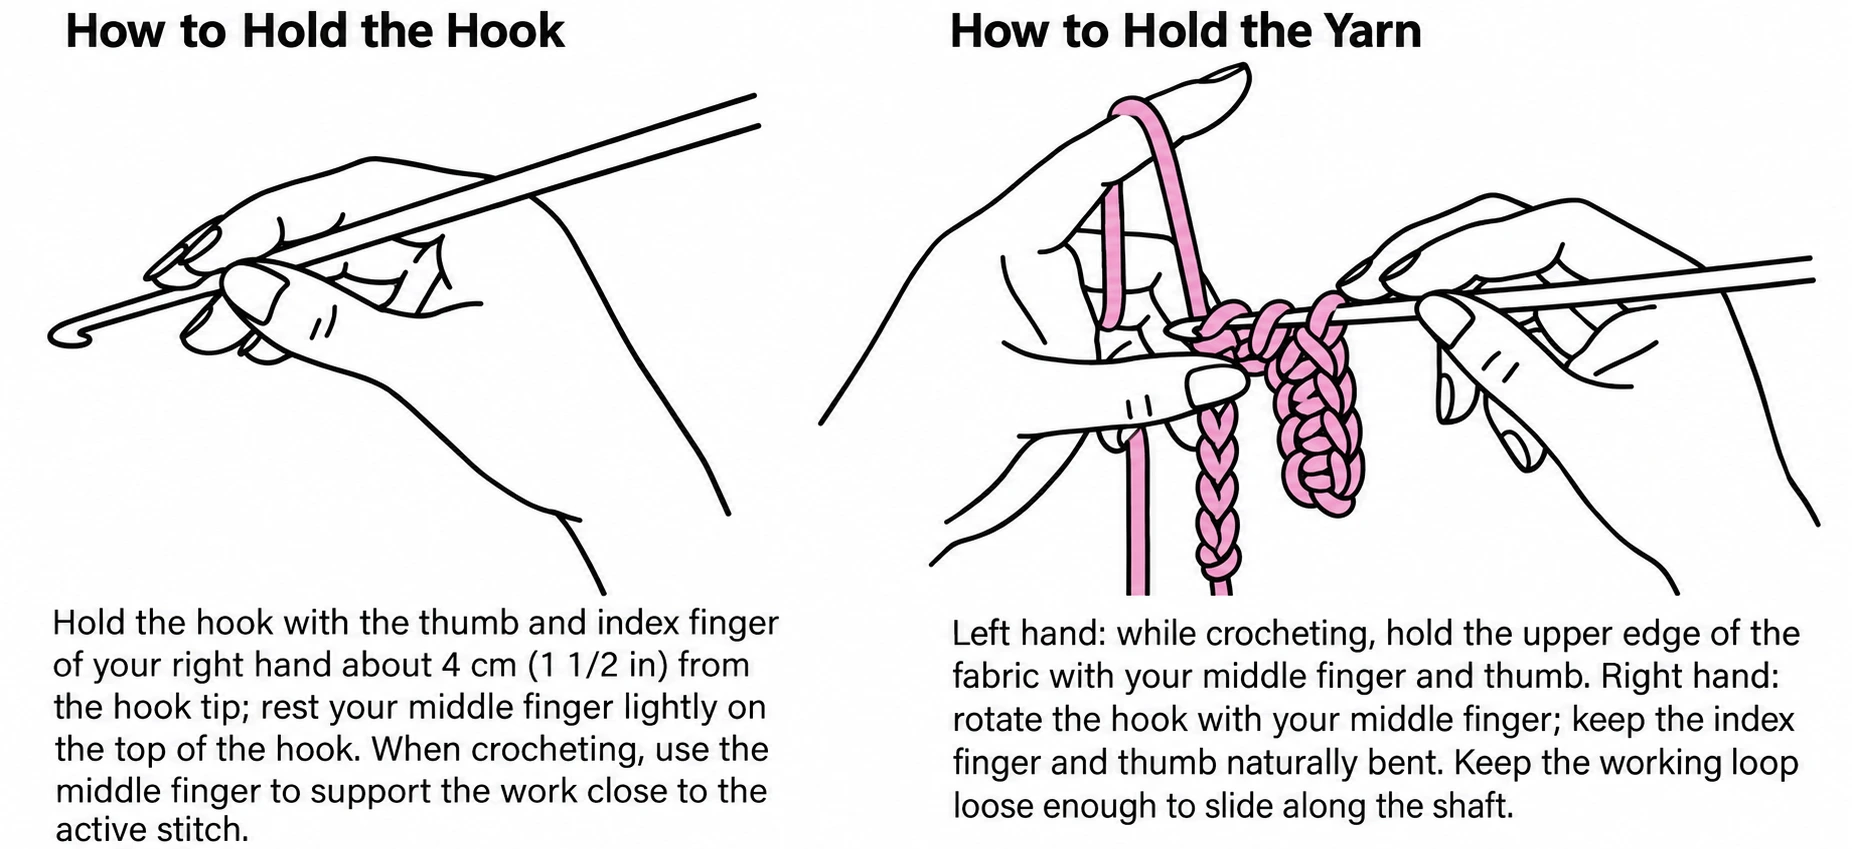
Keep the loop on the shaft loose enough to slide. If each stitch becomes a struggle, relax your grip and check that you are not tightening the working yarn after every movement. Choose a comfortable hook hold and move your supporting fingers along the fabric as it grows.
Keep the first kit small
- The yarn and hook specified for one chosen project.
- A stitch marker to identify the start of a round.
- A blunt tapestry needle for weaving in tails.
- Scissors and a tape measure.
- Suitable filling only if the project requires it.
A yarn-label hook recommendation is a starting point. The pattern’s gauge and the fabric you need make the final decision.
Reference notes
Adapted from the yarn, hook and handling sections of the supplied I Want to Learn Crochet (Chinese-language reference). The Craft Yarn Council yarn-weight guide also treats its hook ranges as guidelines rather than a substitute for pattern gauge.
Step illustrations and photographs are excerpts from the supplied reference materials credited below. In-image instructional text has been translated into English and the supplied images enhanced with AI assistance. The English captions explain the pictured actions. Select a step image to view it at full size.
Chinese Crochet Pattern Symbols: X, V, A, T, F and E Explained
A crochet pattern can describe the same stitch with a drawing, an English abbreviation or a letter used by a particular designer. Start by checking the pattern key. A familiar-looking letter does not always carry the same meaning from one pattern to another.
This guide translates the two Chinese reference charts into US crochet language. Keep it beside your pattern as a reading aid, especially when making flowers and amigurumi from Chinese instructions.
In this guide
Start with the six everyday stitches / Read increases and decreases as actions / Special letters need their own key / Translate a whole instruction / US and UK names / A quick reading routine
Start with the six everyday stitches
| Reference letter | Chinese name | US instruction |
|---|---|---|
| CH | 锁针 / 辫子针 | Chain, ch |
| SL | 引拔针 | Slip stitch, sl st |
| X | 短针 | Single crochet, sc |
| T | 中长针 | Half double crochet, hdc |
| F | 长针 | Double crochet, dc |
| E | 长长针 | Treble crochet, tr |
The letter E here is a stitch label, not a hook size. Likewise, X is a shorthand used in these charts; an English written pattern normally uses sc.
Read increases and decreases as actions
| Reference | What to do | Change in stitch count |
|---|---|---|
| V | Work 2 sc in one stitch | +1 |
| W | Work 3 sc in one stitch | +2 |
| A | Join 2 sc into one, sc2tog | −1 |
| M | Join 3 sc into one, sc3tog | −2 |
| TV / TW | Work 2 / 3 hdc in one stitch | +1 / +2 |
| TA / TM | Work hdc2tog / hdc3tog | −1 / −2 |
| FV / FW | Work 2 / 3 dc in one stitch | +1 / +2 |
| FA / FM | Work dc2tog / dc3tog | −1 / −2 |
| EV / EW | Work 2 / 3 tr in one stitch | +1 / +2 |
| EA / EM | Work tr2tog / tr3tog | −1 / −2 |
An increase uses one existing stitch and produces several new stitches. A decrease collects several existing stitches into one new top. Count those outputs rather than counting how many times the hook moved.
Special letters need their own key
| Reference | Meaning in the supplied charts |
|---|---|
| BLO / FLO | Back loop only / front loop only |
| NX / NT / NF | Back-post sc / hdc / dc in this reference |
| WX / WT / WF | Front-post sc / hdc / dc in this reference |
| UX / UF | Loop-stitch variants based on sc / dc |
| G | Popcorn; check the number and height of stitches |
| Q | A grouped texture stitch; the exact construction differs between these two charts |
| K | An unworked position or skip; confirm the pattern instruction |
| H | Row count in this reference |
| J | An elongated sc worked into a lower row in this reference |
Q needs particular care: one chart describes a three-double-crochet grouped stitch, while the other uses Q for a broader texture category and specifies the component stitches separately. Do not substitute a puff, bobble or cluster just because the letter looks familiar. The star, triangle, omega and arch-shaped picot signs are also designer-specific here.
Translate a whole instruction
In these reference charts, [2F, CH, 2F] means two double crochets, one chain and two more double crochets in the same insertion point. Write that in English as “(2 dc, ch 1, 2 dc) in the same stitch.”
[(T,F)V] puts one half double crochet and one double crochet into the same stitch. [(T,F)A] instead joins a half double crochet and a double crochet across their specified base stitches. The shared starting point and shared finishing point are different ideas.
[(3F)G] specifies a popcorn made from three double crochets in this chart. [(3T)Q] specifies a three-half-double-crochet grouped texture; check how its loops are closed in the accompanying instructions. These details are not supplied by G or Q alone.
The longer example [1CH, (F, Ω)*3, F, 1CH] places one chain, three repetitions of a double crochet plus the chart’s corner-picot instruction, one more double crochet and one final chain in the indicated base. You still need the definition of that corner picot to work it correctly. The other picot symbols distinguish one-chain and three-chain variants and their different closing methods.
Brackets do not always mean “in one stitch.” Other designers use brackets for repeats or stitch totals. Read the sentence around the brackets and the pattern key before beginning.
US and UK names
US single crochet is UK double crochet; US half double crochet is UK half treble; US double crochet is UK treble; and US treble is UK double treble. Yarnumi uses US terms in this guide. Changing the name does not change the physical stitch.
A quick reading routine
- Identify US or UK terminology.
- Check every unfamiliar letter against that pattern’s key.
- Separate the stitch, its insertion point and the repeat count.
- Work a small section and compare its stitch total with the pattern.
Reference notes
Adapted from the supplied Chinese stitch-letter charts and the stitch-symbol section of I Want to Learn Crochet (Chinese-language reference). English names were checked against the Craft Yarn Council abbreviation list. The reference letters above are a translation aid, not a universal alphabet.
Step illustrations and photographs are excerpts from the supplied reference materials credited below. In-image instructional text has been translated into English and the supplied images enhanced with AI assistance. The English captions explain the pictured actions. Select a step image to view it at full size.